Eb a d c, Avent express ii microwave steam sterilizer us, Loading the sterilizer assembly and use – Philips AVENT Microwave Sterilizer Starter Set SCF271-02 User Manual
Page 2
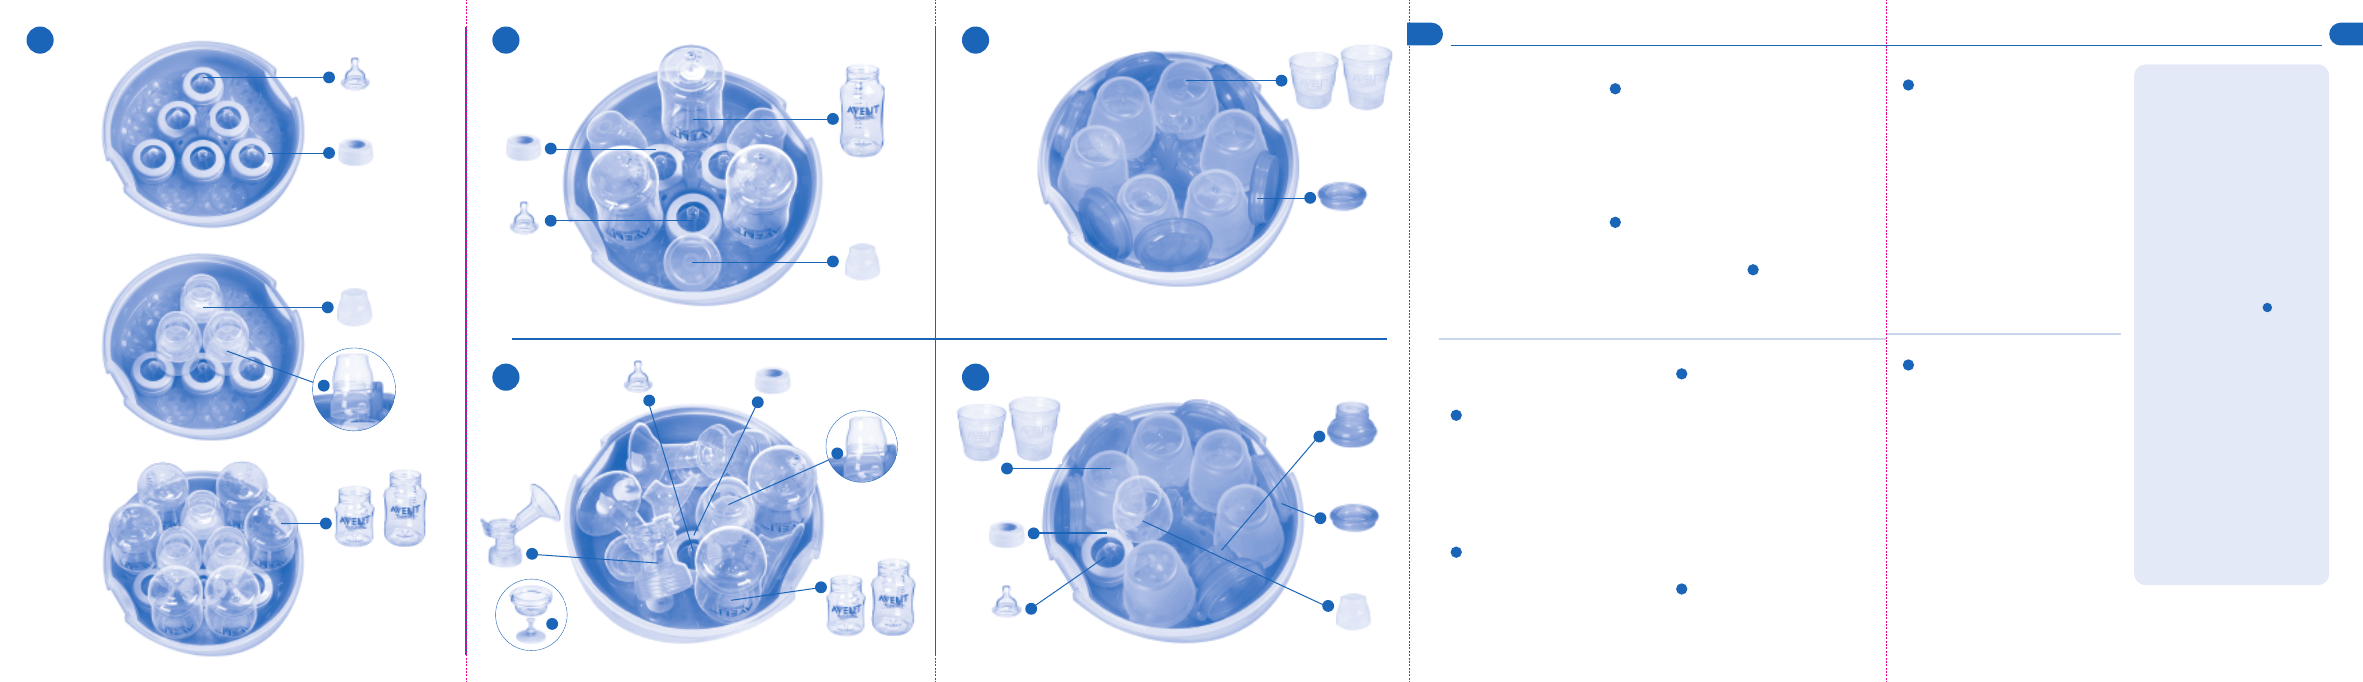
Cargando un Biberón Desechable VIA* y hasta cuatro
Vasos y Tapas VIA de 6 oz./180 ml O de 8 oz./240 ml
1. Meta la mamila en una de las cavidades para
mamilas exteriores.
2. Coloque la rosca encima de la mamila.
3. Meta los Vasos VIA boca abajo alrededor del
vástago de las tapas de cúpula.
4. Coloque el Adaptador VIA de costado alrededor
del borde del estante (como se demuestra).
5. Meta las Tapas VIA verticalmente alrededor del
borde del estante. Será más fácil cargar si los
bordes dan al exterior.
6. Coloque la tapa de cúpula en la ranura superior
despejada del vástago de las tapas de cúpula.
Cargando otros productos para alimentar y productos
para bebés
Al esterilizar otros PRODUCTOS NO ELÉCTRICOS de AVENT
simplemente ponga los componentes en el estante,
dejando suficiente espacio como para permitir que el
vapor circule eficientemente.
NOTE: No sobrecargue el esterilizador.
NOTE: No coloque las tapas de cúpula boca abajo en el esterilizador.
NOTE: El Esterilizador a Vapor para Microondas AVENT Express II se
diseñó específicamente para contener el contorno ancho de los
Biberones de Alimentación Natural AVENT.
* Consta de Vaso, Tapa y Adaptador VIA, una Mamila de Flujo
Lento Extra Suave, Tapa de Cúpula y Rosca
E
B
A
D
C
1
4
3
2
6
5
2
1
3
4
5
1
2
1
1
2
3
4
6
4
3
8
AVENT Express II Microwave Steam Sterilizer
US
Loading the sterilizer
Assembly and Use
Before using the AVENT Express II Microwave Steam
Sterilizer, always ensure that the items are positioned
according to the below loading instructions.
Loading six 4oz/125ml or 9oz/260ml
AVENT Natural Feeding Bottles
1. Position the nipples in the nipple cavities around
the dome cap stem.
2. Place the screw rings over the nipples.
3. Place the first three dome caps in the lower slots
of the dome cap stem.
4. Place the remaining three dome caps in the upper
slots of the dome cap stem.
5. Position the bottles upside down around the
previously loaded nipples and screw rings.
Loading three 11oz/330ml AVENT Natural
Feeding Bottles
1. Position the nipples in the three nipple cavities
surrounding the dome cap stem.
2. Place the screw rings over the nipples.
3. Position the bottles upside down in the three
outer nipple cavities.
4. Arrange the three dome caps around the edge
of the rack in between the inverted bottles.
Loading one or two AVENT ISIS Breast Pumps
(non-electrical components only) and two
4oz/125ml OR two 9oz/260ml AVENT
Natural Feeding Bottles
1. Disassemble the ISIS Breast Pump ensuring
the stem is removed from the diaphragm.
2. Position the ISIS Breast Pump bodies into the
two slots provided.
3. Position the nipples in the nipple cavities
around the dome cap stem.
4. Place the screw rings over the nipples.
5. Place one dome cap in the unobstructed lower
slot of the dome cap stem, then the second in
the upper slot on top of the inserted dome cap.
6. Position the bottles upside down in the
unobstructed bottle cavities.
7. Place the remaining NON-ELECTRICAL pump
components in any unobstructed space on the rack.
Loading six 6oz/180ml OR 8oz/240ml VIA
™
Cups and Lids
1. Position the VIA Cups upside down around the
dome cap stem.
2. Position the VIA Lids vertically around the racks
edge. Rims should face out for easier loading.
A
B
D
C
Contents
1. Lid
a. Clips
2. Bottle/Accessories Rack
b. Dome cap stem
c. Bottle cavity
d. Nipple cavity
e. ISIS
™
Breast Pump slots
3. Base
f. Safety grips
Before each use
Wash all items in warm
soapy water and then rinse
in water.
Wash your hands before
handling your sterilized
products.
1. Remove rack from the
sterilizer and pour 200ml
of water into the base.
IMPORTANT: Failure to add
enough water may cause damage
to the AVENT Express II
Microwave Steam Sterilizer
and/or your microwave. Adding
too much water may mean your
items are not properly sterilized.
2. Put the rack back into the base.
3. Position the lid over the
sterilizer base and lock the
clips into place until you
hear them “click”.
4. Ensure that the microwave
is clean and dry before use –
Place the sterilizer into the
center of the microwave.
Select microwave wattage
and timings – See Table III –
do not exceed these times.
I
II
Please take a few minutes to read through
the ENTIRE INSTRUCTION LEAFLET including
the warnings before using your AVENT
Express II Microwave Steam Sterilizer for the
first time. PLEASE RETAIN THESE INSTRUCTIONS.
Also available at www.aventamerica.com
Thank you for
choosing AVENT
Now you can enjoy the convenience
and ease of using the AVENT Express
II
Microwave Steam Sterilizer, which
effectively eliminates household
bacteria in just minutes! Its large
capacity holds more than any other
microwave sterilizer – up to six
bottles – yet it is compact and
lightweight enough for travel.
Advanced features such as cool
safety grips aid in safe handling,
and make it easier than ever to
sterilize AVENT Breast Pumps,
Bottles, Cups and more.
III
13
ES
Después de cada ciclo
IMPORTANTE: Deje que la unidad se enfríe por un mínimo de
dos minutos antes de sacar el esterilizador del microondas.
1. Sacando el esterilizador del microondas: Después de
que la unidad se haya enfriado, sáquela del microondas
sujetando el faldón y/o las empuñaduras de seguridad
y luego coloque en una superficie plana y resistente
al calor.
NOTE: Artículos permanecerán estériles en el Esterilizador a Vapor
para Microondas por hasta 24 horas si no se quita la tapa.
2. Después de sacar el esterilizador del microondas:
Q
uite la tapa abriendo los ganchos – Al quitar la tapa,
diríjala en sentido opuesto de usted para permitir que
el vapor se escape.
Cuidado y limpieza
• Siempre vacíe de la unidad cualquier agua que quede y
enjuague para prevenir la acumulación de sarro.
• Siempre asegure que esté completamente seco antes
de guardarlo.
• El Esterilizador a Vapor para Microondas AVENT Express II
es a prueba del lavavajillas.
ADVERTENCIAS –
EL NO SEGUIR LAS INSTRUCCIONES PUEDE HACER
Q
UE SE ESCALDE O CAUSAR DAÑO A ESTE
PRODUCTO Y/O SU MICROONDAS
• Siempre asegure que use 200 ml de agua
antes de esterilizar. (Se debe vaciar la unidad
de cualquier agua que quede antes de cada
uso posterior.)
• Siempre siga las instrucciones de carga y
no sobrecargue.
• No utilice lejía o soluciones/pastillas químicas
para esterilizar en el esterilizador ni en los
productos por ser esterilizados.
• No esterilice artículos metálicos o electrónicos
en el esterilizador.
• No meta el cepillo para biberones en
el microondas.
• Siempre emplee el período de tiempo de
calentamiento apropiado para la potencia de
su microondas. (Vea el Cuadro ).
• En los hornos de combinación, asegure que el
grill esté apagado y se haya enfriado antes de
usar este producto.
• Asegure que la tapa esté sujetada
apropiadamente a la base antes de meter
en el microondas.
• Siempre deje que se enfríe por un mínimo de
2 minutos antes de sacar del microondas.
• No quite la tapa del esterilizador
inmediatamente después de cada ciclo. Deje
que se enfríe ya que el vapor estará caliente.
• Al sacar del microondas, asegure de sostener
el esterilizador a un nivel plano para evitar
que el agua caliente gotee o derrame.
• Al sacar el esterilizador del microondas,
TENGA CUIDADO – todavía estará caliente.
• Al quitar la tapa, diríjala en sentido opuesto
de usted para permitir que el vapor se escape.
• Tenga cuidado al tocar los productos
esterilizados ya que pueden estar calientes.
• Siempre mantenga el producto fuera del
alcance de los niños.
Puede ser que algunos de los productos no estén
disponibles en todo país. Favor de contactar AVENT
para averiguar la disponibilidad.
AVENT® está aquí para ayudarla
1.800.54.AVENT
www.aventamerica.com
IV
E
III
2
5