6maintenance, 1defrosting, 1defrosting refrigerator compartment – Liebherr UIK 1424 Comfort User Manual
Page 7: 2defrosting freezer compartment, 2cleaning the appliance, 3replacing the interior light, 4customer service, 6 maintenance, Maintenance, 1 defrosting
- at room temperature
- in a microwave oven
- in a conventional or fan oven
u
Food once thawed should be re-frozen only in exceptional
cases.
6 Maintenance
6.1 Defrosting
6.1.1 Defrosting refrigerator compartment
The refrigerator compartment is defrosted automatically. The
water evaporates. Drops of water on the rear wall are function-
ally conditioned and perfectly normal.
u
Clean the drain hole at regular intervals to allow the defrost
6.1.2 Defrosting freezer compartment*
A layer of frost and ice forms in the freezer compartment after
the appliance has been in use for a lengthy period of time. This
is quite normal. The layer of frost and ice forms more quickly if
the door is opened frequently or if the food is warm when
placed inside. However, a thick layer of ice will increase the
appliance‘s energy consumption. You should therefore defrost
the appliance regularly.
CAUTION
Risk of injury and damage as a result of hot steam!
u
Do not use electric heaters or steam cleaners, naked flames
or defrosting sprays for defrosting.
u
Do not remove ice using sharp instruments.
u
Switch off the appliance.
u
Pull out the plug.
u
Wrap the frozen food in newspaper or blankets and store in
a cool place.
u
Leave the compartment and appliance door open during
defrosting.
u
Remove detached pieces of ice.
u
Pay attention that the defrost water does not run into the
kitchen unit.
u
If necessary, pick up defrost water several times, using a
sponge or cloth.
u
Clean the compartment (see 6.2) .
6.2 Cleaning the appliance
WARNING
Risk of injury and damage as a result of hot steam!
Hot steam can lead to burns and can damage the surfaces.
u
Do not use any steam cleaners!
NOTICE
Incorrect cleaning damages the appliance!
u
Do not use cleaning agents in concentrated form.
u
Do not use any scouring or abrasive sponges or steel wool.
u
Please do not use any aggressive, scouring, sand-,
chloride-, chemical- or acid-based cleaning agents.
u
Do not use chemical solvents.
u
Do not damage or remove the type plate on the inside of the
appliance. It is important for the customer service.
u
Do not pull off, bend or damage cables or other compo-
nents.
u
Do not allow any cleaning water to enter the drain channel,
ventilation grille or electrical parts.
u
Please use soft cleaning cloths and a universal pH-neutral
cleaning agent.
u
Please use cleaning and care products suitable for contact
with foodstuffs in the appliance interior.
u
Empty appliance.
u
Pull out the power plug.
u
Clean the vent grille regularly.
w
Dust deposits increase energy consumption.
u
Clean plastic outer and inner surfaces with lukewarm
water and a little washing-up liquid.
u
Clean drain hole: Remove deposits
with a narrow instrument, e.g. a
cotton bud.
u
Most of the parts can be dismantled for cleaning: see the
relevant chapter.
u
Clean items of equipment by hand with lukewarm water
and a little washing-up liquid.
After cleaning:
u
Wipe dry the appliance and items of equipment.
u
Connect the appliance and switch it on again.
u
Put the food back inside.
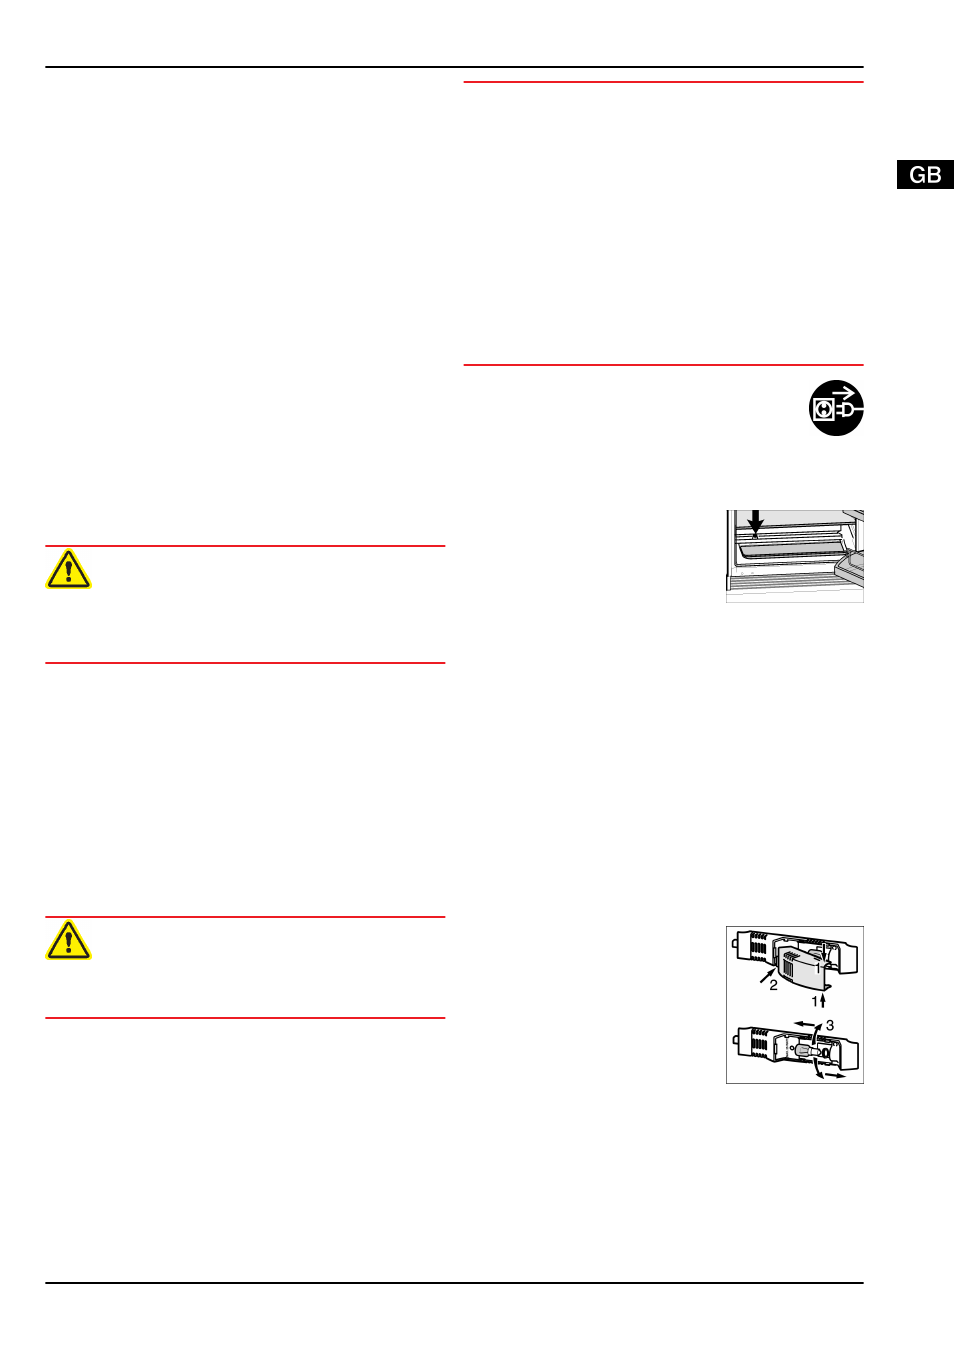
6.3 Replacing the interior light
Bulb data
q
max. 25 W
q
Bulb fitting: E14
q
Current type and voltage must conform with the data on the
type plate
u
Switch off the appliance.
u
Pull out the mains plug or switch off/unscrew the fuse.
u
Take hold of the lamp cover at
the top and bottom
Fig. 3 (1)
.
u
Disengage the lamp cover at
the back and detach it
Fig. 3 (2)
.
u
Replace the bulb
Fig. 3 (3)
.
u
Clip the back end of the cover
in and clip the sides into place.
Fig. 3
6.4 Customer service
First check whether you can correct the fault yourself by refer-
ence to the list (see Malfunction). If this is not the case, please
contact the customer service whose address is given in the
enclosed customer service list.
Maintenance
* Depending on model and options
7