Standard equipment, Telescope assembly – Bushnell 78-9512 User Manual
Page 2
STANDARD EQUIPMENT
•
Complete Main Telescope Assembly
•
Full Length Variable-Height Hardwood Tripod
•
Altazimuth Yoke Mount
•
5mm, 20mm focal length - Eyepieces
•
Diagonal Mirror, 3x Barlow Lens, Erecting Lens
•
5 x 24mm Finderscope w/focus adjustment, Accessory Tray
•
Hardware Pack:
Tripod leg: 3-2_”bolts, 6-
11
/16
washers and 3-wingnuts
Accessory tray: 3-_” bolts, 6-_” washers and 3-wingnuts
Tripod Leg Lock Screws: 3 pc.
TELESCOPE ASSEMBLY
1.
Remove all components from the carton and identify all components. READ THROUGH ASSEMBLY
INSTRUCTION BEFORE YOU ASSEMBLE YOUR TELESCOPE
2.
Set-Up Tripod, Mount and Accessory Tray
•
Select one
Tripod Leg (5)
and extend the
Tripod Leg Middle Section (6).
Using
Tripod Leg Lock Screws (9)
included in the hardware pack, insert the
Tripod Leg Lock Screw
into the lower brackets on the
Tripod
Leg.
Tighten the
Tripod Leg Lock Screws
so that the middle section is securely in place. Repeat on
remaining two legs.
•
Locate the
Altazimuth Yoke Mount (3).
Note: Before assembling tripod legs
to Altazimuth Yoke Mount, make sure the Accessory Tray Braces(7) face
inward.
Locate the long bolts and washers from the hardware pack.
Position the mount over the
Tripod Leg (5)
as shown
(fig. 1).
and align the
holes in the
Tripod Leg
with the holes in the mount. Insert the bolts
through the holes at the top of a
Tripod Leg.
A washer should be
positioned on both outer sides of the
Tripod Leg.
Attach a wing nut to
the bolt, but do not tighten it all the way. Repeat on the remaining two
Tripod Legs
. Once you have attached all
Tripod Legs
to the mount,
securely tighten all wing nuts.
•
Locate the
Accessory Tray (8).
Using the accessory tray bolts, wingnuts
and washers
( 3-_” bolts, 6-_ washers and 3 - wingnuts)
connect the
Accessory
Tray
to the
Accessory Tray Braces (7).
Start with one
Tripod Leg
and attach wingnut. Wingnuts should
be positioned beneath the
Accessory Tray.
Do not tighten wingnuts until all
Accessory Tray Braces
are
attached as some adjustments may be required.
1. Attach Telescope and Finderscope
•
Locate
Telescope Main Tube (2).
Secure telescope to
Altazimuth
Yoke Mount (3)
by removing
Altitude Lock Knobs (17)
and positioning
the telescope between yoke. Carefully replace the
Altitude Lock
Knobs
and remove lens cover from
60mm Objective Lens (1)
•
Locate the
Finderscope(16)
with pre-assembled
Finderscope Mount
(13).
Remove the two nuts located near the back of the
Telescope
Main Tube (2)
and place the
Finderscope
and
Mount
assembly over
the exposed screws. Replace the nuts, and securely tighten the
Finderscope Mount
in place.
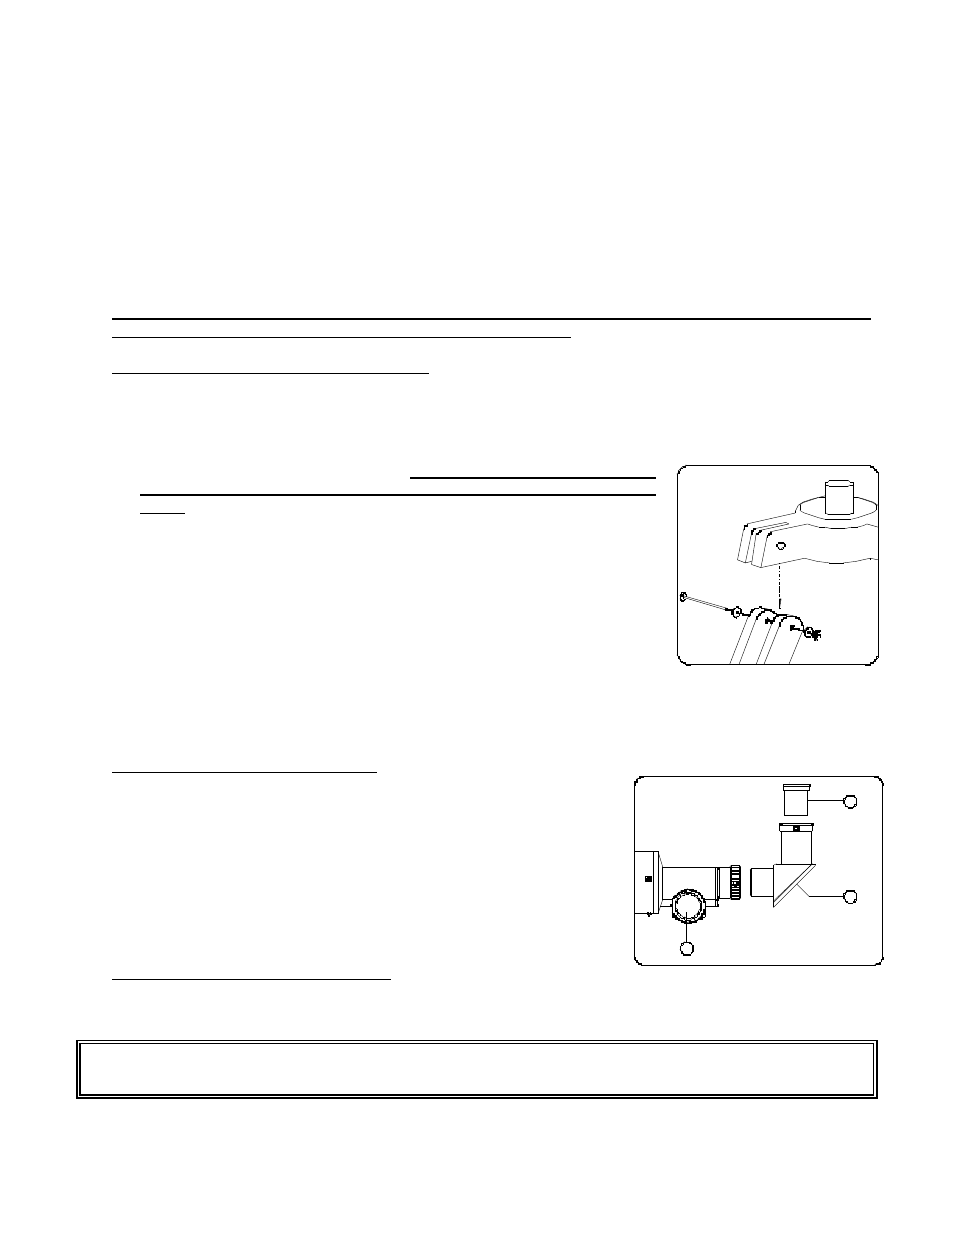
1. Attach Eyepiece and Diagonal Mirror
•
Locate an
Eyepiece (12)
(either the 5mm or 20mm) and
Diagonal
Mirror (11).
Attach the
Diagonal Mirror
as shown
(fig. 2).
Insert an
Eyepiece
into the
Diagonal Mirror.
Your Bushnell Telescope is now ready to be used. To obtain the fullest
enjoyment from your telescope, please refer to the additional information below.
fig. 1
fig 2.
12
11
10