How to use – Black & Decker DCM2160W User Manual
Page 4
6
5
SETTING THE CLOCK
1. Plug appliance into standard electrical outlet.
2. The digital clock display flashes 12:00
(F).
Note: You must set the clock in order to use the Delayed
Brewing feature.
3. To set the time: Press HOUR button until the correct
hour appears
(G).
Note: When the time passes Noon a small light appears
in the top left corner of the digital display under the PM
signage to let you know you are in P.M. time. If the P.M.
indicator is not lit, the time is A.M.
4. Repeat with the MIN button
(H). (If minute setting is not
changed within 5 seconds, the clock will revert to default
time and the selection of hour and minute will have to
be repeated.)
Tip: Hold the button down to make the hours and minutes
change rapidly after a short delay. To change the time in
1 minute increments, press and release the MIN button.
Note: If the unit is unplugged or power is interrupted even momentarily, the time
will need to be reset.
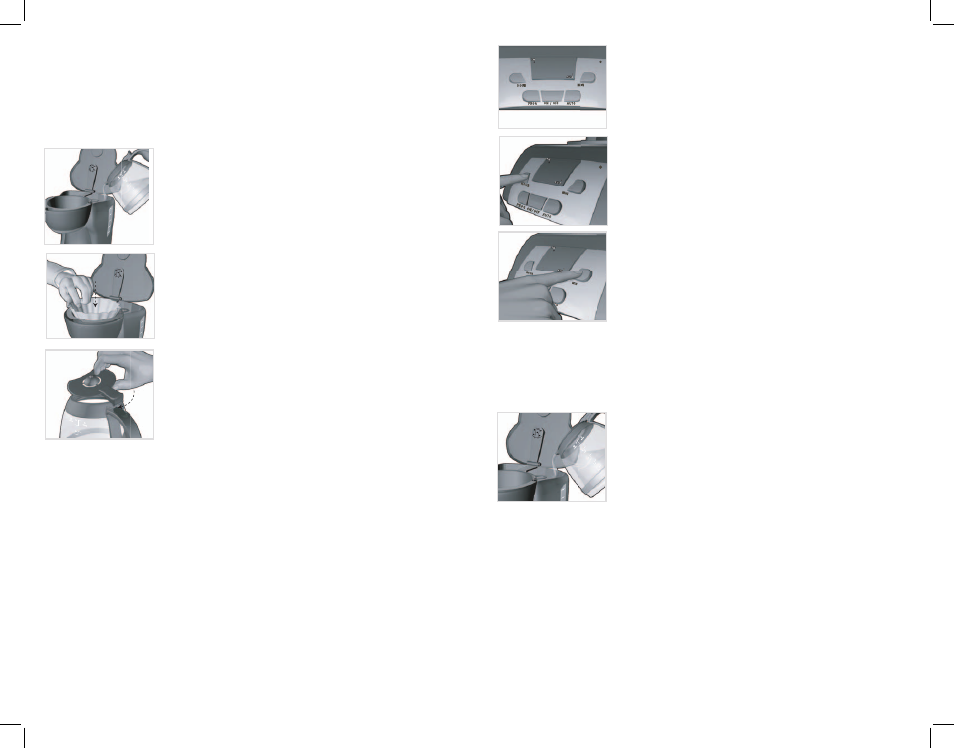
BREWING COFFEE
It is not necessary to set the clock to brew coffee unless you want to use Delayed
Brewing.
1. Open water reservoir/brew basket cover.
2. Fill water reservoir with cold tap water up to the desired
water marking on the side of reservoir.
Caution: Be
careful not to exceed the 12-cup maximum level, to
avoid water running out the overflow hole in the back
of the coffeemaker (J).
3. Place an 8 to 12 cup basket style paper filter in the removable filter basket,
make sure that it is properly centered in the brew basket.
4. Add your desired amount of ground coffee.
5. Insert brew basket into brew basket holder following directions in GETTING
STARTED.
6. Close brew basket/ water reservoir cover securely.
7. Place brew- thru cover on empty carafe following directions in
GETTING
STARTED.
Note: Coffee may overflow if brew-thru lid is not properly aligned.
8. Place empty carafe on the “Keep Hot” plate.
9. Plug cord into standard electrical outlet.
POWE
R
G
POWER
12:00
F
POWE
R
H
MA
X
J
How to Use
This product is for household use only.
GETTING STARTED
1. Remove all packing material, and any stickers from the product.
2. Remove and save literature.
3. Wash all removable parts as instructed in the Care and Cleaning section.
4. Open water reservoir/brew basket cover and pour in
fresh cold water up to the #12-cup level mark.
Caution:
Be careful not to exceed the 12-cup maximum level, to
avoid water running out the overflow hole in the back
of the coffeemaker (C).
5. Place empty 8 to 12 cup basket style paper filter into
removable filter basket.
6. Place basket into brew basket with the handle to the
right
(D).
7. Close water reservoir/brew basket cover securely.
8. To replace brew-thru lid cover on empty carafe insert
small hole on left side of cover handle into projection on
carafe cover holder. Press U-shaped projection on right
side of cover handle down to click into position on right
side of cover holder
(E).
9. Place empty carafe on the “Keep Hot” plate.
10. Pull power cord out from power cord holder in back of coffeemaker and plug
into standard electrical outlet.
11. Brew water through appliance following the “Brewing Coffee” instructions
without adding coffee grounds. This removes any dust or residue that may
have remained in the coffeemaker during the manufacturing process.
12. When brewing is complete, discard the water from the carafe and paper filter
from filter basket.
13. Turn off the coffeemaker; unplug it and allow it to cool down.
ADJUSTING THE POWER CORD LENGTH
• You can adjust the length of the power cord to suit your needs.
• To increase the length of the power cord, simply grasp the cord (not the plug)
in the rear of the coffeemaker and gently pull down and out of the slot away
from the coffeemaker.
• To decrease the length of the power cord, simply feed any excess cord into the
slot in the rear of the coffeemaker.
• Lift the cord and lock it into the slot when cord is at desired length.
MA
X
D
MA
X
C
E