Black & Decker SDC740 User Manual
Page 5
8
7
SPACER MOUNTING INSTALLATION (OVERHANG LIP CABINETS)
Important: Always wear protective glasses or goggles to prevent injury when
drilling.
Note: Spacers are provided in case your cabinet has an overhang lip at the front
edge. The spacers are used on the rear screw holes of the appliance to ensure it is
level with the front. Only use spacers if your cabinet has an overhang.
1. Clear countertop under installation area to avoid getting on other appliances or
items. Open cabinets and remove contents to make mounting easier
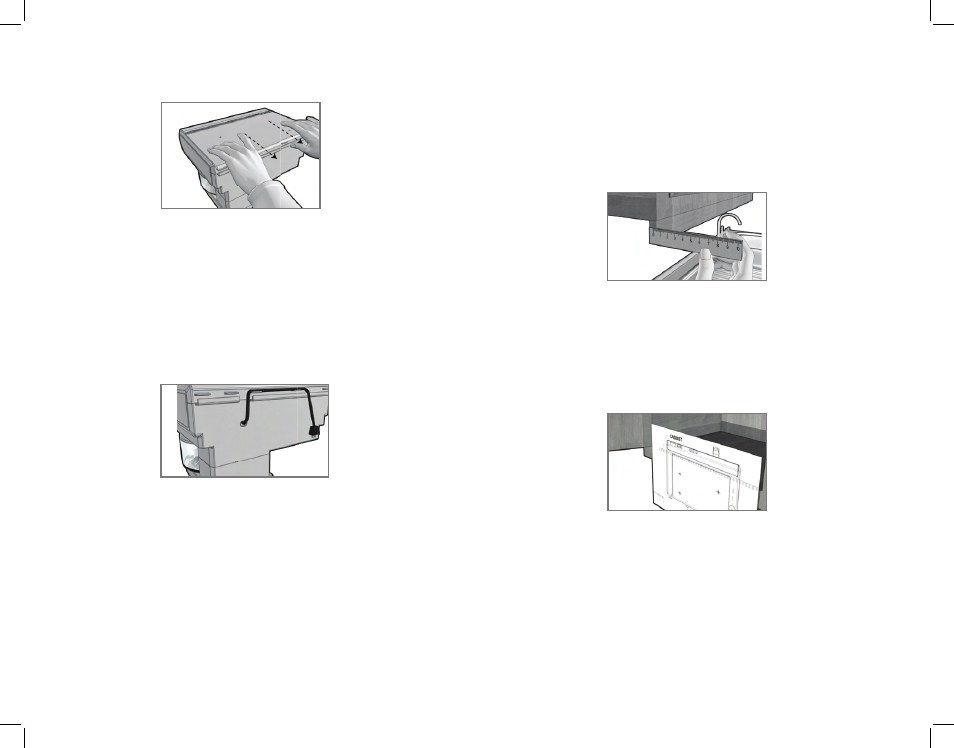
2. Using a ruler, measure the thickness of the overhang lip from the front to back
of the overhang, accurately noting the number for use in the following step
(H).
Note: If you do not have a ruler, you may cut out and use the paper ruler provided
on the edge of your mounting template.
3. Once you have the overhang thickness, look at the dashed lines on the
mounting template; each line has a measurement next to it that indicates
the height of the lip used with that line. For example, if your cabinet has an
overhang thickness of ½”, you will use the ½” dashed line on the template.
4. With cabinet doors open, place line selected on mounting template even with
the bottom front edge of your cabinet, and tape in place against the lip
(J).
Important: Do not align screw holes on template with the partition between
cabinets, as this will prevent you from installing the appliance properly. Pay close
attention to where the drill holes will be set so as not to damage your cabinets
during mounting. Drilling through your cabinet’s partition may cause damage to
cabinets and prevent proper installation.
J
H
Important: Top panel of coffeemaker is removable to make installation easier.
Simply grip the panel at the rear and pull back to remove (F). Once removed,
mount in place following the directions below and then slide coffeemaker back
on the panel track to reattach appliance once the panel has been mounted.
8. Hold panel in place; drilled holes on cabinet should be aligned with mounting
holes on the panel.
9. From inside of the cabinet down into panel holes, drop 4 screws in place. Place
a nut on each screw and tighten to secure the panel in place.
Note: Always tighten nuts to ensure the appliance does not move or shake during
operation.
10. Once the panel is secure, reattach coffeemaker to panel by lifting appliance
up, aligning it with the track on the panel and then sliding it back into place.
11. Pull out cord from cord storage behind appliance and plug into standard
electrical outlet. Extra cord can be fed back into storage or hung over cord
management hook behind unit
(G).
Caution: This appliance features a Save-A-Plug™ outlet receptacle to connect
smaller †SpaceMaker™ appliances such as the mini food processor / grinder or
can opener. Do not use this outlet for any other appliance!
Note: If you are connecting another †SpaceMaker™ appliance into the Save-A-
Plug™ outlet, make sure you can easily unplug the appliance after each use.
12. Your †SpaceMaker™ appliance is now ready for use!
F
G