Ac d e, Bc d, Power on input network input volume wan 3 2 1 lan – Pioneer XW-SMA4-K User Manual
Page 2: Wan 3 2 1 lan, No yes yes no yes no yes yes no, Aux in dc in input volume standby/on, Input volume standby/on
Connect to network
A
C
D
E
power on
input
network
input
volume
WAN
3
2
1
LAN
Connecting
this unit
using
wireless
LAN
WAN
3
2
1
LAN
WPS-PBC
Connecting to a router without
WPS-PBC function
Connect this unit directly to your computer or
tablet PC. Settings must be performed from the
Web browser of the computer or tablet PC.
WAN
3
2
1
LAN
WPS-PBC
Connecting to a router with WPS-PBC function
If your computer or tablet PC
is equipped with wireless
LAN function
If your computer or tablet PC is
not equipped with wireless LAN
function (wired LAN only)
B
C
D
power on
input
network
input
volume
WAN
3
2
1
LAN
Connecting
this unit
using wired
LAN
WAN
3
2
1
LAN
DHCP
When fixed IP must be set
(connecting to a router without DHCP
server function)
Your computer or tablet PC must be connected
directly to the unit, and settings must be
performed from a Web browser.
If your computer or tablet
PC is equipped with
wireless LAN function
WAN
3
2
1
LAN
DHCP
Connecting to a router with DHCP server function
(this method should be used under normal conditions)
If your computer or tablet
PC is not equipped with
wireless LAN function
(wired LAN only)
If you intend to connect an iPhone/iPod touch/iPad (with iOS ver 5.0 or later) to a
conventional household wireless LAN
The same wireless LAN connection settings can be applied to this unit.
F
Enjoying AirPlay
2.
Tap AirPlay icon ( ).
3.
Select SMA.
4.
Tap
to play music.
(use this method under normal conditions)
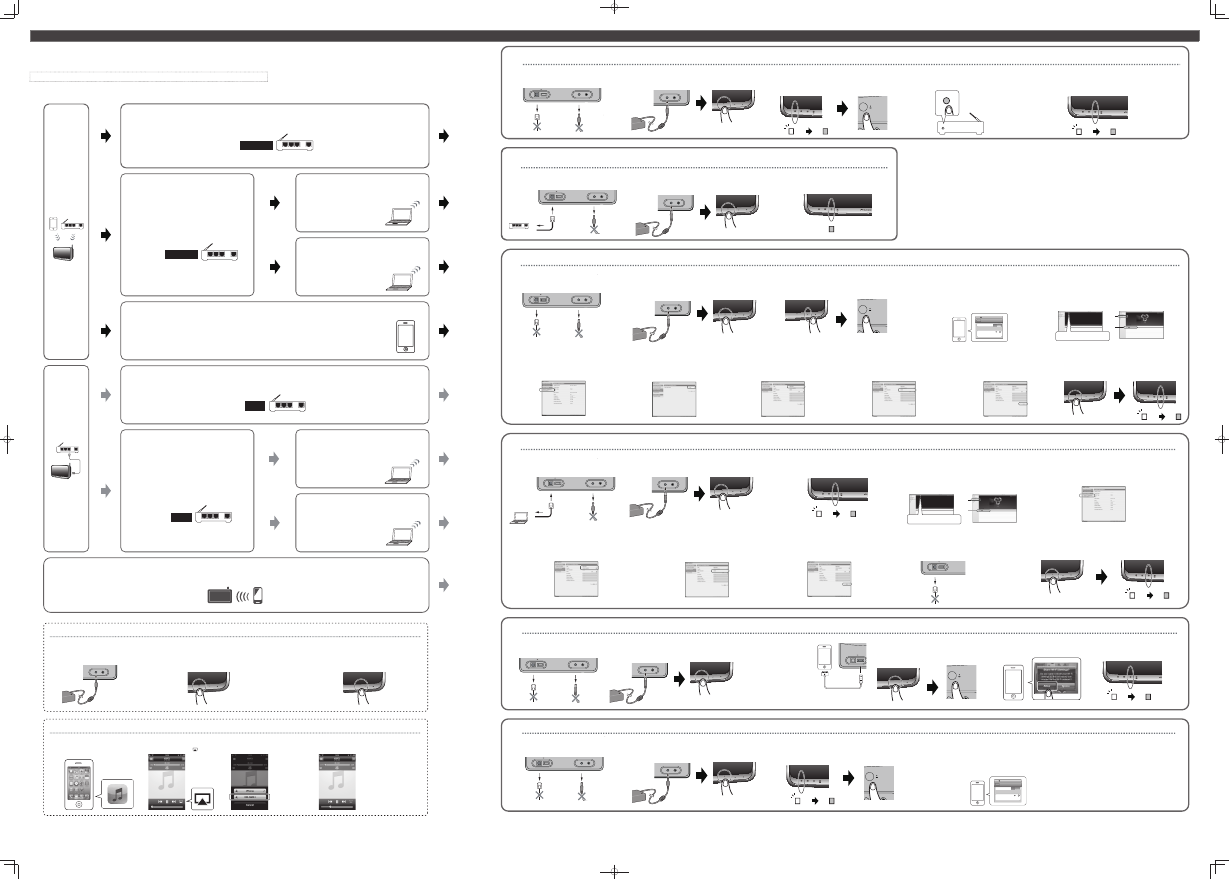
Wireless Direct Function
The Wireless Direct function allows the use of a direct wireless connection between this unit and a wireless LAN device, without the need for a
router.
No
Yes
Yes
No
Yes
No
Yes
Yes
No
When connection is complete, read the following instructions.
1.
Tap iPod icon.
2.
Press the
standby/on button.
After the power turns on, it takes approximately 30 seconds for the unit to
be ready to use (“power on” LED will go from flashing to solid blue).
3.
Press the input button for 3 seconds.
The LEDs will flash blue 4 times to signal Quick Start Mode has
been turned on.
Turning on Quick Start Mode
1.
Connect the AC adapter.
Quick Start Mode significantly reduces the time required for startup. It also allows the unit to power on automatically using AirPlay and DLNA. Follow the steps below to turn on Quick Start Mode.
AUX IN
DC IN
AUX IN
DC IN
input
volume
standby/on
input
volume
standby/on
By connecting the unit to your home LAN, you can enjoy AirPlay and playback of music stored on your computer or other device.
• This unit cannot be used to play movie fi les.
• For information regarding the format of fi les supported by this unit, consult the Operating Instructions posted on the Pioneer website.
Methods of connection may vary depending on the device used. Confi rm the type of unit, and follow the appropriate instructions.
・ If you select method A, C or E, confi rm the LAN cable is not connected to this unit.
A
Connections for wireless LAN using WPS-PBC function
1.
Confirm that the AC adapter and LAN cable are not
connected to the unit.
2.
Connect the AC adapter, and press standby/on button.
The power on indicator will flash blue. Wait for about 30 to 40
seconds.
3.
When the power on indicator stops flashing, press the
rear-panel network setup/wireless direct button.
The network indicator will change from flashing red to flashing
purple.
4.
Within 2 minutes, press the router's WPS button.
For information regarding router operation, consult the router's
Operating Instructions.
5.
The network connection settings will be performed automatically,
and when the connection is complete, the unit's indicator will
briefly change to flashing red, then light steadily blue.
B
Wired connection to a router with DHCP server
3.
The power on indicator's flashing will stop, and when
the power is fully turned on, the network indicator will
light blue.
F
Wireless Direct Function
E
Connection settings using an iOS device
1.
Confirm that the AC adapter and LAN
cable are not connected to the unit.
3.
When the power on indicator
stops flashing, use a USB cable
to connect this unit to the
iPhone/iPod touch/iPad (iOS
device with iOS ver 5.0 or later).
* Confirm that the iOS device has
a wireless connection to your
router.
* Confirm that the iOS device's
screen lock is disabled.
4.
Press and hold input button on the front panel, and then
press and hold network setup/wireless direct button on
the rear panel for 3 seconds.
A screen like the following should appear on the iOS device.
3.
Confirm that the unit's power on indicator stops flashing. Hold the
unit's rear-panel network setup/wireless direct button depressed for 3
seconds.
The unit will begin rebooting (the power on indicator will flash blue); wait for
about 30 to 40 seconds.
4.
When the network indicator lights purple, connect to the network
called "Wireless Direct:xxxxxx" from Wi-Fi network setting on the
computer, iPhone, tablet PC or other device.
The “xxxxxx” is the device's unique identifier number.
* Consult the appropriate Operating Instructions for information regarding operation
of the computer, iPhone, tablet PC or other device used.
Note that the network indicator will
continue to light purple even after this
connection is established.
Thereafter, you can listen to music using
the smart phone or other device. For
details, consult the Operating
Instructions for the respective device.
4.
When the network indicator lights red, start your computer's
Web browser, and access the URL noted below to make
settings for this unit.
The Web Control menu will appear.
For Safari: Press Bookmark icon. Click Bonjour list (a), and then
select this unit's name (“Friendly Name”) (b) in Bookmark.
D
Using a Web browser on a computer supporting wired LAN to make connecting settings for the unit
1.
Use a LAN cable to connect the unit to the computer.
9.
Disconnect the LAN cable from the unit and confirm that
the router's power is ON.
If you intend to use the unit in a wired configuration, use a LAN
cable to connect the unit to the router.
10.
Press standby/on button.
The power on indicator will flash blue. When the power is completely
on (power on indicator lights steadily blue), the network indicator will
light blue, indicating that settings are completed.
3.
When the power on indicator stops flashing, press and hold volume
– button on the front panel, and then press and hold network
setup/wireless direct button on the rear panel for 3 seconds.
The unit will reboot (the power on indicator will flash blue). Wait for
about 30 to 40 seconds.
4.
When the network indicator lights red, connect to the
network called "Pioneer Setup:xxxxxx" from Wi-Fi network
setting on the computer, iPhone, tablet PC or other device.
The “xxxxxx” is the device's unique identifier number.
* Consult the appropriate Operating Instructions for information
regarding operation of the computer, iPhone, tablet PC or other device
used.
* Since this kind of connection is not encoded, a minor security risk may
be involved.
5.
When the connection is established, boot your Web
browser and access the URL noted below to make settings
for this unit.
The Web Control menu will appear.
For Safari: Press Bookmark icon. Click Bonjour list (a), and then
select this unit's name (“Friendly Name”) (b) in Bookmark.
C
Connection settings from a Web browser using a computer, iPhone, tablet PC or other device supporting wireless LAN
1.
Confirm that the AC adapter and LAN cable are not
connected to the unit.
11.
Press standby/on button.
The power on indicator will flash blue. When the power is
completely on (power on indicator lights steadily blue),
the network indicator will light blue, indicating that
settings are completed.
2.
Connect the AC adapter, and press standby/on button.
The power on indicator will flash blue. Wait for about 30 to 40
seconds.
1.
Disconnect the AC adapter before performing the
connection between router and this unit.
Use a LAN cable to connect this unit and your router.
2.
Connect the AC adapter, and press standby/on button.
The power on indicator will flash blue. Wait for about 30 to 40
seconds.
6.
From the menu on the left, select “Network
Configuration.”
If you wish to change the Friendly Name, select
“Friendly Name” from the menu and change the
name before selecting “Network Configuration.”
7.
When the Auto/Manual selection screen appears,
select “Auto.”
If you are manually inputting the SSID or setting a fixed
IP with a wired connection, select “Manual.” For details,
refer to the item “Web Control” of the Operating
Instructions.
8.
Select your router's SSID.
If the SSID does not appear, either repeat
step (6), or use step (7) to select Manual
and input the SSID manually.
9.
If you are asked to input a password, input it
here.
Also, if input of a fixed IP is required, set DHCP to
OFF here and make the setting. For details, refer to
the item “Web Control” of the Operating
Instructions.
10.
When settings are completed, click on Apply.
The unit will automatically power down. Confirm that
the router's power is ON.
If you intend to use the unit in a wired configuration,
use a LAN cable to connect the unit to the router.
2.
Connect the AC adapter, and press standby/on button.
The power on indicator will flash blue. Wait for about 30 to 40
seconds.
3.
Wait for the network indicator to change from flashing to
steadily lighted red.
This may require up to 90 seconds or so.
5.
From the menu on the left, select “Network Configuration.”
If you wish to change the Friendly Name, select “Friendly Name”
from the menu and change the name before selecting “Network
Configuration.”
6.
If you are considering using this unit with wireless connections,
input your router's SSID, then select “Security.”
Also, if input of a fixed IP is required, set DHCP to OFF here and make
the setting. For details, refer to the item “Web Control” of the Operating
Instructions.
7.
If a password is requested, input it here.
8.
When settings are completed, click on Apply.
The unit will automatically power down.
2.
Connect the AC adapter, and press standby/on
button.
The power on indicator will flash blue. Wait for about 30 to
40 seconds.
6.
When the network indicator changes from
flashing red to steadily lighted blue, the
connection is completed.
5.
Tap the “Allow” button.
This connection allows the temporary use of this unit in places where a router is not available; when power is turned off, the Wireless Direct function is disabled and the network setting of this unit returns to the previous setting.
Since this kind of connection is not encoded, a minor security risk may be involved. For details, see the Operating Instructions.
If you use an iPhone/iPod touch/iPad (iOS device with iOS ver 5.0 or later) with wireless LAN connection, apply the iOS device’s connecting settings to this unit.
1.
Confirm that the AC adapter and LAN
cable are not connected to the unit.
2.
Connect the AC adapter, and press standby/on
button.
The power on indicator will flash blue. Wait for about 30 to
40 seconds.
For Safari
For Safari
PIONEER CORPORATION
1-1, Shin-ogura, Saiwai-ku, Kawasaki-shi, Kanagawa 212-0031, Japan
Корпорация Пайонир
1-1, Син-Огура, Сайвай-ку, г. Кавасаки, префектура Канагава, 212-0031, Япония
Импортер: ООО "ПИОНЕР РУС"
125040, Россия, г. Москва, ул. Правды, д.26 Тел.: +7(495) 956-89-01
PIONEER ELECTRONICS (USA) INC.
P.O. BOX 1540, Long Beach, California 90801-1540, U.S.A. TEL: (800) 421-1404
PIONEER ELECTRONICS OF CANADA, INC.
340 Ferrier Street, Unit 2, Markham, Ontario L3R 2Z5, Canada TEL: 1-877-283-5901, 905-479-4411
PIONEER EUROPE NV
Haven 1087, Keetberglaan 1, B-9120 Melsele, Belgium TEL: 03/570.05.11
PIONEER ELECTRONICS ASIACENTRE PTE. LTD.
253 Alexandra Road, #04-01, Singapore 159936 TEL: 65-6472-7555
PIONEER ELECTRONICS AUSTRALIA PTY. LTD.
5 Arco Lane, Heatherton, Victoria, 3202, Australia, TEL: (03) 9586-6300
PIONEER ELECTRONICS DE MEXICO S.A. DE C.V.
Blvd.Manuel Avila Camacho 138 10 piso Col.Lomas de Chapultepec, Mexico, D.F. 11000 TEL: 55-9178-4270
K002_B4_Ru
AUX IN
DC IN
iPod/iPhone/iPad
LAN(10/100)
AUX IN
DC IN
input
volume
standby/on
6
AUX IN
DC IN
input
volume
standby/on
6
power on
input
network
network setup
wireless direct
AUX IN
DC IN
power on
input
network
network setup
wireless direct
AUX IN
DC IN
WPS
WPS
AUX IN
DC IN
iPod/iPhone/iPad
LAN(10/100)
WAN
3
2
1
LAN
power on
input
network
power on
input
network
AUX IN
DC IN
iPod/iPhone/iPad
LAN(10/100)
AUX IN
DC IN
input
volume
standby/on
6
input
volume
standby/on
6
network setup
wireless direct
AUX IN
DC IN
Wi-Fi Network
Choose a Network...
iPod
Network
ON
Wi-Fi
0001 Setup:xxxxxx
a
b
SMA
SMA
http://192.168.1.1
a
b
SMA
SMA
http://169.254.1.1
S1000.1000.0
XW-SMA1
XX:XX
X:X
XXX:XXX
X:X
X:X
input
volume
standby/on
6
power on
input
network
AUX IN
DC IN
iPod/iPhone/iPad
LAN(10/100)
AUX IN
DC IN
input
volume
standby/on
6
power on
input
network
S1000.1000.0
XW-SMA1
XX:XX
X:X
XXX:XXX
X:X
X:X
iPod/iPhone/iPad
LAN(10/100)
input
volume
standby/on
6
power on
input
network
AUX IN
DC IN
iPod/iPhone/iPad
LAN(10/100)
AUX IN
DC IN
input
volume
standby/on
6
iPod/iPhone/iPad
LAN(10/100)
network setup
wireless direct
AUX IN
DC IN
input
volume
standby/on
6
Share Wi-Fi Settings?
Ignore
power on
input
network
AUX IN
DC IN
iPod/iPhone/iPad
LAN(10/100)
AUX IN
DC IN
input
volume
standby/on
6
Wi-Fi Network
Choose a Network...
iPod
Network
ON
Wi-Fi
0001 Setup:xxxxxx