NITECORE EA4 User Manual
User manual, Features, Dimensions
User Manual
Features
·
Novel 'Unique Integrated Technology' offers a more sturdy and
lightweight body.
·
Utilizes a CREE XM-L2 T6 LED
·
Maximum output of up to 960 lumens
·
Integrated “Precision Digital Optics Technology” provides extreme
reflector performance
·
Boasts a peak beam intensity of 24,000cd and a throw distance of up to
310 meters
·
Innovative single button two-stage switch offers a user-friendly interface
(patented)
·
Eight rapidly switchable brightness modes to select from
·
High efficiency circuit board provides up to 22 hours runtime
·
Integrated power indicator light displays remaining battery power
(patented)
·
Power indicator’s secondary function displays battery voltage (accurate
to 0.1V)
·
Reverse polarity protection prevents damage due to incorrectly inserted
batteries
·
Stainless steel retaining ring protects the core components from
damage
·
Toughened ultra-clear mineral glass with anti-reflective coating
·
Constructed from aero grade aluminum alloy
·
Sturdy HAIII military grade hard-anodized
·
Waterproof in accordance with IPX-8 (two meters submersible)
·
Impact resistant to 1.5 meters
·
Tail stand capability
Dimensions
Length: 117mm (4.6”)
Head diameter: 40 mm (1.57”)
Tube diameter: 41.8mm (1.65”)
Weight: 159g (5.6oz)(without battery)
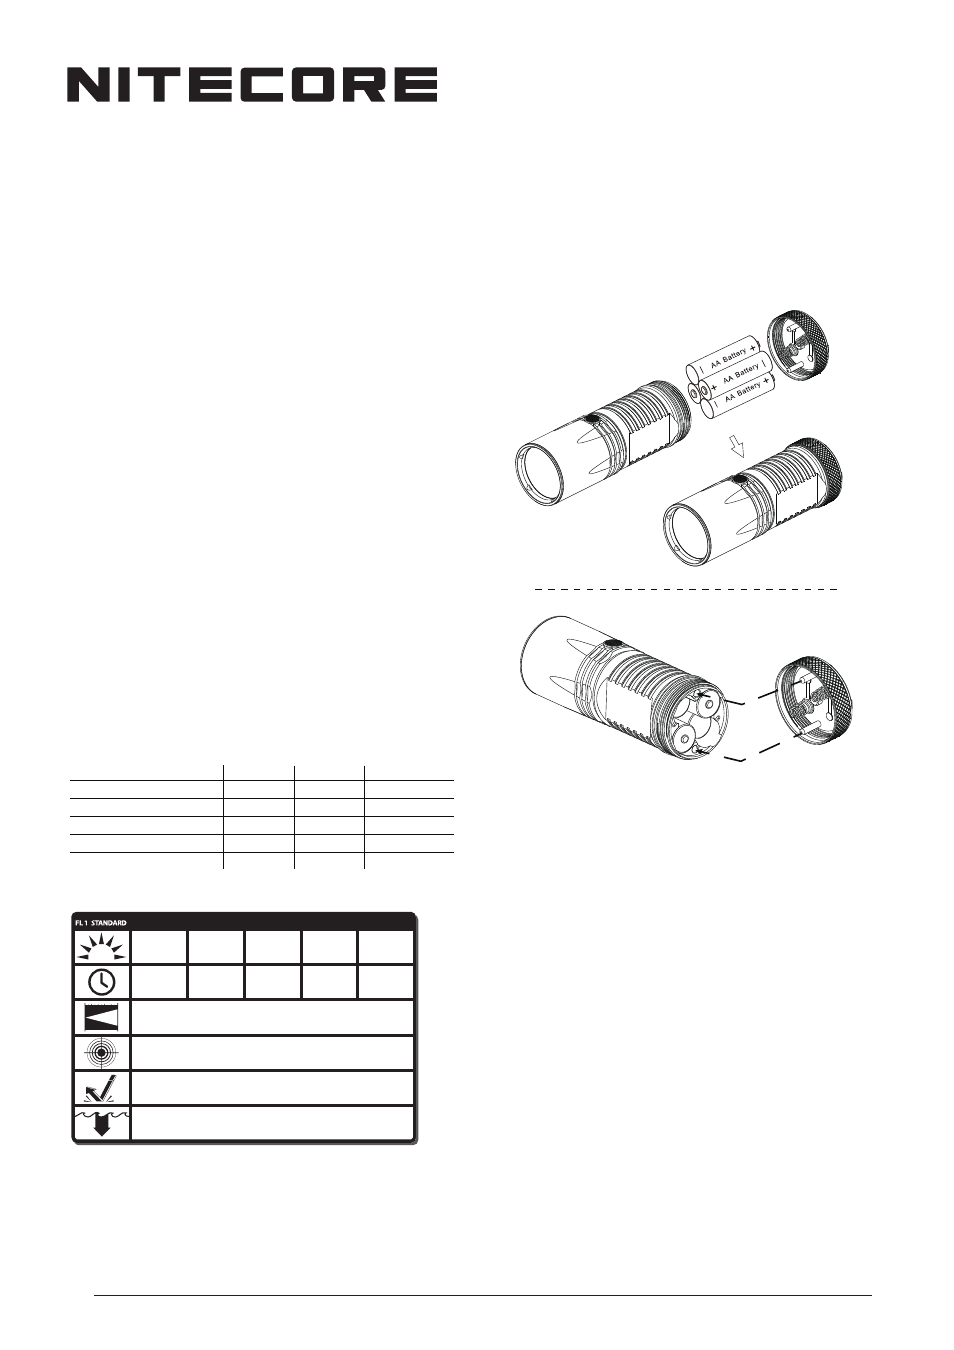
Battery installation
1. Insert batteries with the positive (+) and negative (-) ends
corresponding to the diagram on the inside of the battery
compartment.
2. Tighten the tail cap by aligning the two gold pins on the inside of the
tail cap with the corresponding holes on the flashlight body and rotate
clockwise.
Thanks for purchasing NITECORE!
Output & Runtime
Power Tips
1. When the light is on, the power indicator will blink once every two
seconds when power levels reach 50%.
2. When the light is on, the power indicator will blink consistently when
power levels are low.
3. Each time batteries are inserted or the light is put into lockout mode,
the power indicator light will blink in various patterns to indicate the
battery voltage (accurate to ±0.1V). For example, when the battery
voltage is at a maximum charge of 4.2V, the power indicator will blink
4 times in quick succession, followed by a one second pause and two
more blinks, indicating a total battery voltage of 4.2V.
Changing / Charging Batteries
When the power indicator blinks rapidly it means the batteries need to be
replaced or recharged. Alternatively if the light becomes dim or
unresponsive to adjustment this also indicates batteries need to be
replaced or recharged.
Maintenance
Every 6 months, threads should be wiped with a clean cloth followed by
a thin coating of silicon-based lubricant.
Warranty Service
All NITECORE® products are warranted for quality. DOA / defective
products can be exchanged for replacement through a local
distributor/dealer within the 14 days of purchase. After 14 days, all
defective / malfunctioning NITECORE® products will be repaired free of
charge for a period of 18 months from the date of purchase. After 18
months, a limited warranty applies, covering the cost of labor and
maintenance, but not the cost of accessories or replacement parts. The
warranty is nullified in all of the following situations:
1. The product(s) is/are broken down, reconstructed and/or modified by
unauthorized parties.
2. The product(s) is/are damaged through improper use.
3. The product(s) is/are damaged by leakage of batteries.
For the latest information on NITECORE® products and services, please
contact your national NITECORE® distributor or send an email to
[email protected]
®
The All-Round Flashlight Expert
TURBO
HIGH
MID
LOW
LUMENS
605
LUMENS
960
LUMENS
330
LUMENS
148
1
h
45
min
4
h
30
min
LOWER
LUMENS
72
22
h
11
h
2
h
310m
(Beam Distance)
24000cd
(Peak Beam Intensity)
IPX-8, 2m
(Waterproof AND Submersible)
1.5m
(Impact Resistant)
NITECORE (SYSMAX) is a member of PLA
TO, participating in and helping
to develop the ANSI FL1 standard of measurement. Product testing data
is in accordance with these internationally recognized scientific
standards.
Tips
Inserting batteries in a dark environment: Two of the four battery slots in
the EA4’s battery compartment feature grooves indicating that batteries
should be inserted with the negative (-) ends facing forward, while the two
slots with no grooves require the batteries to be inserted with the positive
(+) ends facing forward. In this way, batteries can be inserted correctly
through tactile feedback alone.
After loading the batteries, the power indicator light will blink to indicate
the battery voltage. Please refer to the “Power Tips” section of this
manual for details.
WARNING
1. Insert batteries using the image on the inside of the battery
compartment as a reference.
2. Do not mix rechargeable and non-rechargeable batteries.
3. Do not mix batteries of different types/brands.
General Operation
The EA4 utilizes a 2-stage switch similar to a camera shutter button. The
light’s numerous functions are selected according to the depth the switch
is pressed. The EA4 has two modes: Daily mode and Search / Turbo
mode.
Operating In Daily Mode
1. With the light turned off, press the switch partway down and release
within a second to enter daily mode.
2. Daily mode contains four brightness levels: ultra-low, low, medium, and
high. Pressing the switch partway down in quick succession will cycle
through these modes. Pressing the switch partway down and holding
for more than one second when in daily mode will enter into turbo
mode. See Turbo / Search mode instructions below.
3. The light is turned off (put into standby mode) by pressing the button
all the way down and releasing within a second. This will also
memorize the last daily mode used.
4. Daily mode has a momentary function which allows the light to be
turned on only when the switch is held. With the light turned off, press
the switch partway down and hold to activate daily mode’s momentary
function. The light will turn off the moment the switch is released.
Operating in Search / Turbo Mode
1. With the light turned off, press the switch all the way down and release
within one second to enter turbo mode. To cycle between high and
turbo modes press the button partway down while in turbo mode.
2. To turn the light off when in turbo mode, once again press the button all
the way down and release within one second.
3. With the EA4 turned on in Search/Turbo mode, partway presses of the
button will cycle between high and ultra-high mode. There is no
memory function in Search/Turbo mode.
NB: For user safety and to prevent overheating / failure, the EA4 will
automatically switch to high mode after three minutes of use in
Turbo mode.
Standby Mode / Lockout and Unlock functions
With the light turned on, press the switch all the way down and release
within one second to enter into standby mode. In this mode, the light will
consume small amounts of power to maintain the settings in the MCU
(micro control unit) but appear to be turned off. When in standby mode
the power indicator light will flash once every three seconds to show the
location of the light.
With the light turned on, press the switch all the way down and hold for
more than one second. The light will turn off and enter into lockout mode.
Lockout mode consumes almost no battery power and prevents the light
from accidentally turning on. Holding the switch for more than one second
to exit the lockout mode.
NB:
1. When entering lockout mode, the power indicator will flash to indicate
specific battery voltage. Please refer to the “Power Tips” section of this
manual for details.
2. When EA4 is kept in a backpack or left unused for extended periods,
Nitecore recommends the bezel is loosened to cut off the power entirely,
thus saving battery power and preventing accidental activation of the
flashlight.
Special Strobe / SOS mode and
Location Beacon
With the light turned on, press the switch all the down twice in quick
succession to enter strobe mode. When in strobe mode, press the switch
all the way down and hold for more than one second to cycle through
strobe, SOS and location beacon modes. To select any of these modes
simply release the switch when it is displayed. To turn off the light fully
press and release the switch.
EA4
SIZE
Nominal voltage
Usability
Primary AA battery
AA
1.5V
Y (Recommended)
Rechargeable AA battery
AA
1.2V
Y (Recommended)
Primary AA Lithium battery
L91
1.5V
Y
Primary LiFePO4 battery
14500
3.2V
Rechargeable Li-ion battery
14500
3.7V
N (Banned)
N (Banned)
NOTICE
The above data has been measured in accordance with the international
flashlight testing standards ANSI/NEMA FL1 using 4 x 1.2V 2400mAh AA
batteries under laboratory conditions. The data may vary slightly during
real-world use due to battery type, individual usage habits and environmental
factors.
Accessories
Quality holster, lanyard, spare O-ring
Battery Options