Instruction, Manual ni-491e – WIKA TCA User Manual
Page 2

INSTRUCTION
MANUAL
NI-491E
Rev. 5 11/02
1 - GENERAL NOTES
1.1 FOREWORD
The wrong choice of a series or a model, as well as the incorrect
installation, lead to malfunction and reduce instrument life. Failure
to abide by the indications given in this manual can cause dam-
age to the instrument, the environment and persons.
1.2 ALLOWED OVERRANGE
Temperatures exceeding the working range can be occasionally
tolerated provided they remain within the limits stated in the in-
strument features (trial temperature). Continuous temperatures
exceeding the working range can be applied to the instrument,
provided they are clearly stated in the instrument features. The
current and voltage values stated in the technical specifications
and ratings must not be exceeded. Transitory overranges can
have a destructive effect on the switch.
1.3 TEMPERATURE
Due to the temperature of both the environment and the process
fluid, the temperature of the instrument could exceed the allowed
limits (normally from -20° to +70°C). Therefore in case it does,
suitable measures (protection against heat radiation, heated
lockers), aimed at limiting the value, must be taken.
2 - OPERATING PRINCIPLE
The operating principle is based on a pressure measuring ele-
ment, connected via a capillary tube to a temperature-responding
bulb. This system is partially filled with a volatile liquid, the resid-
ual free volume being filled by its saturated vapour. In this system
a pressure is generated which is a non-linear function of bulb
temperature; this pressure acts on a stainless steel diaphragm
which applies a force to a stiff disc; this force is directly propor-
tional to the temperature value to which the bulb is submitted and
is contrasted by an helicoidal spring charged by a suitable bush.
When the force balance point is exceeded, the stiff disc shifts
and, by means of a rigid rod, activates one or two simultaneous
release electric microswitches. The microswitches are of the
rapid release type with automatic rearm. When the temperature
moves away from the set values, returning towards the normal
values, the switch is rearmed.
3 - IDENTIFICATION PLATE AND MARKINGS
The instrument is fitted with a metal plate bearing all its functional
characteristics and – in case of explosionproof execution (Series
TCA) – also the markings prescribed by standard CEI EN 50014.
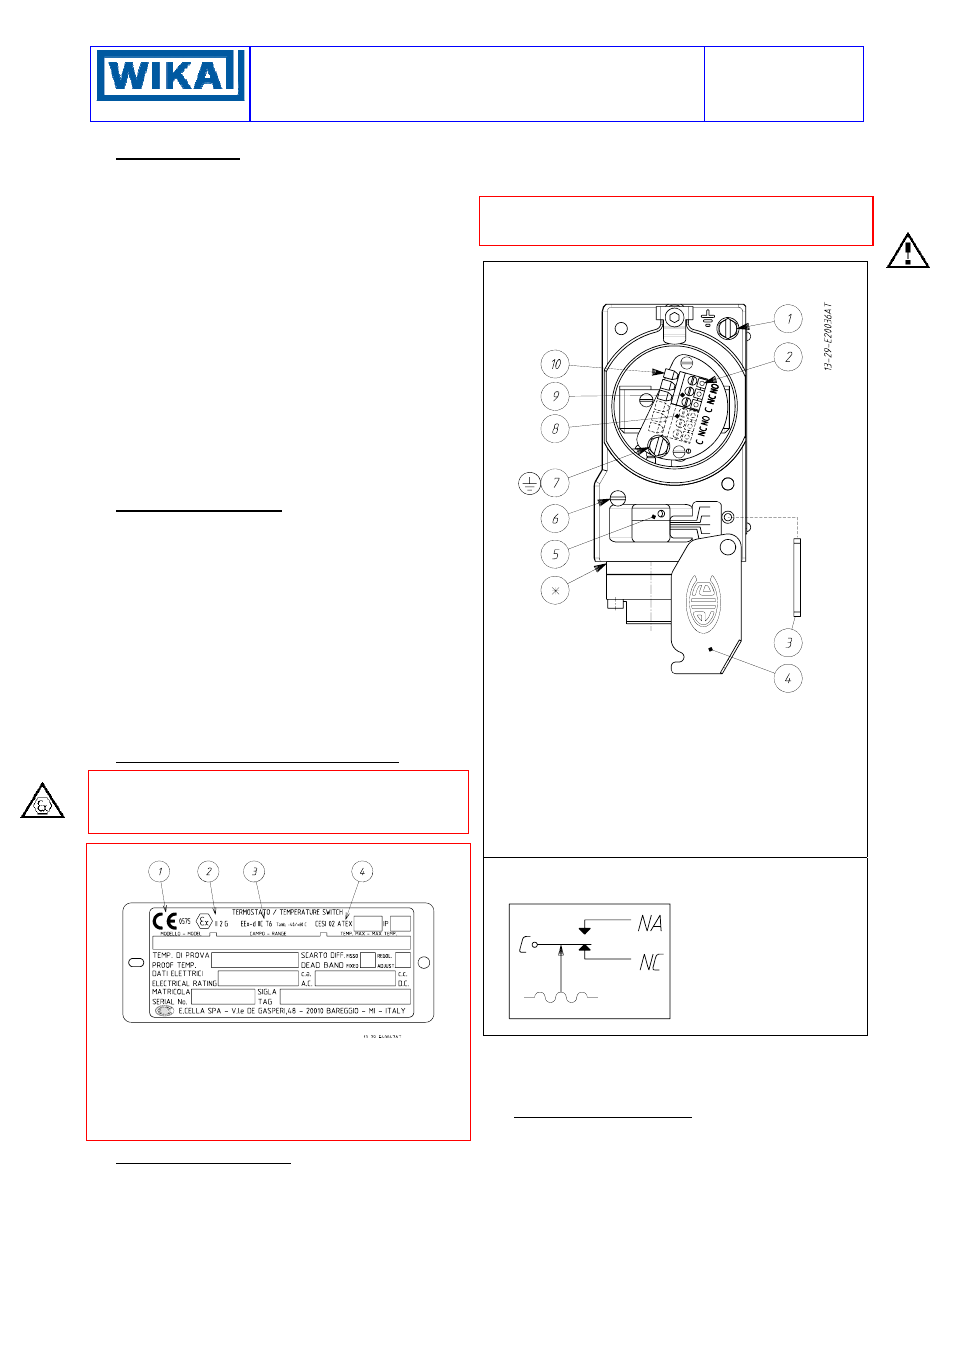
Fig. 1 shows the plate mounted on explosionproof instruments.
Fig. 1 -
Explosionproof instruments plate
1 CE marking and identification number of the notified body
responsible for production surveillance.
2 Apparatus classification according to ATEX 949 CE directive.
3 Type of protection and ambient temperature limits of opera-
tion.
4 Notified body that issued the type certificate and number of
said certificate.
4 - SET POINT REGULATION
The charge of the helicoidal spring can be regulated by means of
the bush (for adjustment) in such a way that the switch is released
when the temperature reaches (increasing or decreasing) the
desired value (set point). The instrument is usually supplied with
the switches set at 0°C or at the lowest setting range value if this
is higher than 0°C (factory calibration). The instrument is sup-
plied with an adhesive rating plate showing the set point calibra-
tion value. With factory calibration the values are not indicated
on the ratings as these are temporary and will be modified with
the definitive values. Prior to installation the instrument must be
calibrated and the definitive calibration values written on the
adhesive rating plate using a suitable indelible ink pen.
If the instrument has been ordered with a specific calibration, it
is a good rule to check the calibration values marked on the
relevant adhesive label, prior to installation.
The position of the adjustment bush is given in figure 2
Fig. 2 - Electrical connections and regulating screws (one
contact/two contacts instruments)
1) External earth screw
2) Hole for test plug
3) Adjustment rod for set point calibration
4) Adjustment bush access plate
5) Adjustment bush
6) Screws for fixing the adjustment bush access plate
7) Internal earth screws
8) Terminal block for the second microswitch
9) Terminal block for the first microswitch
10) Pre-insulated test prod thimbles
11) Ventilation path
Microswitch electrical circuit: State of the contacts at a tempera-
ture of 0°C
Designation of the contacts:
C - common
NA - Normally open
NC - Normally closed
The effect that the direction of rotation of the adjustment bush has
is described on the ratings.
The bush must be turned by means of the appropriate adjustment
rod which comes with the instrument (fig.2).
5 - SET POINT CALIBRATION
In order to proceed with the calibration and the periodical func-
tional verification of the instrument a suitable calibration circuit
(fig. 3) and an adequate heat source is required.
