Vertical, through the roof installation – DuraVent FasNSeal W2 Double-Wall User Manual
Page 9
9
for procedure. (see JOINt CONNeCtIONS)
Do not drill through or penetrate any part of
the vent system.
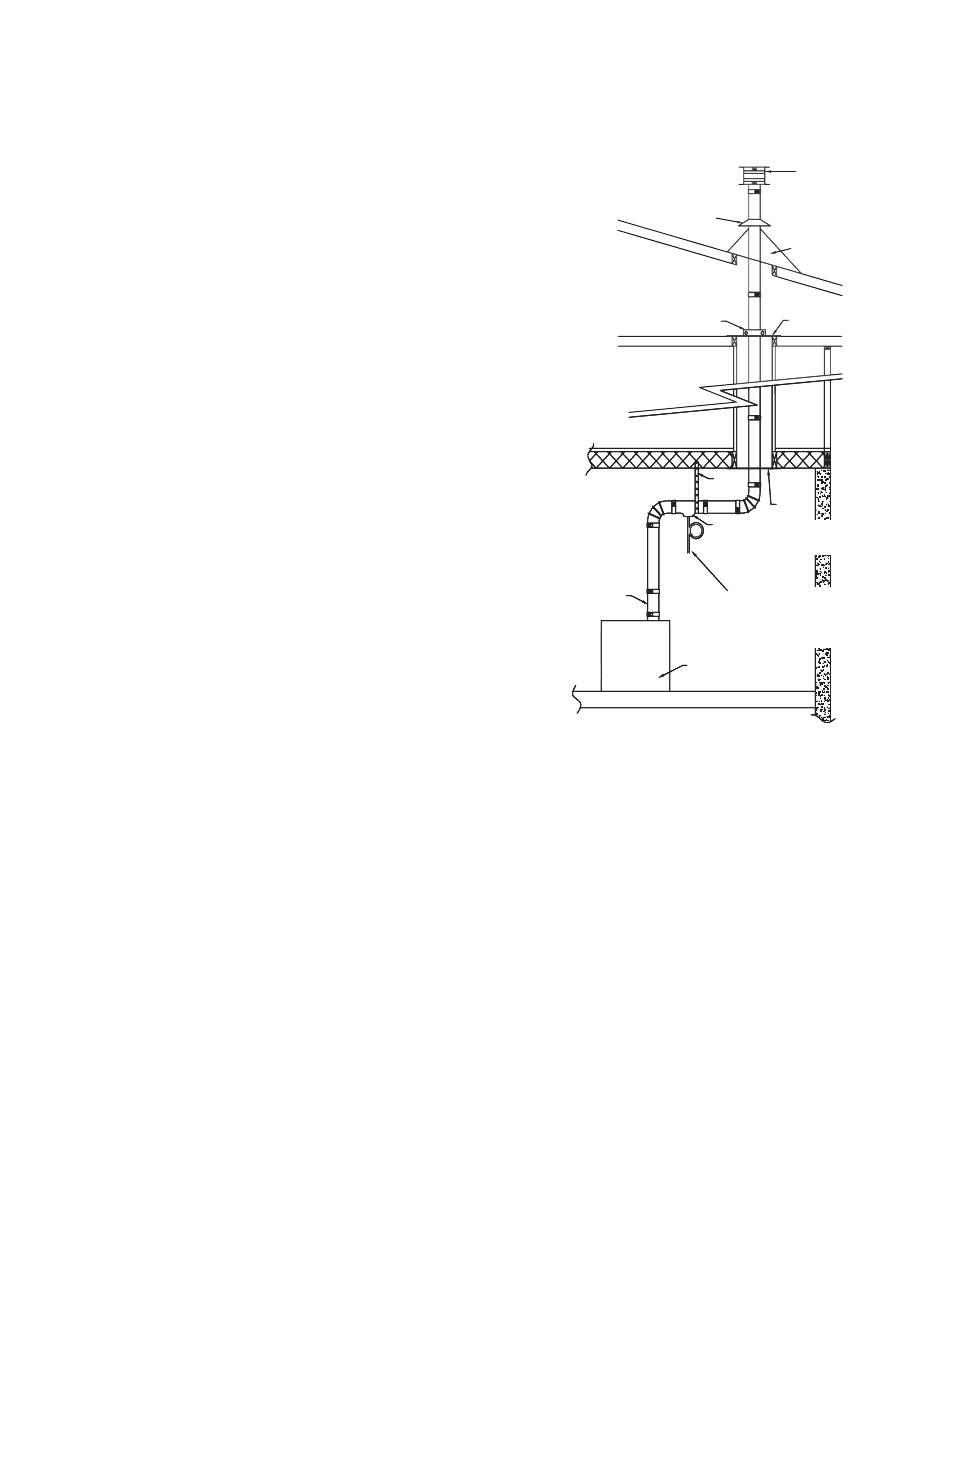
VERTICAL, THROUGH THE ROOF
INSTALLATION
• terminate the system 6’ (1.8m) from the
combustion air intake of any appliance.
• terminate the system at least 3’ (.9m) from
any other building opening, gas utility meter,
service regulator or the like.
• terminate the system at least 2’ (.61m) above
the roofline and any wall or vertical structure
closer than 8’ (2.4m). additional support is
required for systems that extend more than 6’
(1.8m) above the roofline.
enclose residential exterior vent systems
below the roof line or use FasNSeal W2 to limit
condensation and protect against mechanical
failure.
• Install a Wall Bracket after every transition
from horizontal to a vertical run of over 10’
(3.05m), a minimum of every 12’ (3.66m)
of vertical run, and after any offset in the
vertical run. (See Detailed FNS Wall Bracket
Installation).
• Unless FasNSeal W2 is installed in a fire
rated shaft, a fire stop and support is required
when penetrating fire rated floors, walls or
ceilings.
• the total equivalent vent length from
appliance flue collar to the termination shall
not be greater than specified in the appliance
manufacturer’s installation instructions.
• a FasNSeal W2 Rain Cap or any other
provision as required by the appliance
manufacturer must be used to keep rain or
debris out of the vent.
1. Locate the path for the vent system.
2. Cut and frame openings in floors and
ceilings to accommodate Firestops.
Vertical Through the
Roof Installation
3. Cut the opening so the minimum clearance
between the outer sleeve & any combustibles
is maintained.
4. When installing on a pitched roof, place
the Roof Flashing under the roofing material
up slope from the vent and above the roofing
material below the vent. Seal as required.
5. Begin installing FasNSeal W2 from the
appliance upward.
6. Now begin installing FasNSeal W2 from the
appliance upward.
7. Once FasNSeal W2 reaches the roof line,
slide the Storm Collar over the vent length.
apply a bead of silicone sealant where the
Storm Collar rest on the flashing. tighten the
clamp of the Storm Collar to achieve a snug fit.
8. add additional vent lengths as needed.
9. attach Rain Cap or termination Cone to
finish.
rAincAP
AdJuSTABLe
FLASHing
SuPPOrT
cLAmP
FireSTOP
Fire-
STOP
HOrizOnTAL drAin
Tee Or drAin FiT-
Ting w/Tee
TO drAin. diSPOSe OF cOn-
denSATeS AccOrding TO
LOcAL cOdeS
APPLiAnce
STOrm
cOLLAr
APPLiAnce
AdAPTer
HAnger
STrAP