M&G DuraVent DuraTech® 5-8 User Manual
Page 19
19
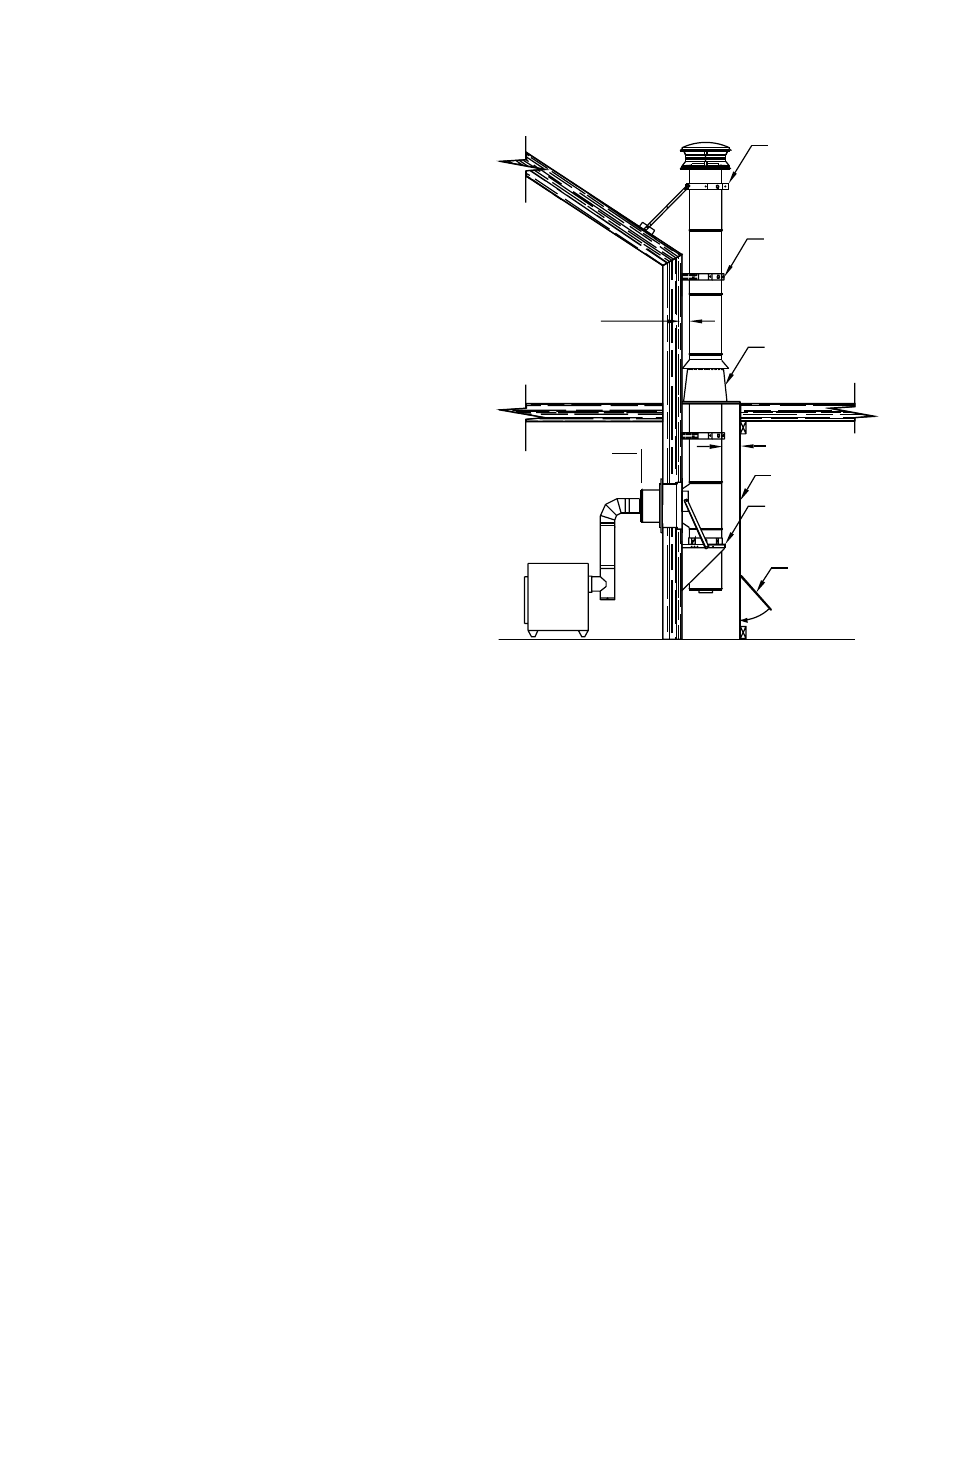
Section: Twist lock the Tee onto a desired
length of Chimney to be used as the cleanout
section. Use only one chimney section (any
length) to attach to bottom of the Tee. Tighten
support band around chimney section at
proper height to insure that Tee is centered
through Wall Thimble (Fig 25 & 26). Use the
1/2” sheet metal screws provided to insure
a tight connection between support band
and chimney section. Connect support band
to support base using the 1/2” sheet metal
screws provided (Fig 26). Twist lock Tee Cap
into bottom of Chimney Cleanout section.
6. Install Branch onto Tee: From inside
the house, attach the Chimney Branch up
to 24” chimney section, depending on wall
thickness, positioned horizontally used to pass
through the wall) to the Tee by twist locking it
clockwise. Important: The Chimney section
used to penetrate through the wall must extend
at least 6” into the room (Fig 25 & 27). Use
high-temperature sealant (500ºF) to seal
between the Wall Thimble and the Chimney on
the outer wall.
7. Install Cover Plate and Finishing Collar:
After the Chimney Branch is secured in place
(penetrating at least 6” into the room), slide
the Cover Plate over the Branch and attach
it to the framing using (4) 1-1/4” long, round
head wood screws. Be sure that the Branch
is centered in the opening of the Cover Plate.
Twist lock the Finishing Collar on to the
female end of the Chimney Branch by twisting
clockwise.
8. Complete Chimney: Attach the Chimney
Sections as in Step 7 in the Ceiling Supported
Installation section. Secure the chimney to
the wall with Wall Straps at a minimum of
8-foot intervals and maintain at least 2 inches
of clearance to combustible materials. The
Wall Straps are adjustable to allow from 2”- 6”
clearance to combustibles. Slip the Wall Straps
around the chimney, tighten the bolts, adjust
the clearance, and fasten the Wall Straps to
the wall with (4) #8, 1-1/2” long wood screws.
Once the chimney is at the minimum height
specified in Figure 1, attach the Chimney Cap
onto the top of the chimney by holding it by
the collar and twist locking it clockwise onto
the Chimney Pipe. If the chimney penetrates
an overhang, frame for at least 2 inches of
clearance, and install Flashing and Storm
Collar as described in Steps 9 & 10 for Ceiling
Supported Installations. Another option is to
cut away the overhang for a 2-inch clearance
(Fig 28). If the chimney extends more than 5
feet above the top Wall Strap or Flashing, use an
Extended Roof Support Bracket.
9. Install Chase Top Flashing: It is
recommended that a Tee Supported Chimney be
enclosed in a chase. If a chase enclosure has
been constructed, you can either use a standard
flat-roof flashing, or you can use a Chase Top
Figure 27
EXTENDED ROOF
SUPPORT BRACKET
ADJUSTABLE WALL
STRAP
ADJUSTABLE
FLASHING
2 INCHES MIN
FRAMED CHASE
ADJUSTABLE TEE
SUPPORT
ACCESS DOOR
FOR CLEANING
2 INCHES MIN
6 INCHES MIN
INTO ROOM