Sf-700cb – Fagor SF-700CB User Manual
Page 12
22
EN
23
EN
3 - PROGRAMMING
(continued)
4 - REGULAR MAINTENANCE
4.3 - C
LEANING THE CONDENSER
The condenser must be cleaned twice a
month.
— Unplug the power cable from the socket before
cleaning the condenser.
Clean it as follows:
— Open the grill at the front of the appliance.
— Release the condenser and remove it carefully
(Fig. 4.3.1).
— Remove any fluff from the condenser. Clean it with
water only under the tap
(Fig. 4.3.2).
— After cleaning, ensure that none of the tubes are
“blocked” and that the fins are clean.
— Rub it superficially.
— Re-insert the condenser and lock it in place. Close
the grill.
When refitting the condenser, ensure that it
is pushed in firmly right to the back of its
housing when locking it in.
3 - PROGRAMMING
P
ROGRAMS
AUTO
— Turn the
Time selector
to the
posi-
tion.
— Choose your laundry by pressing the
Laundry
choice
(Fig. 3.2.1):
S E L E C T
C
A U T O
A
COTTON -
: For loads consisting of household
linen, terry towelling and cotton clothes and under-
clothes.
MIXED -
: For loads consisting of items of
different types (cotton and hard-wearing synthetic
articles) or made from mixed fibres.
DELICATES -
: For laundry that are particularly
temperature-sensitive (e.g. made from acrylic
fibres).
The drying temperature is regulated to suit the type
of textile selected.
— Press the “
Start/Pause” button
to start
your program.
The
drying time indicator lights
switch off one
by one until the end of the drying cycle
(Fig. 3.2.2).
A
LTERING PROGRAMMING OR DRYING DURING
OPERATION
— Press the “Start/
Pause” button
to inter-
rupt drying.
The
drying time and choice of textile indicators
flash
(Fig. 3.2.3).
— Select another program.
— Press the “
Start/Pause” button
to
resume drying.
F
F
B
F
— Press the “
Start/Pause” button
to start
your program.
The
drying time indicator lights
switch off one
by one until the end of the drying cycle
(Fig. 3.2.2).
A
DDING OR REMOVING AN ITEM DURING DRYING
— Press the “Start/
Pause” button
to inter-
rupt drying or open the door.
The
drying time and the choice of textile indicators
flash
(Fig. 3.2.3).
— Insert or remove the item or items and close the
door.
— Press the “
Start/Pause” button
to
resume drying
.
C
OOLING CYCLE
All programs finish with a cooling cycle that lasts for
a few minutes to allow the washing to cool gra-
dually.
Do not stop your dryer before this cycle has
finished.
F
F
B
F
A
NTI
-
CREASING OPTION
The
“Anti-creasing” option fluffs the textiles every 10
minutes for up to 24 hours, until the door is opened
or the machine is turned off. It begins as soon as the
drying finishes and prevents the clothes from sett-
ling in the machine.
— To select this function, press the
“Anti-creasing”
button
(Fig. 3.2.6).
T
ANK
F
ULL WARNING DURING CYCLE
If the tank is full before the end of the drying cycle,
the machine shuts off.
The
“Tank Full” light
, the
drying time and the
choice of textile indicators will start to flash (Fig.
3.2.7).
— Proceed to empty your
condensate container.
— Press the “
Start/Pause” button
to restart
your program.
C
LEAN CONDENSER WARNING
The
“Condenser warning” light
will flash from-
time to time to remind you that you should clean the
condenser
(Fig. 3.2.8).
Do not forget to do this as soon as possible,
since the warning will disappear when the
next program starts.
F
D
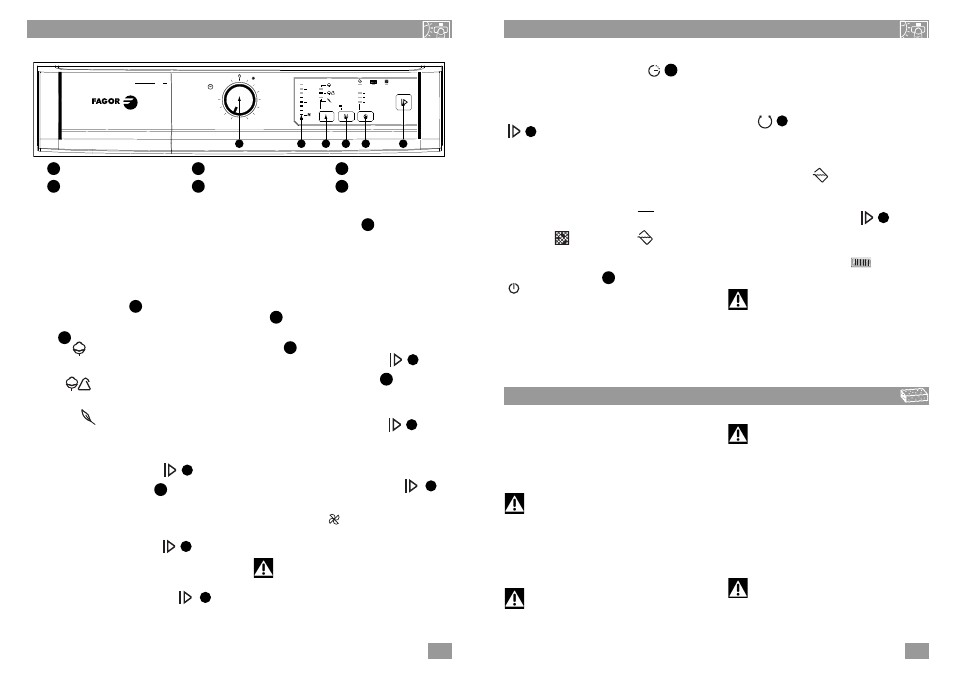
3.1 - T
HE CONTROL PANEL
3.2 - P
ROGRAMMING A DRYING CYCLE
Your dryer is equipped with a sensor which automatically detects the moment when your laundry is dry.
— You access the
automatic dryness detection programs by turning the Time selector
to
.
— If you wish to adjust the time for the cycle yourself (so that laundry is slightly damp for immediate ironing, for
example, or for extra drying or to dry just a few pieces of laundry) use
timed programs with set drying times.
S
TARTING THE APPLIANCE
— Check that the power cable is plugged in, and if the door is properly closed.
A U T O
A
A
C
D
E
F
B
S E LE CT
9h
6h
3h
2h
STOP
1h
10
180
min
140
160
120
100
80
60
50
40
20
30
A U T O
Condensing
kg
7
SF-700CB
C la s s
B
Time selector
Drying time indicators
B
A
Laundry choice
Anti-creasing
D
C
Delayed start
Start/Pause
F
E
T
IMER DRYING PROGRAMS
— Select the drying time by turning the
Time selec-
tor
to the desired drying time The indicators
light up according to the time selected.
— Choose your laundry by pressing the
Laundry
choice
.
S E L E C T
C
A
D
ELAYING A PROGRAM
’
S START
(Fig. 3.2.4)
— You can delay the start time by 3, 6 or 9 hrs by
pressing the
"Delayed start" button
seve-
ral times.
The corresponding “3h, 6h or 9hr” light will flash.
Pressing once more will cancel the
"Deferred start"
function.
— Confirm by pressing the “
Start/Pause” button
. The deferred start indicator is set.
During the
delayed start phase, the indicator
changes from 9:00 to 6:00 or from 6:00 to 3:00.
Once the
Delayed Start time delay has expired, the
program actually starts.
S
TOPPING THE APPLIANCE
When the drying cycle is finished,
only the “STOP”
light comes on to show that the cycle is finished
(Fig. 3.2.5).
The
“Filter”
and
“Tank full”
lights flash
alternately to remind you that you must clean the fil-
ter and empty the water collection tank after every
drying cycle.
— Turn the
Time selector
to the
“Stop” position
.
— Empty your dryer.
— Clean the
filter and empty the condensate contai-
ner (for how to do this, see the “REGULAR MAIN-
TENANCE” section).
A
F
E
N
OTE
:
— The
"Anti-creasing" option remains selected from one program to the next. Just press the button once to des-
elect the option.
4.1 - C
LEANING THE FILTER
This is located in the lower part of your dryer.
Clean it as follows:
— Remove it from its housing by pulling it upwards
(Fig. 4.1.1).
— Open the filter and clean it by removing the thin
coating of fluff covering it
(Fig. 4.1.2).
— Re-insert it in its housing, pushing it well in.
Do not wash filter with water (Fig. 4.1.3). The
filter must be cleaned after every drying.
4.2 - E
MPTYING THE CONDENSATE CONTAINER
This is located at the top or bottom of your
appliance (according to model), and it recovers the
water extracted from your items during drying.
— To empty it, release it from its housing by pulling
it towards you
(Fig. 4.2.1).
The condensate container must be emptied
after each drying cycle (Fig. 4.2.2).
— Empty the condensate container if there is a risk
of frost, or if you wish to move or tilt your
appliance.