Bennett bath vanity, Installing side mounted towel bar, Installing decorative extension – Decolav 1720 User Manual
Page 2: Changing the front mounted towel bar, Setting up your new vanity, Assembly instructions
Please contact 1-866-332-6528 for further assistance
DecolaV.com
© Deco laV, inc. 2014
2
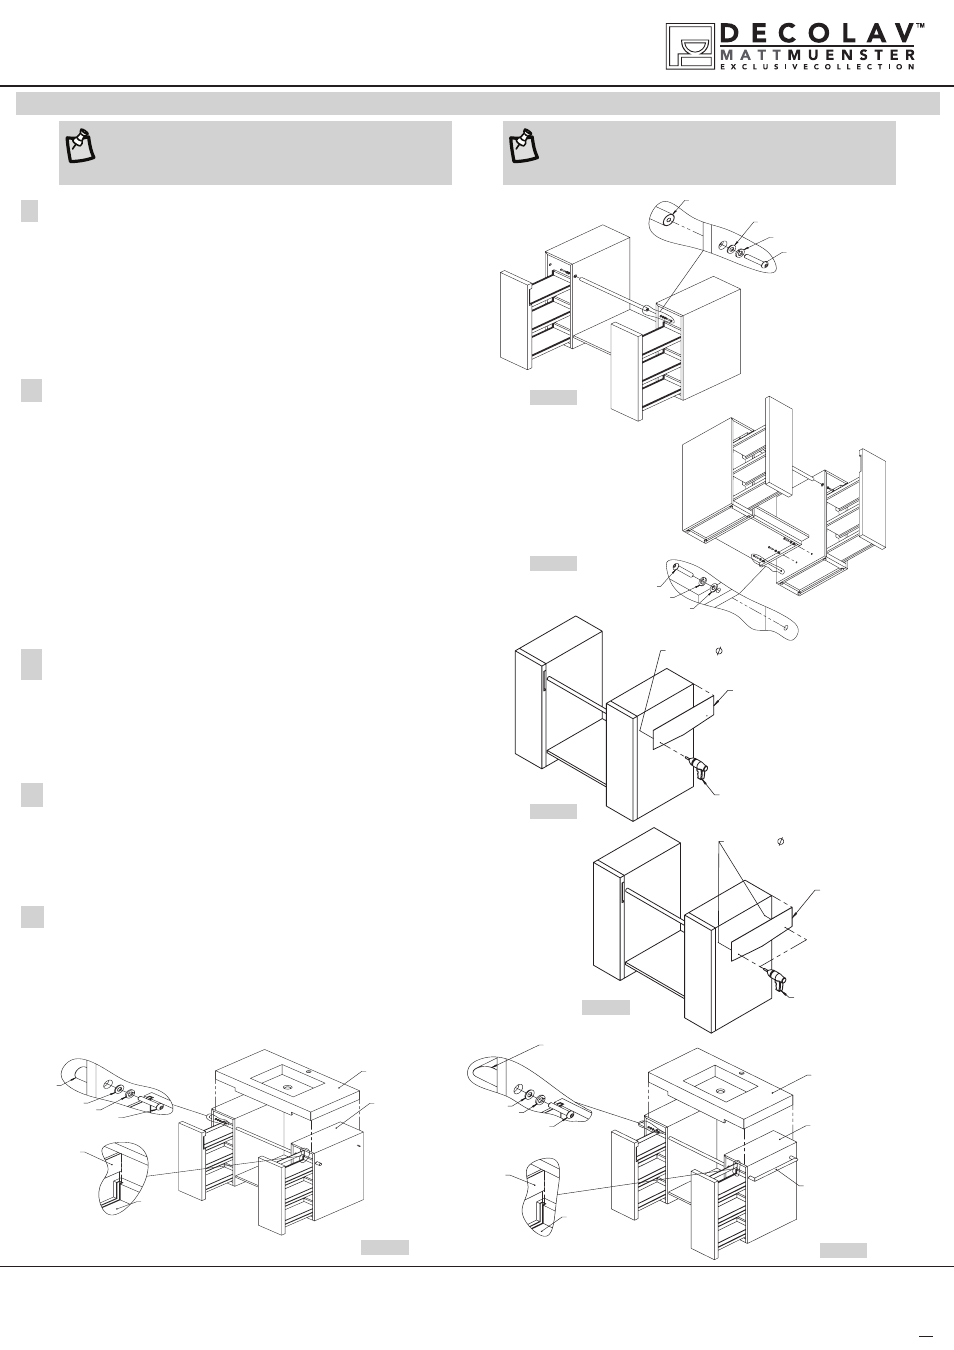
assembly instructions
• Quartz countertop with integrated lavatory is sold separately
• Place the Quartz countertop with integrated lavatory on top of the vanity cabinet. adjustments
may be necessary to align correctly. see figures 5 and 6
• insert the Glass Walls into the slots in the drawers. see figure 6
installing quartz countertoP with integrated
lavatory
5
• side mounted towel Bar is sold separately
• measure and mark the location of the side mounted towel Bar by using the
cut-out template supplied. see figure 3
• carefully drill two holes, using a 3/8” drill bit, through the vanity cabinet wood
installing side mounted towel bar
4
• measure and mark the location of the Decorative extension by using the
cut-out template supplied. see figure 2
• carefully drill two holes, using a 3/8” drill bit, through the vanity
cabinet wood. (Before drilling use commercial painters tape to help
prevent wood and finish from splitting)
installing decorative extension
3
• slide the drawer out until fully extended. see figure 1
• While holding the front mounted towel Bar, loosen the machine screw inside
both drawers
• carefully remove and set aside the machine screws, flat Washers and lock
Washers. You will use them again
• align the front mounted towel Bar with the holes inside the vanity bottom
shelf. insert the machine screw, flat Washer and lock Washer through the
hole inside the vanity bottom shelf. re-tighten the machine screw on the
front mounted towel Bar
• repeat step to secure the opposite side of the front mounted towel Bar
changing the front mounted towel bar
2
• carefully remove your new vanity from carton and place safely aside
• turn off water supply to faucet
• remove existing vanity
• Determine the location in the bathroom the vanity will be installed
• measure the vanity width and height and mark outline on wall
• move the vanity into place and level with the adjustable glides on bottom feet
• locate and mark wall studs
setting uP your new vanity
1
Lock Washer
Flat Washer
Machine Screw
Front Towel Bar
Side Towel Bar Hole
Position Template
Drill
Drilled Hole
10mm
Apply Silicone Here
Lavatory
(Sold separately)
Apply Silicone Here
Machine Washer
Side Mounted Towel Bar
(Sold separately)
Drilled Hole 10mm
Decorative Extension Hole
Position Template
Drill
Machine Washer
Lock Washer
Lock Washer
Flat Washer
Flat Washer
Lavatory
(Sold separately)
Side Mounted Towel Bar
(Sold separately)
Decorative Extension
(Included)
Decorative Extension
(Included)
Apply Silicone Here
Lavatory
(Not Provided
Purchased Separately)
D
E
F
C
I
Drawer
Apply Silicone Here
Side Mounted Towel Bar
(Not Provided
Purchased Separately)
Lavatory
(Not Provided
Purchased Separately)
D
E
F
Side Mounted Towel Bar
(Not Provided
Purchased Separately)
I
Drawer
bennett bath vanity
item #1720-GaW / 1720-raW / 1720-WeG
figure 1
figure 3
figure 4
figure 5
figure 6
Machine Screw
Lock Washer
Flat Washer
figure 2
note: use Decolav drain item #9290-cP/sn/Pn/DB,
9296-cP/sn/Pn/DB or #9298-cP/sn/Pn/DB.
Decolav cannot guarantee leakage wih other manufacturer drains.
note: use Decolav decorative bottle trap item #9102-cP/sn/
Pn/DB to complete the look.
(
Please note both a polished and brushed towel bar are included for your
convenience)