Enter, Setting language and clock, Set top box settings – Sony RDR-GX257 User Manual
Page 2: Test the set top box controller, Record a tv program, Record a tv program using timer, Insert a dvd disc, Playback the recorded dvd disc
SONY RDR-GX257 QSG US 4-111-178-
11(1)
11
22
33
44
55
66
77
88
00
99
MARKER
DISPLAY
NEXT
PLAY
PAUSE
REC REC STOP
VOL
CH
TV
CHAPTER
MARK
REC MODE
ADVANCE
RETURN
PREV
STOP
SEARCH
REPLAY
PLAY
MODE
ANGLE
SUBTITLE
INPUT
MENU
CH
OPEN/
CLOSE
INPUT
ZOOM
CLEAR
SYSTEM
MENU
TITLE
LIST
TOP MENU
TIMER
ENTER
THUMBNAIL
AUDIO
Setting language
and clock
1
Turn on the recorder and the connected
cable box/satellite receiver.
2
Turn on your TV and switch the input
selector on your TV so that the signal
from the recorder appears on your TV
screen.
3
Select a language for the on-screen
displays, and press ENTER.
Select the language.
Exit
Select
Next
English
LANGUAGE
4
Set the month, date, year, and time using
/// or the number buttons and
press ENTER to start the clock.
Date
Year
Time
Prev.
Next
Move
00
19
:
2008
12
10
/
Clock Setting
PM
5
Press ENTER to close the display.
Initial Setup is Completed.
Prev.
Select
Exit
Finish
When using the supplied set top box controller, make
necessary settings and check that the controller
works correctly (
See right ).
1
1
2
2
3
3
4
4
5
5
6
6
7
7
8
8
0
0
9
9
ENTER
RETURN
/ (on/standby)
SYSTEM MENU
///ENTER
Press ENTER to
make a selection
Number buttons
Label side facing up
Test the set top box
controller
1
Select [Test] and press ENTER.
2
Check the overall connection and press
ENTER.
Select
Set-Top Box Edit
A
OK
Please check
IR cable connection
for device control.
Device Type
Brand
Number of Digits
ENTER Key
Key Speed
Test
Prev.
3
Turn on the cable box/satellite receiver (if
turned off), and press ENTER.
Select
Set-Top Box Edit
A
OK
Make sure that your
device is powered on.
Device Type
Brand
Number of Digits
ENTER Key
Key Speed
Test
Prev.
4
Select a code for the recorder's remote
and press ENTER.
Select
Set-Top Box Edit
A
1
2 3 4 5 6 7
IR Code 17
Connected device has
multiple IR codes for
remote control.
Please select one.
Device Type
Brand
Number of Digits
ENTER Key
Key Speed
Test
Move
Prev.
5
Press
/// to enter a channel (any
channel), select [OK], and press ENTER.
Select
Set-Top Box Edit
A
1
0
OK
Ch.
Cable Box
ABC
IR Code 17
2 Digit Type
Select Ch.
Device Type
Brand
Number of Digits
ENTER Key
Key Speed
Test
Move
Prev.
6
Check if the same channel is selected on
the cable box/satellite receiver.
Prev.
Select
Set-Top Box Edit
A
Yes
No
IR Code 17
Connected device's
channel will be changed
automatically.
Was the channel changed?
Device Type
Brand
Number of Digits
ENTER Key
Key Speed
Test
Move
If the same channel is not selected, return to step 4
by pressing
RETURN repeatedly and try one of
the other code(s) until you find the one that works.
7
Select [Yes] and press ENTER.
8
Press ENTER to close the display.
Select
Set-Top Box Edit
A
Exit
Congratulations!
Connected device control
test is complete.
Device Type
Brand
Number of Digits
ENTER Key
Key Speed
Test
Prev.
7
Select from the following options and
press ENTER.
[Device Type]: Selects the type of cable
box/satellite receiver.
Exit
Select
Move
Set-Top Box Edit
Device Type
Brand
Number of Digits
ENTER Key
Key Speed
Test
Cable Box
Satellite Box
Digital Video Recorder
Other Set-Top Boxes
A
[Brand]: Press
/ to select the initial
of the brand name , press ENTER, and
then press
/ to select the brand.
Exit
Select
Move
Set-Top Box Edit
ABC
Adelphia
Allegro
Americast
Antronix
Archer
Device Type
Brand
Number of Digits
ENTER Key
Key Speed
Test
A
[Number of Digits]: Selects the number
of digits for your cable box/satellite
receiver's channel.
Exit
Select
Move
Set-Top Box Edit
Device Type
Brand
Number of Digits
ENTER Key
Key Speed
Test
2 Digit Type
3 Digit Type
4 Digit Type
A
Example: Ch.12
[ENTER key]: Selects whether you need
to press the ENTER button each time
after entering the channel number.
Exit
Select
Move
Set-Top Box Edit
Off
On
A
If your device needs
ENTER key to change
channels. please select ON.
ON. use ENTER key
OFF. do not use ENTER key
Device Type
Brand
Number of Digits
ENTER Key
Key Speed
Test
[Key Speed]: Selects the speed to send
commands to the cable box/satellite
receiver.
Exit
Select
Move
Set-Top Box Edit
Slow
Normal
Fast
A
Device Type
Brand
Number of Digits
ENTER Key
Key Speed
Test
After making changes, check if the cable box/satellite
receiver control works correctly (
See right ).
Set top box
settings
1
Press SYSTEM MENU.
2
Select [Setup] and press ENTER.
SystemMenu
Timer Record
Setup
Media
Photo
Music
Video(Title)
3
Select [Video] and press
.
Disc Record Mode
DV Input
Auto Chapter
Set-Top Box Control
Set-Top Box Edit
Exit
4
Select [Set-Top Box Control] and press
.
5
Select [On] and press ENTER.
Disc Record Mode
On
DV Input
Auto Chapter
Set-Top Box Control
Set-Top Box Edit
Off
Exit
Select
Prev.
6
On the [Current Setting] display, select
[Edit] and press ENTER.
Current Setting
Device Type
: Cable Box
Brand
: ABC
Description
: IR Code 17
Number of Digits
: 2 Digit Type
ENTER Key
: Off
Key Speed
: Normal
Exit
Set-Top Box Control
Edit
Be sure to make the following settings beforehand as they are
necessary for general TV viewing and timer setting.
hint
You can use "Setup" options (audio, video, etc.) to better adjust your viewing
environment. Refer to "Settings and Adjustments" in the Operating Instructions.
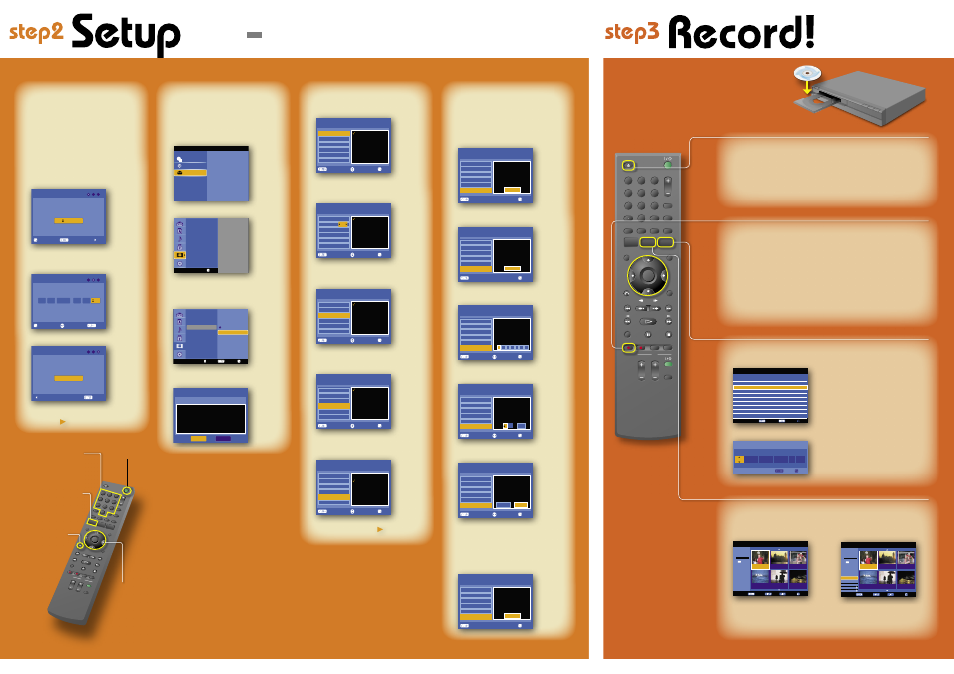
Record a TV Program
1
Press INPUT to select input
source until “L1” appears in the
front panel display.
2
Select a channel on the
connected cable box or satellite
receiver.
3
Press REC MODE repeatedly to
select the recording mode.
HQ, SP, LP, EP, or ULP
HQ offers the best quality picture, but with
the shortest recording time. Recording time
increases with each successive mode, but
the picture quality gradually deteriorates.
4
Press
REC.
The recorder starts recording. To stop
recording, press
REC STOP.
Record a TV Program using Timer
1
Press TIMER.
Exit
Edit
Erase
Timer List
Date
Start
NEW
Length Mode
Check
1/2
Set-Top
Channel
Imput
SP
OFF Rec.OK
30min
7:20 PM
10/12 Sun
L1
2
Select [NEW] and press ENTER.
Date
Start
Stop
Mode
Set-Top
Channel
Imput
Exit
OK
SP
OFF
7:50 PM
7:20 PM
10/12 Sun
L1
Timer Record
100 min Remain
3
Press
/// to set input
source, date, start/stop time, and
channel.
If you do not use the set top box controller,
press CLEAR to select [OFF] in [Set-Top
Channel]. Be sure to select the channel on
the connected cable box/satellite receiver.
4
Press ENTER.
5
Press RETURN to turn off the
Timer List.
Leave the cable box/satellite receiver turned
on.
Insert a DVD Disc
1
Press
OPEN/CLOSE and place
a recordable DVD on the disc
tray.
2
Press
OPEN/CLOSE again to
close the disc tray.
Wait until “REAd” disappears from the front
panel display.
Refer to “Recordable and Playable Discs” in
the Operating Instructions for details about
recordable discs.
Playback the Recorded DVD Disc
1
Press TITLE LIST.
The Title List menu appears.
Select
Playlist
Exit
Info.
Original
Title 1
1/7
12/07
0:45:00
Title 2
12/09
1:00:00
Title 3
12/10
0:15:00
Title 4
12/13
0:10:00
Title 5
12/16
0:10:00
Title 6
12/19
0:25:00
Title List
DVD-VR
2hour 45min
Remain
2
Press
/ to select the title you
want to play and press ENTER.
The sub-menu appears.
Select
Playlist
Exit
Info.
Original
Title 1
1/7
12/07
0:45:00
Title 2
12/09
1:00:00
Title 3
12/10
0:15:00
Title 4
12/13
0:10:00
Title 5
12/16
0:10:00
Title 6
12/19
0:25:00
Play
Search
Erase
Edit
Play List
DVD-VR
2hour 45min
Remain
Title List
3
Press
/ to select [Play] and
press ENTER.
Playback starts from the beginning of the
title.