English operations, Other useful functions, Español operaciones – Sony ZS-S3iPBLACK User Manual
Page 2: Ipod/iphone, Radio, Otras funciones útiles
English
Operations
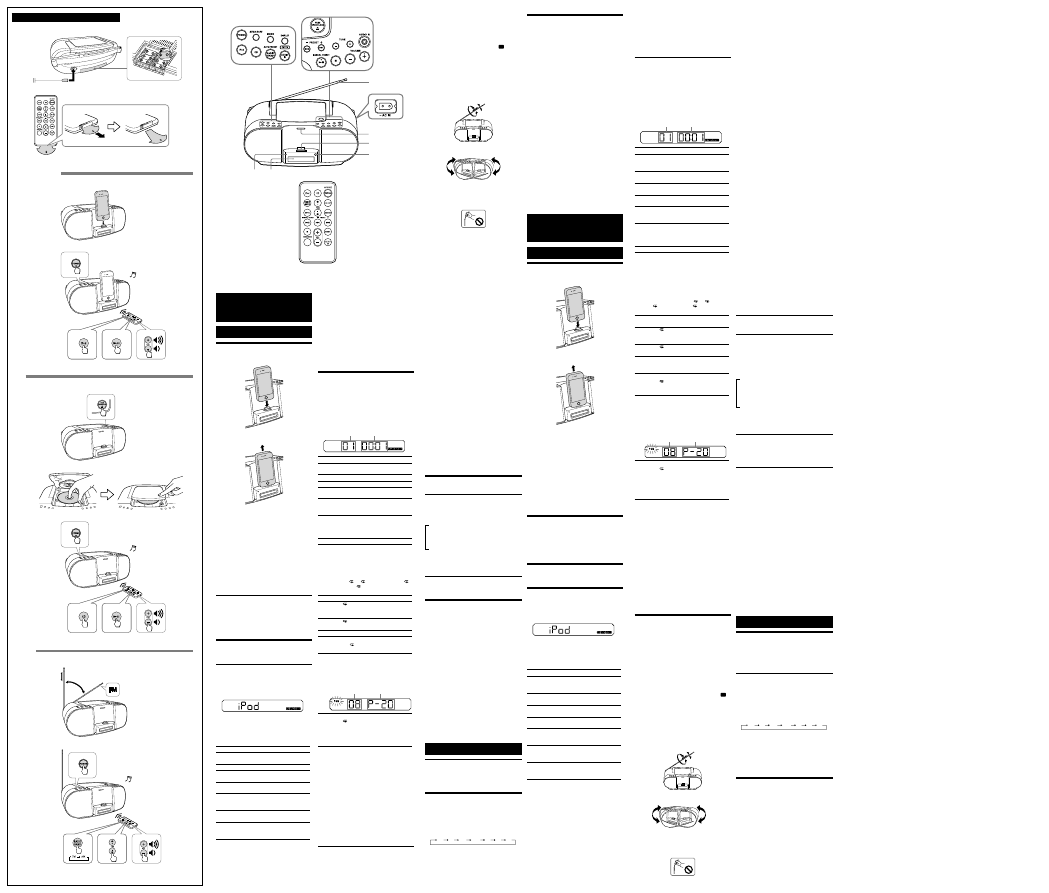
How to handle an iPod
To set an iPod
To remove an iPod
Notes
An iPod in a case or cover can be set in this unit.
However, if the case or cover interferes with the
connection, remove the case or cover before setting the
iPod on the Dock Connector.
When placing or removing the iPod, hold it at the same
angle as the Dock Connector on the unit. Do not pull the
iPod forward too far.
When placing or removing the iPod, hold the unit
securely.
Do not twist or bend the iPod, as this may result in
connector damage.
Remove the iPod when transporting it; otherwise, a
malfunction may result.
If the iPod does not reach the supporter on the front of
the unit, attach the supplied cushion below the supporter.
To turn the unit on/off
Press POWER.
The OPR/BATT indicator lights up when the unit is turned
on.
Tip
There is no backlight for the display.
Adjusting the volume
Press VOLUME +/− (VOL +/− on the remote).
Operating an iPod
1
Set an iPod on the Dock Connector.
For details, see “How to handle an iPod.”
2
Press POWER and then press iPod.
“iPod” appears in the display.
3
Press .
The iPod begins to play back.
If the iPod does not start playing back, operate directly
on the iPod.
You can operate the connected iPod by the unit or the
buttons on the iPod.
To
Press
Pause playback
To resume play, press it again.
Stop playback
Go to the next
track
Go back to the
previous track
*
Locate a point
while listening to
the sound
(forward) or (backward)
while playing and hold it until you
find the desired point.
Select a menu
(remote only)
Press MENU, and or to select a
menu, then press ENTER.
Go back to the
previous menu
(remote only)
Press MENU.
* During playback, this operation returns to the beginning of the
current track. To go back to the previous track, press twice.
Notes
If a pop-up message appears on the display of the iPod
touch or iPhone, see “About App.”
Some operations may differ or may not be available
between different models of iPod.
If the battery of the iPod is extremely low, charge it for a
while before operation.
Sony cannot accept responsibility in the event that data
recorded to an iPod is lost or damaged when using the
iPod connected to this unit.
For details of environmental conditions for operating the
iPod, check the website of Apple Inc.
To remove the iPod
For details, see “How to handle an iPod.”
To charge an iPod (AC only)
You can use the unit as a battery charger for an iPod when
the power is supplied by the AC power source.
Charging begins when the iPod is connected to the unit.
The charging status appears in the display on the iPod. For
details, see the user’s guide of the iPod.
Playing a CD
1
Press PUSH OPEN/CLOSE and place a disc with
the label side up in the CD compartment.
To close the CD compartment, press PUSH OPEN/
CLOSE.
2
Press POWER.
3
Press CD.
4
Press .
The unit plays all the tracks once.
Track number Playing time
To
Press
Pause playback
To resume play, press it again.
Stop playback
Go to the next track
Go back to the
previous track
*
Locate a point while
listening to the
sound
(forward) or (backward)
while playing and hold it until you
find the desired point.
Locate a point while
observing the
display
(forward) or (backward)
while paused and hold it until you
find the desired point then
press .
Remove the CD
PUSH OPEN/CLOSE
* During playback, this operation returns to the beginning of the
current track. To go back to the previous track, press twice.
Note
A music CD format other than CD-DA, (such as MP3/
WMA files), cannot be played by this unit.
To select a CD play mode
Press MODE until “ 1,” “ ,” “SHUF,” “SHUF” and “ ,”
“PGM,” or “PGM” and “ ” appear in the display. Then
proceed as follows:
To Select
Select
Then do this
Repeat a
single track
“ 1”
Press or to select
the track that you want to
repeat, then press .
Repeat all
tracks
“ ”
Press .
Shuffle play “SHUF”
Press .
Repeat tracks
in random
order
“SHUF”
and “ ”
Press .
Program
play
“PGM”
Press or then press
DISPLAY/ENTER (ENTER on
the remote) for the tracks (up
to 20) you want to program in
the order you want. Then
press .
Programed track Playing order
Repeat
programed
tracks
“PGM” and
“ ”
Press or then press
DISPLAY/ENTER (ENTER on
the remote) for the tracks (up
to 20) you want to program in
the order you want. Then
press .
To cancel the selected play mode
Press MODE repeatedly until the selected mode disappears
from the display.
To check the programed track and playing order
in the display
To check the order of tracks before playing, press DISPLAY/
ENTER (ENTER on the remote).
Every time you press the button, the track number appears
in the programed order.
To change the current program
Press once if the CD is stopped and twice if the CD is
playing. The current program will be erased. Then create a
new program following the programing procedure.
Notes
If you try to program 21 tracks or more, “FULL” will
appear in the display.
You can play the same program again, since the program
is saved until you open the CD compartment.
Listening to the radio
1
Press POWER.
2
Press RADIO BAND repeatedly.
Each time you press the button, the radio band
toggles between AM and FM.
3
Hold down TUNE + or – until the frequency digits
begin to change in the display.
The unit automatically scans the radio frequencies and
stops when it finds a clear station.
If you cannot tune in a station, press TUNE + or –
repeatedly to change the frequency step by step.
When an FM stereo broadcast is received, appears.
Notes
If you touch or operate an iPod connected to this unit
while listening to AM/FM, noise may occur. Avoid
touching or operating the iPod in this case.
If you are listening to the radio with an iPhone connected
to the unit, interference with radio reception may occur.
Remove the iPhone in this case.
To improve the reception
Extend the antenna to its full length and reorient it for
best FM reception.
Reorient the unit itself to improve AM reception.
Note
Adjust the direction of the antenna by holding the bottom
of it. The antenna can be damaged if you move the
antenna with excessive force.
To set monaural sound if stereo
reception is poor
The unit automatically switches between stereo and
monaural output, depending on reception conditions.
However, if stereo reception is unstable, you can manually
set for monaural output to improve the sound.
Press MODE to show “MONO” in the display. (To resume
stereo reception, press MODE again to show “ST” in the
display.)
To preset radio stations
You can store radio stations into the unit’s memory. You can
preset up to 30 radio stations, 20 for FM and 10 for AM in
any order.
1
Press POWER.
2
Press RADIO BAND to select the band.
3
Hold down AUTO PRESET/RADIO BAND
(RADIO BAND on the remote) for 2 seconds until
“AUTO” flashes in the display.
4
Press DISPLAY/ENTER (ENTER on the remote).
The stations are stored in memory from the lower
frequencies to the higher ones.
If a station cannot be preset automatically
You need to preset a station with a weak signal manually.
1
Press POWER.
2
Press RADIO BAND to select the band.
3
Tune in a station you want using TUNE + or –.
4
Press MANUAL PRESET to enter manual preset
mode.
5
Press PRESET + or – until the preset number you
want for the station flashes in the display.
6
Press DISPLAY/ENTER (ENTER on the remote).
The new station replaces the old one.
Tips
The preset radio stations remain in memory even if you
unplug the AC power cord or remove the batteries.
To cancel the preset number setting, press MANUAL
PRESET instead of ENTER in step 6.
To play preset radio stations
1
Press POWER.
2
Press RADIO BAND to select the band.
3
Press PRESET + or – to tune in the stored station.
Using the display
CD mode
To check the total track number and playing time
In stop mode, press DISPLAY/ENTER on the unit.
To check the remaining time
In play/pause mode, press DISPLAY/ENTER on the unit
repeatedly. The display changes as follows:
The current track number and playing time
The current track number and the remaining
time of the current track*
The number of tracks left and remaining
time on the CD
* For tracks numbered over 20, the remaining time appears as
“- -:- -” in the display.
Radio mode
To display the frequency or a preset station number
Each time you press DISPLAY/ENTER on the unit, the display
changes to the frequency or a preset station number.
Connecting optional
components
You can enjoy the sound from an optional component, such
as a portable digital music player, through the speakers of
this unit. Be sure to turn off the power of each component
before making any connections. For details, refer to the
instruction manual of the component to be connected.
1
Connect the AUDIO IN jack to the line output
jack of the portable digital music player or other
component using an audio connecting cable (not
supplied).
2
Press POWER to turn the unit on.
3
Turn the connected component on.
4
Press AUDIO IN and start playback on the
connected component.
“AUDIO IN” appears in the display, and the sound from
the connected component is output from the speakers of
this unit.
Notes
The necessary type of audio connecting cable depends on
the optional component. Be sure to use the correct type of
cable.
If the volume level is low, adjust the volume of the unit
first. If the volume is still too low, adjust the volume of the
connected component.
Other useful functions
Reinforcing the bass sound
Press MEGA BASS.
“MEGA BASS” appears in the display.
To return to normal sound, press the button again.
Falling asleep to music
This function is only available by using the remote.
1
Play the music source you want.
2
Press SLEEP repeatedly to set the sleep timer
duration.
Each time you press the button, the indication changes as
follows:
60
90 120
OFF
10 20 30
The minute number blinks. Then the unit goes back to the
previous display.
The sleep timer is set and the unit goes off after the duration
you set.
To cancel the sleep function
Press POWER to turn off the power, or press SLEEP on the
remote repeatedly to set the sleep timer to “OFF” in step 2.
About App
A dedicated Dock App for iPod touch/iPhone available at
Apple App Store.
Search for “D-Sappli” and download the free App to find
out more about the functions.
Features
D-Sappli includes various timer functions: Alarm, Music
Play Timer and Sleep Timer.
You can set up to 10 alarms, using songs in iPod or Preset
Sound in D-Sappli for the alarm sound.
Music Play Timer allows you to play/pause desired music
at a desired time. Sleep Timer allows you to specify a time
at which to stop music playback. Alarm, Music Play
Timer and Sleep Timer work in combination with the
power supply of the unit.
Alarm, Music Play Timer and Sleep Timer are available
only when D-Sappli is activated.
D-Sappli can display a list of Radio Preset Stations
programmed in this unit.
You can rename the Radio Preset Stations, and change
their preset numbers on the D-Sappli. Preset numbers
and order will also be changed accordingly in the unit.
D-Sappli also includes a clock display enlarge feature.
Notes
If the App to link with this unit is not downloaded to the
iPod touch/iPhone, a pop-up message prompting you to
download D-Sappli may appear repeatedly.
Deactivate the App’s link function to stop the pop-up
message.
To deactivate the App’s link function: Connect the AC
power source, and then press POWER to turn off the unit.
Remove the iPod touch/iPhone from the Dock Connector.
While holding down , also press and hold POWER on
the unit for at least 2 seconds. (“OFF” appears in the
display to show that the App’s link function has been
deactivated.)
To re-activate the App’s link function, repeat the above
steps. (“ON” appears in the display to show that the App’s
link function has been activated.)
Español
Operaciones
Cómo manejar un iPod
Para colocar un iPod
Para extraer un iPod
Notas
En esta unidad, se puede colocar el iPod con su estuche o
funda. Sin embargo, si el estuche o funda interfieren con
la conexión, retírela antes de colocar el iPod en el
conector de la bandeja.
Al colocar o extraer el iPod, sosténgalo en el mismo
ángulo que el conector de la bandeja de la unidad. No jale
mucho el iPod hacia adelante.
Al colocar o extraer el iPod, sujete la unidad con firmeza.
No gire ni incline el iPod ya que se podría dañar el
conector.
Extraiga el iPod al transportarlo; de otra manera se
podrían causar daños.
Si el iPod no llega al soporte ubicado en el frente de la
unidad, conecte la almohadilla suministrada que está
debajo del soporte.
Para encender/apagar la
unidad
Presione POWER.
El indicador OPR/BATT se ilumina al encender la unidad.
Consejo
No hay luz de fondo de pantalla.
Ajuste del volumen
Presione VOLUME +/− (VOL +/− en el control remoto).
Reproducción de un iPod
1
Coloque un iPod en el conector de la bandeja.
Para obtener detalles, consulte “Cómo manejar un iPod”.
2
Presione POWER y luego presione iPod.
Aparece “iPod” en la pantalla.
3
Presione .
Comienza la reproducción del iPod.
Si el iPod no comienza la reproducción, opere
directamente desde el iPod.
Puede utilizar el iPod conectado mediante la unidad o
los botones del iPod.
Para
Presione
Poner en pausa la
reproducción
Para reanudar la reproducción,
presiónela otra vez.
Detener la
reproducción
Ir a la siguiente
pista
Volver a la pista
anterior
*
Localizar un
punto mientras
escucha sonido
(avanzar) o (retroceder)
durante la reproducción y retener
hasta encontrar el punto deseado.
Seleccione un
menú (sólo
control remoto)
Presione MENU, y o para
seleccionar un menú, y luego
presione ENTER.
Vuelva al menú
anterior (sólo
control remoto)
Presione MENU.
* Durante la reproducción, esta operación vuelve al principio de la
pista actual. Para volver a la pista anterior, presione dos veces.
Notas
Si aparece un mensaje emergente en la pantalla del iPod
touch o iPhone, consulte “Acerca de App”.
Algunas operaciones pueden no coincidir o no estar
disponibles según el modelo de iPod.
Si la batería del iPod está casi agotada, cárguela antes de
utilizarlo.
Sony declina toda responsabilidad en el caso de la pérdida
o corrupción de datos grabados en el iPod al utilizarlo
conectado a esta unidad.
Para obtener información detallada sobre las condiciones
ambientales para utilizar el iPod, visite el sitio web de
Apple Inc.
Para extraer el iPod
Para obtener detalles, consulte “Cómo manejar un iPod”.
Startup Guide/Guía de inicio rápido
VOLUME + (VOL + on the remote) and
buttons have a tactile dot.
Los botones VOLUME + (VOL + en el control remoto) y
tienen un
punto táctil.
Display
Supporter
Dock Connector
Remote sensor
OPR/BATT indicator
Antenna
iPod/iPhone
CD
Radio
Pantalla
Soporte
Conector de la bandeja
Sensor remoto
Indicador
OPR/BATT
Antena
Para cargar un iPod (sólo CA)
Puede utilizar la unidad como un cargador de batería del
iPod cuando la fuente de alimentación de CA suministre la
energía.
La carga comienza cuando el iPod se conecta a la unidad. El
estado de carga aparece en la pantalla del iPod. Para obtener
más información, consulte el manual del usuario del iPod.
Reproducir un CD
1
Presione PUSH OPEN/CLOSE y coloque un
disco con la etiqueta hacia arriba en el
compartimiento del CD.
Para cerrar el compartimiento del CD, presione
PUSH OPEN/CLOSE.
2
Presione POWER.
3
Presione CD.
4
Presione .
La unidad reproduce todas las pistas una vez.
Número de pista
Tiempo de reproducción
Para
Presione
Poner en pausa la
reproducción
Para reanudar la reproducción,
presiónela otra vez.
Detener la
reproducción
Ir a la siguiente
pista
Volver a la pista
anterior
*
Localizar un punto
mientras escucha
sonido
(avanzar) o (retroceder)
durante la reproducción y retener
hasta encontrar el punto deseado.
Localizar un punto
mientras observa la
pantalla
(avanzar) o (retroceder)
durante la pausa y retener hasta
encontrar el punto deseado, luego
presione .
Retirar el CD
PUSH OPEN/CLOSE
* Durante la reproducción, esta operación vuelve al principio de la
pista actual. Para volver a la pista anterior, presione dos veces.
Nota
Esta unidad no puede reproducir un formato de CD de
música que no sea CD-DA, (como los archivos MP3/
WMA).
Para seleccionar un modo de
reproducción de CD
Presione MODE hasta que aparezca “ 1”, “ ”, “SHUF”,
“SHUF” y “ ”, “PGM”, o “PGM” y “ ” en la pantalla.
Luego proceda de la siguiente manera:
Para
seleccionar
Seleccionar Luego haga esto
Repita una
sola pista
“ 1”
Presione o para
seleccionar la pista que desea
repetir, luego presione .
Repite todas
las pistas
“ ”
Presione .
Reproducción
en modo
aleatorio
“SHUF”
Presione .
Repite las
pistas en
orden
aleatorio
“SHUF” y
“ ”
Presione .
Reproducción
programada
“PGM”
Presione o luego
presione DISPLAY/ENTER
(ENTER en el control remoto)
para programar las pistas
(hasta 20) a reproducirse en el
orden que usted quiera. Luego
presione .
Pista programada Orden de la reproducción
Repite las
pistas
programadas
“PGM” y
“ ”
Presione o luego
presione DISPLAY/ENTER
(ENTER en el control remoto)
para programar las pistas
(hasta 20) a reproducirse en el
orden que usted quiera. Luego
presione .
Para cancelar el modo de reproducción
seleccionado
Presione MODE varias veces hasta que el modo
seleccionado desaparezca de la pantalla.
Para comprobar la pista programada y el orden
de reproducción en la pantalla
Para comprobar el orden de las pistas antes de reproducir,
presione DISPLAY/ENTER (ENTER en el control remoto).
Cada vez que presione el botón, el número de pista
aparecerá en el orden programado.
Para cambiar el programa actual
Presione una vez si el CD se detiene y dos veces si el CD
se está reproduciendo. El programa actual se borrará. Luego
cree un nuevo programa siguiendo el procedimiento de
programación.
Notas
Si intenta programar 21 pistas o más, aparecerá “FULL”
en la pantalla.
Puede reproducir el mismo programa otra vez, debido a
que el programa se guarda hasta que usted abre el
compartimiento de CD.
Escuchar la radio
1
Presione POWER.
2
Presione RADIO BAND varias veces.
Cada vez que presiona el botón, la banda de radio
alterna entre AM y FM.
3
Mantenga presionado TUNE + o – hasta que los
dígitos de frecuencia comiencen a cambiar en la
pantalla.
La unidad explora automáticamente las frecuencias de
radio y se detiene cuando encuentra una estación clara.
Si no puede sintonizar una emisora, presione TUNE +
o – varias veces para cambiar la frecuencia de a una por
vez.
Si se recibe una difusión de estéreo FM, aparecerá .
Notas
Si toca o utiliza un iPod conectado a esta unidad mientras
escucha AM/FM, posiblemente escuche ruido. Evite tocar
o usar el iPod en este caso.
Si escucha la radio con un iPhone conectado a la unidad,
posiblemente haya interferencias con la recepción de la
radio. Quite el iPhone en este caso.
Mejorar la recepción
Extienda la antena por completo y oriéntela para lograr la
mejor recepción de FM.
Reoriente la unidad para mejorar la recepción de AM.
Nota
Ajuste la dirección de la antena sujetando su parte
inferior. La antena puede dañarse si la mueve con fuerza
excesiva.
Configurar el sonido monoaural si
la recepción estéreo es mala
La unidad cambia automáticamente entre la salida estéreo y
monoaural en función de las condiciones de recepción. No
obstante, si la recepción estéreo no es estable, puede
configurar manualmente la salida monoaural para mejorar
el sonido.
Presione MODE para mostrar “MONO” en la pantalla. (Para
reanudar la recepción estéreo, presione MODE otra vez para
mostrar “ST” en la pantalla).
Preestablecer estaciones de radio
Puede almacenar las emisoras de radio en la memoria de la
unidad. Puede preestablecer hasta 30 emisoras de radio, 20
para FM y 10 para AM en cualquier orden.
1
Presione POWER.
2
Presione RADIO BAND para seleccionar la banda.
3
Mantenga presionado AUTO PRESET/RADIO
BAND (RADIO BAND en el control remoto)
durante 2 segundos hasta que parpadee “AUTO”
en la pantalla.
4
Presione DISPLAY/ENTER (ENTER en el control
remoto).
Las emisoras se almacenan en la memoria de las
frecuencias más bajas a las más altas.
Si no se puede preestablecer una estación de
forma automática
Posiblemente necesite preestablecer una emisora con una
señal débil de forma manual.
1
Presione POWER.
2
Presione RADIO BAND para seleccionar la banda.
3
Sintonice la emisora que desee usando TUNE + o –.
4
Presione MANUAL PRESET para ingresar el
modo preestablecido manual.
5
Presione PRESET + o – hasta que el número
preestablecido que desea para la emisora parpadee
en la pantalla.
6
Presione DISPLAY/ENTER (ENTER en el control
remoto).
La nueva estación reemplaza a la anterior.
Sugerencias
Las emisoras de radio preestablecidas permanecen en la
memoria incluso si desenchufa el cable de alimentación
de CA o retira las baterías.
Para cancelar la configuración de número preestablecido,
presione MANUAL PRESET en lugar de ENTER en el
paso 6.
Para reproducir estaciones de
radio preestablecidas
1
Presione POWER.
2
Presione RADIO BAND para seleccionar la banda.
3
Presione PRESET + o – para sintonizar la emisora
almacenada.
Cómo usar la pantalla
Modo CD
Para comprobar el número total de pistas y el tiempo
de reproducción
En el modo de detención, presione DISPLAY/ENTER en la
unidad.
Para comprobar el tiempo restante
En el modo de reproducción/pausa, presione DISPLAY/
ENTER en la unidad varias veces. La pantalla cambia de la
siguiente manera:
El número de pista actual y el tiempo de
reproducción
El número de pista actual y el tiempo restante
de la pista actual*
El número de pistas que quedan y el tiempo
restante en el CD
* Para más de 20 pistas, el tiempo restante aparece como “- -:- -” en
la pantalla.
Modo radio
Para visualizar la frecuencia o un número de emisora
presintonizada
Cada vez que presione DISPLAY/ENTER en la unidad, la
pantalla cambia a la frecuencia o un número de emisora
presintonizada.
Conexión de componentes
opcionales
Es posible disfrutar del sonido de un componente opcional,
como un reproductor de música digital portátil, a través de
los altavoces de la unidad. Asegúrese de apagar todos los
componentes antes de realizar las conexiones. Para obtener
detalles, consulte el manual de instrucciones del
componente que desee conectar.
1
Conecte la toma AUDIO IN a la toma de salida de
línea de un reproductor de música digital portátil
u otros componentes usando un cable de
conexión de audio (no suministrado).
2
Presione POWER para encender la unidad.
3
Encienda el componente conectado.
4
Presione AUDIO IN y comience la reproducción
en el componente conectado.
“AUDIO IN” aparece en la pantalla, y el sonido del
componente conectado se emite a través de los altavoces
de la unidad.
Notas
El tipo de cable de conexión de audio requerido depende
del componente opcional. Asegúrese de usar el tipo de
cable correcto.
Si el nivel del volumen es bajo, ajuste primero el volumen
de la unidad. Si el volumen sigue siendo demasiado bajo,
entonces ajuste el volumen del componente conectado.
Otras funciones útiles
Reforzar el sonido de
graves
Presione MEGA BASS.
Aparece “MEGA BASS” en la pantalla.
Para volver al sonido normal, presione el botón otra vez.
Dormirse con música
Esta función se encuentra disponible usando el control remoto
únicamente.
1
Reproduzca la fuente de música que desee.
2
Presione SLEEP varias veces para configurar la
duración del Sleep Timer.
Cada vez que presione el botón, la indicación cambia de
la siguiente manera:
60
90 120
OFF
10 20 30
El número del minuto parpadea. Luego la unidad regresa
a la pantalla anterior.
El Sleep Timer está configurado y la unidad se apaga
después de la duración que usted configuró.
Para cancelar la función Sleep
Presione POWER para apagar la unidad, o presione SLEEP
en el control remoto varias veces para configurar el Sleep
Timer en “OFF” en el paso 2.
Acerca de App
Existe una aplicación de bandeja específica disponible para
iPod touch/iPhone en la tienda Apple App Store.
Busque “D-Sappli” y descargue la aplicación gratuita para
obtener más información sobre las funciones.
Características
D-Sappli incluye varias funciones de temporizador:
Alarma, Music Play Timer y Sleep Timer.
Utilice canciones en el iPod o Sonido de preajuste en
D-Sappli para el sonido de la alarma para configurar
10 alarmas.
Music Play Timer le permite reproducir y poner en pausa
la música que quiere y cuando quiere. Sleep Timer le
permite especificar un horario para detener la
reproducción de música. Alarma, Music Play Timer y
Sleep Timer funcionan en combinación con el suministro
de energía de la unidad.
Alarma, Music Play Timer y Sleep Timer están disponibles
solamente cuando se activa D-Sappli.
D-Sappli puede mostrar una lista de estaciones de radio
preestablecidas programadas en esta unidad.
Puede cambiar el nombre de las estaciones de radio
preestablecidas y cambiar el número preestablecido en
D-Sappli. Los números preestablecidos y el orden
también cambiarán en consecuencia en la unidad.
D-Sappli incluye a su vez una función de ampliación de la
pantalla de reloj.
Notas
Si la App que se enlaza a esta unidad no se descargó al
iPod touch/iPhone, aparecerá repetidamente un mensaje
emergente instando al usuario a descargar D-Sappli.
Desactive la función enlace de Apps para poner fin al
mensaje emergente.
Para desactivar la función enlace de Apps: Conecte la
fuente de potencia de CA, y luego presione POWER para
apagar la unidad. Retire el iPod touch/iPhone del conector
de la bandeja. Mientras mantiene apretado , también
presione y mantenga POWER de la unidad durante al
menos 2 segundos. (Aparece “OFF” en la pantalla para
mostrar que la función del enlace de App se ha
desactivado).
Para volver a activar la función enlace de Apps, repita los
pasos anteriores. (Aparece “ON” en la pantalla para
mostrar que la función del enlace de App se ha activado).