Auto cal amp menu – Sony HT-DDWG700 User Manual
Page 2
HT-DDWG700 3-284-099-11(1) GB/FR/ES/DE
5: Auto Calibration/
5:Calibrage automatique/
5:Calibración automática/
5:Automatische Kalibrierung
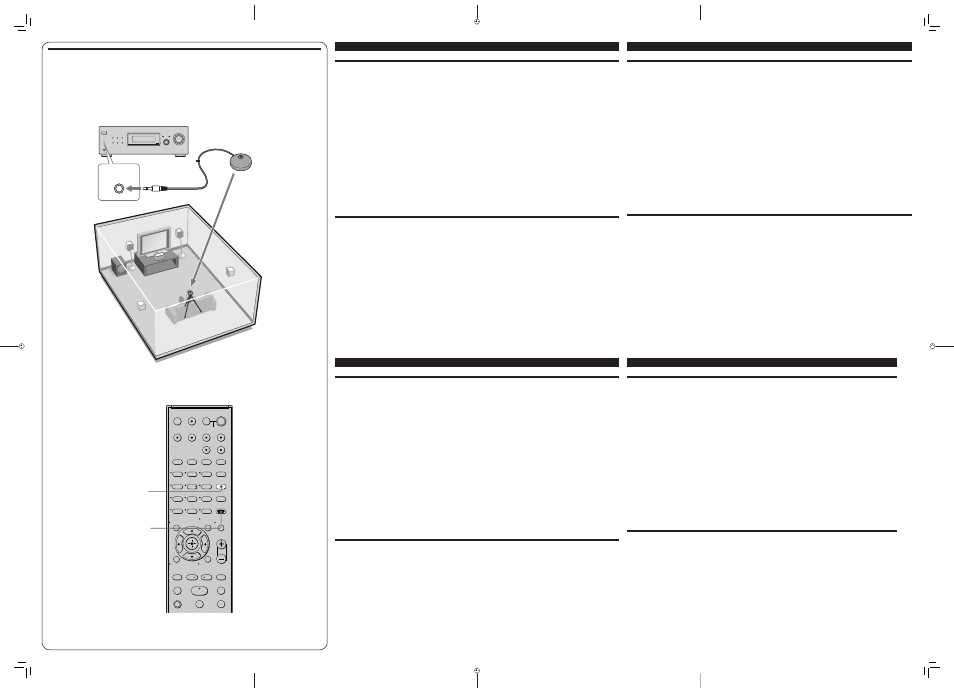
Optimizer microphone (supplied)/
Microphone optimiseur (fournie)/
Micrófono optimizador (suministrada)/
Optimierungsmikrofon (mitgeliefert)
VIDEO IN/
PORTABLE AUDIO IN/
AUTO CAL MIC
PHONES
INPUT SELECTOR
A.F.D.
MOVIE
MUSIC
?/1
DIMMER
SLEEP
2CH
DISPLAY
MASTER VOLUME
INPUT MODE
VIDEO IN/
PORTABLE AUDIO IN/
AUTO CAL MIC
English
5: Calibrating the speaker settings automatically
You can set up the speakers to obtain the sound you want from all connected speakers automatically by using the Auto
Calibration function. The Auto Calibration function will:
• Check the connection between each speaker and the receiver.
• Adjust the speaker level.
• Measure the distance of each speaker from your listening position.
1
Connect the supplied optimizer microphone to the VIDEO IN/PORTABLE AUDIO IN/AUTO CAL MIC
jack on the receiver.
2
Set up the optimizer microphone.
Place the optimizer microphone at your listening position.You can also use a stool or tripod so that the optimizer
microphone remains at the same height as your ears.
3
Press AMP MENU, then press AUTO CAL.
The Auto Calibration function starts.
For details on the Auto Calibration function, refer to step 6 of “Getting started” of the operating instructions supplied
with this receiver.
Notes
•
If there are any obstacles in the path between the optimizer microphone and the speakers, the calibration cannot be performed correctly. Remove any obstacles from
the measurement area to avoid measurement error.
•
The Auto Calibration function cannot detect the sub woofer. Therefore, all sub woofer settings will be maintained.
6: Setting up other components
You should set up each component so that the sound is output from the speakers correctly when you play back a connected
component. Refer to the operating instructions supplied with each component.
After the setting
The receiver is now ready to use. Refer to the operating instruction supplied with the receiver for details.
Français
5: Calibrage automatique des réglages des enceintes
Vous pouvez régler les enceintes afi n d’obtenir automatiquement le son souhaité pour toutes les enceintes raccordées en
utilisant la fonction Auto Calibration. La fonction Auto Calibration :
• Vérifi ez le raccordement entre chaque enceinte et l’ampli-tuner.
• Ajustez le niveau des enceintes.
• Mesure la distance entre chaque enceinte et votre position d’écoute.
1
Raccordez le microphone optimiseur fourni à la prise VIDEO IN/PORTABLE AUDIO IN/AUTO CAL
MIC de l’ampli-tuner.
2
Réglez le microphone optimiseur.
Placez le microphone optimiseur au niveau de votre position d’écoute. Vous pouvez également utiliser une chaise ou
un trépied pour que le microphone optimiseur se trouve au niveau de votre position d’écoute.
3
Appuyez sur AMP MENU, puis sur AUTO CAL.
La fonction Auto Calibration démarre.
Pour plus de détails sur la fonction Auto Calibration, reportez-vous à l’étape 6 de la section « Préparatifs » du mode
d’emploi fourni avec cet ampli-tuner.
Remarques
•
Si des obstacles se trouvent entre le microphone optimiseur et les enceintes, la calibration risque ne pas être effectuée correctement. Enlevez tous les obstacles se
trouvant dans la zone de mesure, afi n d’éviter toute erreur de mesure.
• La fonction Auto Calibration ne peut pas détecter le caisson de graves. Par conséquent, tous les réglages du caisson de graves seront conservés.
6: Paramétrage d’autres composants
Vous devez paramétrer chaque élément de sorte que le son soit émis correctement par les enceintes lorsque vous utilisez un
composant raccordé. Reportez-vous au mode d’emploi fourni avec chaque composant.
Après le paramétrage
L’ampli-tuner est maintenant prêt à l’emploi. Reportez-vous au mode d’emploi fourni avec l’ampli-tuner pour plus de détails.
Español
5: Calibración automática de los ajustes del altavoz
Puede instalar los altavoces para obtener automáticamente el sonido que desee a través de todos los altavoces conectados
mediante la función de calibración automática. La función de calibración automática:
• Compruebe las conexiones entre cada altavoz y el receptor.
• Ajuste el nivel del altavoz.
• Calculará la distancia existente entre cada altavoz y la posición de escucha.
1
Conecte el micrófono optimizador a la toma VIDEO IN/PORTABLE AUDIO IN/AUTO CAL MIC del
receptor.
2
Ajuste el micrófono optimizador.
Coloque el micrófono optimizador en su posición de escucha. Puede utilizar también una banqueta o trípode para que
el micrófono optimizador quede a la altura de los oídos.
3
Pulse AMP MENU y, a continuación, AUTO CAL.
Se iniciará la función de calibración automática.
Para obtener más información sobre la función de calibración automática, consulte el paso 6 de “Procedimientos
iniciales” del manual de instrucciones suministrado con el receptor.
Notas
•
Si hay obstáculos entre el micrófono optimizador y los altavoces, es posible que la calibración no se lleve a cabo correctamente. Retire los obstáculos de la zona de
medición para evitar errores.
•
La función de calibración automática no puede detectar el altavoz potenciador de graves. Por lo tanto, todos los ajustes del altavoz potenciador de graves se
mantendrán.
6: Confi guración de otros componentes
Es necesario confi gurar cada componente para que el sonido se emita correctamente a través de los altavoces al reproducir un
componente conectado. Consulte el manual de instrucciones suministrado con cada componente en cuestión.
Tras realizar el ajuste
El receptor está listo para utilizarse. Consulte el manual de instrucciones suministrado con el receptor para obtener más información.
Deutsch
5: Automatische Kalibrierung der Lautsprechereinstellungen
Dank der automatischen Kalibrierung können Sie die Lautsprecher so einstellen, dass von allen angeschlossenen
Lautsprechern automatisch der gewünschte Ton ausgegeben wird. Funktionen der automatischen Kalibrierung:
• Überprüfen der Anschlüsse zwischen den einzelnen Lautsprechern und dem Receiver.
• Einstellen der Lautsprecherpegel.
• Messen des Abstands der einzelnen Lautsprecher von der Hörposition.
1
Schließen Sie das mitgelieferte Optimierungsmikrofon an die Buchse VIDEO IN/PORTABLE
AUDIO IN/AUTO CAL MIC am Receiver an.
2
Stellen Sie das Optimierungsmikrofon auf.
Stellen Sie das Optimierungsmikrofon an der Hörposition auf. Sie können einen Stuhl oder ein Stativ
verwenden, um das Optimierungsmikrofon auf Ohrenhöhe aufzustellen.
3
Drücken Sie AMP MENU und dann AUTO CAL.
Die automatische Kalibrierung beginnt.
Nähere Informationen zur automatischen Kalibrierung fi nden Sie in Schritt 6 unter „Vorbereitungen“ in der
Bedienungsanleitung zum Receiver.
Hinweise
•
Wenn sich Hindernisse zwischen dem Optimierungsmikrofon und den Lautsprechern befi nden, wird die Kalibrierung nicht richtig durchgeführt. Entfernen
Sie alle Hindernisse aus dem Messbereich, um Messfehler zu vermeiden.
• Bei der automatischen Kalibrierung wird der Subwoofer nicht erkannt. Die Einstellungen für den Subwoofer bleiben daher unverändert.
6: Einstellen anderer Komponenten
Sie müssen die einzelnen Komponenten einstellen, so dass der Ton bei der Wiedergabe der angeschlossenen Komponente über
die Lautsprecher richtig ausgegeben wird. Schlagen Sie dazu in der Bedienungsanleitung zur jeweiligen Komponente nach.
Wenn alle Einstellungen vorgenommen wurden
Der Receiver ist jetzt betriebsbereit. Einzelheiten fi nden Sie in der Bedienungsanleitung zum Receiver.
1
2
3
4
6
7
8
0/10
ENTER
9
SYSTEM STANDBY
TV INPUT
SLEEP
DMPORT
VIDEO
DVD/BD
SAT
TV
2CH
A.F.D.
RETURN/EXIT
TV CH –
PRESET –
TV CH +
PRESET +
TUNING –
TV
TUNING +
FM MODE
REPLAY ADVANCE
MOVIE
MUSIC
AMP MENU
CLEAR
DISPLAY
MUTING
TV VOL
MASTER VOL
DVD/BD
MENU
D.TUNING
AUTO CAL
D.SKIP
SA-CD/CD TUNER
?/1
.
O
H
m
M
X
x
<
<
>
5
>10
-/--
TOOLS/
OPTIONS
TV
?/1
AV
?/1
MEMORY
MENU/HOME
AUTO CAL
AMP MENU
GBFRESDE+DDWG700_2UC.indd 2
GBFRESDE+DDWG700_2UC.indd 2
12/3/2007 12:21:46 PM
12/3/2007 12:21:46 PM