Asante Technologies FRIENDLYNET FR1104-G User Manual
Page 2
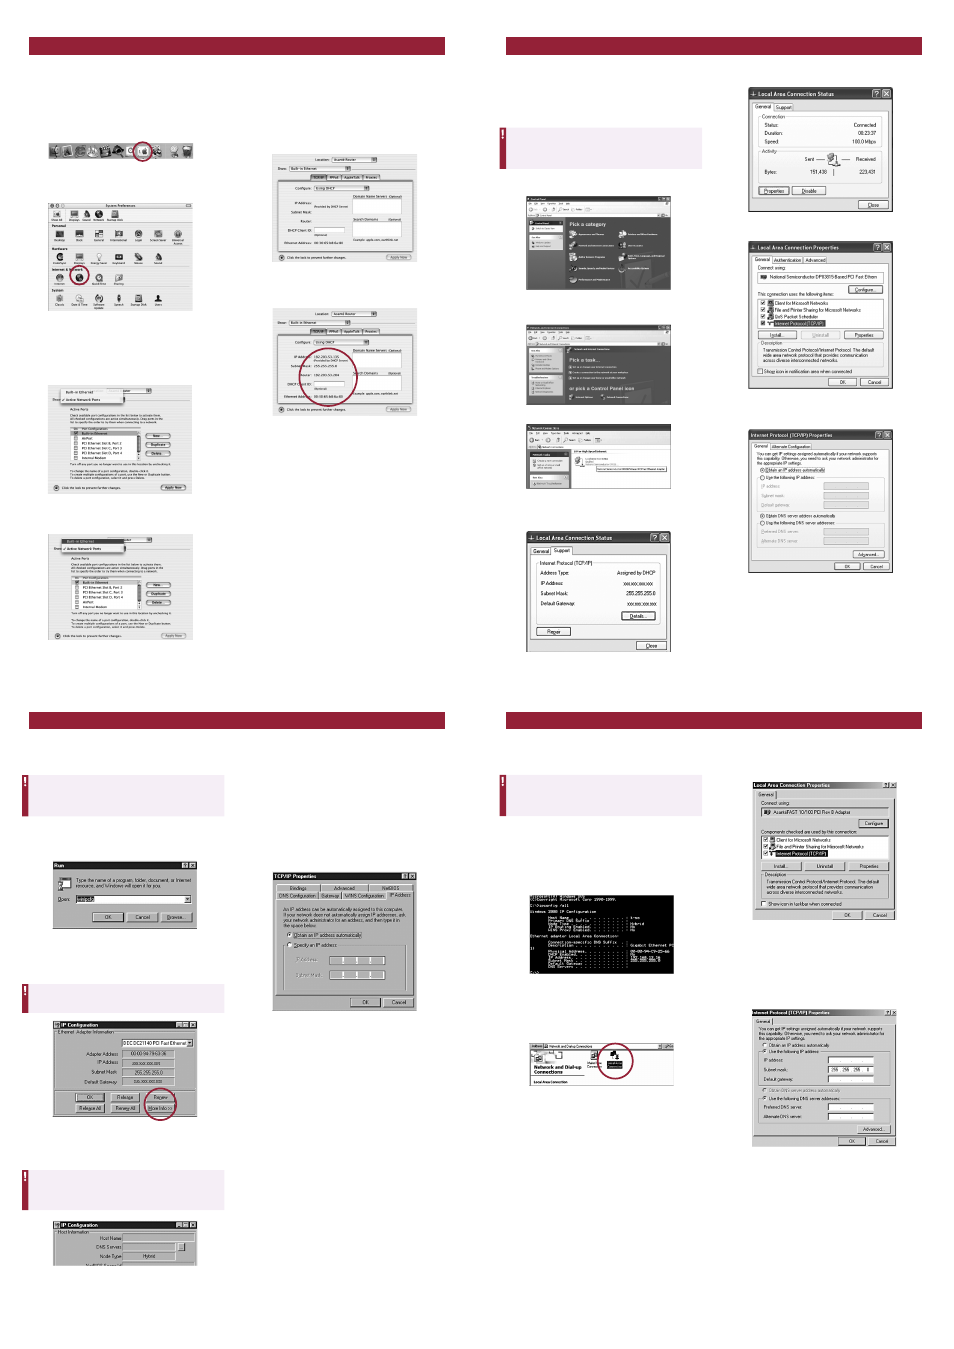
Computer Configuration
Apple Mac OS X
The following steps explain how to determine
your current network settings and set up your
computer so that it can be automatically
configured by the router’s DHCP (dynamic
host configuration protocol) feature.
1. Go to System Preferences in your Dock.
2. Select Network from the System
Preference panel.
3. Select Show: Active Network Ports and
select the Ethernet port that is connected
to your Asanté router. Uncheck any
unused ports. Click Apply Now.
4. Select the connected Ethernet port
in Show.
5. Be sure that the TCP/IP tab is selected. Now
select Configure: Using DHCP. You will
receive the IP address automatically from
your DHCP server.
Before receiving the IP address from the
router’s DHCP server, your screen will look
like this:
After receiving the IP address from the
router’s DHCP server, your screen will look
like this:
The TCP/IP configuration of your computer is
now complete. Repeat these steps to
configure additional Macs running OS X that
you wish to add to the router.
Computer Configuration
Microsoft Windows XP
The following steps explain how to determine
your current network settings and set up your
computer so that it can be automatically
configured by the router’s DHCP (dynamic
host configuration protocol) feature.
Note: Keep your Windows CD-ROM handy.
You may be asked to insert it so that
Windows can copy necessary files.
1. From the Start button, select
Settings/Control Panel.
2. Click on Network and Internet Connections.
3. Click the Network Connections icon.
4. Double-click on the network.
5. Under the Support tab, click on the
Details… button and record your IP
settings for future reference.
6. Under the General tab, click the
Properties button.
7. Select the Internet Protocol (TCP/IP) and
click the Properties button.
8. Select Obtain an IP address
automatically and Obtain DNS server
address automatically.
9. Click OK and restart your computer.
The TCP/IP configuration of your computer
is now complete. Repeat these steps to
configure additional PCs running Windows XP
on your network.
Computer Configuration
Microsoft Windows 95/98/Me
The following steps explain how to determine
your current TCP/IP settings and configure
them to use DHCP.
Note: Keep your Windows CD handy. You may
be asked to insert it so that Windows can
copy necessary files.
1. From the Windows Start button, choose
Run. In the dialog box, type winipcfg and
click OK.
2. Choose your computer’s Ethernet adapter
card from the options available in the
drop-down list.
Tip: The PPP setting is usually for your dial-up
analog modem. Don’t choose this selection.
3. Expand this dialog box by clicking on the
More Info >> button.
Tip: Next to the DNS Servers field, click the
button to show the Secondary DNS (if
available).
4. From the Windows Start button, choose
Settings and select Control Panel.
Double-click the Network icon.
5. In the Configuration tab, highlight the
TCP/IP protocol line associated with your
network card adapter.
6. Click Properties to open the TCP/IP
Properties dialog. Click the IP Address tab.
Select Obtain an IP address
automatically. Click OK.
7. Click OK again. Windows will begin
copying files to your computer. Click Yes
to restart your computer with the new
settings.
The TCP/IP configuration of your computer is
now complete. Repeat these steps to
configure additional PCs running Windows
95/98/Me on your network.
Computer Configuration
Microsoft Windows 2000/NT
The following steps explain how to determine
your current TCP/IP settings and configure
them to use DHCP.
Note: Keep your Windows CD handy. You
may be asked to insert it so that Windows
can copy necessary files.
1. From the Windows Start button, choose
Program > Accessories > Command
Prompt.
2. At the command line, type the command
ipconfig/all and press Enter.
3. From the Start Button, select
Control Panel/Network and Dial-Up
Connections. Double-click on the Local
Area Connection.
4. Under the General tab, highlight the
Internet Options (TCP/IP) and click the
Properties button.
5. Select Obtain an IP address
automatically and Obtain DNS server
address automatically. Click OK when
finished. You may be prompted to restart
your computer.
The TCP/IP configuration of your computer is
now complete. Repeat these steps to
configure additional PCs running Windows
2000/NT on your network.