Vzn series, Installation (continued) – A.J. Antunes & Co VZN-440H 9700746 User Manual
Page 10
VZN SERIES
10
P/N 1011064 Rev. F 12/13
CAUTION
Due to its weight and size, the VZN system MUST be
mounted with the provided Mounting Bracket. Read
the Mounting the System section before attempting to
mount the VZN system. Use care when lifting heavy
objects.
Mounting the System
NOTE: Use caution when lifting and mounting the sys-
tem. The system MUST be mounted using the provided
Mounting Bracket.
The VZN system comes with a Mounting Bracket. When
mounting the system, pay attention to the following guidelines:
• Allow sufficient access for cartridge replacement. VZN-
420 units should be mounted with 20 inches to the left or
right. VZN-440 units should be mounted with 40 inches to
the left or right.
• Mount the system near but NOT above an appropriate
electrical outlet.
• Mount the system near a drain for flushing operations.
• Mount the system before all consumable water
filtration processes.
• Mount the system with the provided Mounting Bracket
and hardware capable of supporting 120 lbs. or more.
• Secure the Mounting Bracket into wall studs or with the
appropriate heavy duty mounting hardware.
The system is pre-assembled to a Back Plate. The Back Plate
has mounting holes across the bottom portion to secure the
bottom of the system to the wall. Some of the bottom mount-
ing holes may be obscured. Plan your mounting accordingly.
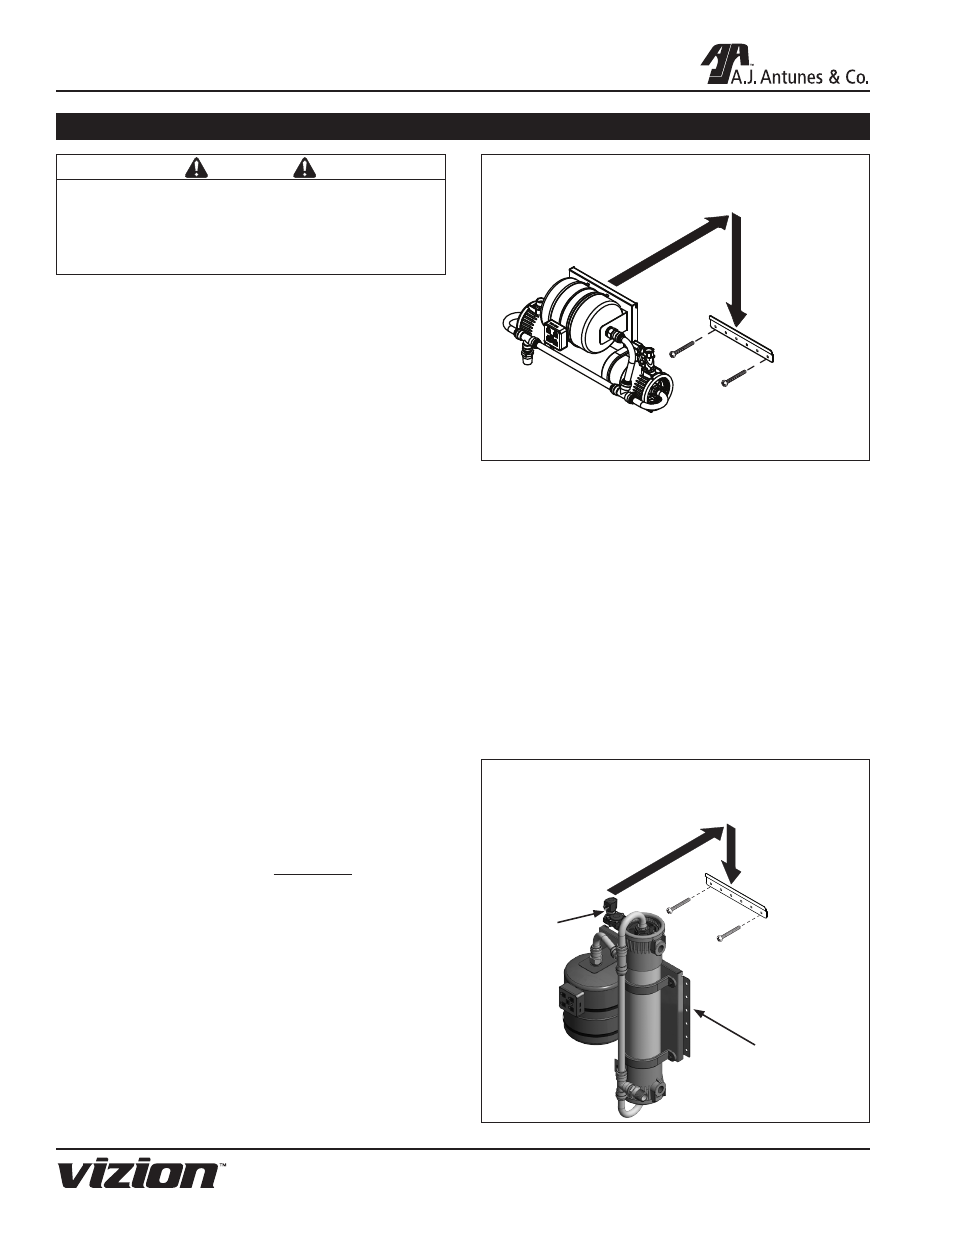
INSTALLATION (continued)
Follow these steps to secure the Mounting Bracket to the wall
and seat the VZN system:
1. Use a stud finder and level to attach the Mounting
Bracket securely to the wall with the appropriate
mounting hardware (Figure 2).
2. The Mounting Bracket is designed so that the VZN
system can be lifted and hung on the Mounting Bracket.
With assistance, lift the system and seat it onto the
Mounting Bracket securely (Figure 2).
3. Secure the bottom portion of the VZN system to the
wall using the holes provided. Make sure the mounting
hardware secures the system into wall studs or use the
appropriate mounting hardware.
Secure Mounting Bracket
to wall studs using
appropriate hardware.
The system is
designed to hang from
the Mounting Bracket.
Back Plate
(holes along bottom
for additional
mounting stability)
Figure 2. Mounting the System
Alternative Vertical Mounting
The system can be mounted vertically if required. See Figure
2A for more details. Note the following when mounting a sys-
tem vertically:
1. Install the Mounting Bracket
horizontally as shown in
Figures 2 and 2a.
2. The system must be mounted so the Solenoid Valve is
located at the TOP (Figure 2a).
3. Allow sufficient access for cartridge replacement. VZN-
420 units should be mounted with 20 inches above
or below. VZN-440 units should be mounted with 40
inches above or below.
4. With assistance, lift the system and seat it securely onto
the Mounting Bracket vertically (Figure 2a).
5. When mounted vertically, the back plate has mounting
holes across the right portion to secure the right side of
the system to the wall.
Secure Mounting Bracket
to wall studs using
appropriate hardware.
The system is
designed to hang from
the Mounting Bracket.
Back Plate
(holes along right
for additional
mounting stability)
Solenoid
Valve
at Top
Mounting
Holes
Figure 2a. Vertical Mounting