1n 1o, Installation height & angle adjustment – Samsung UN85S9AFXZA User Manual
Page 2
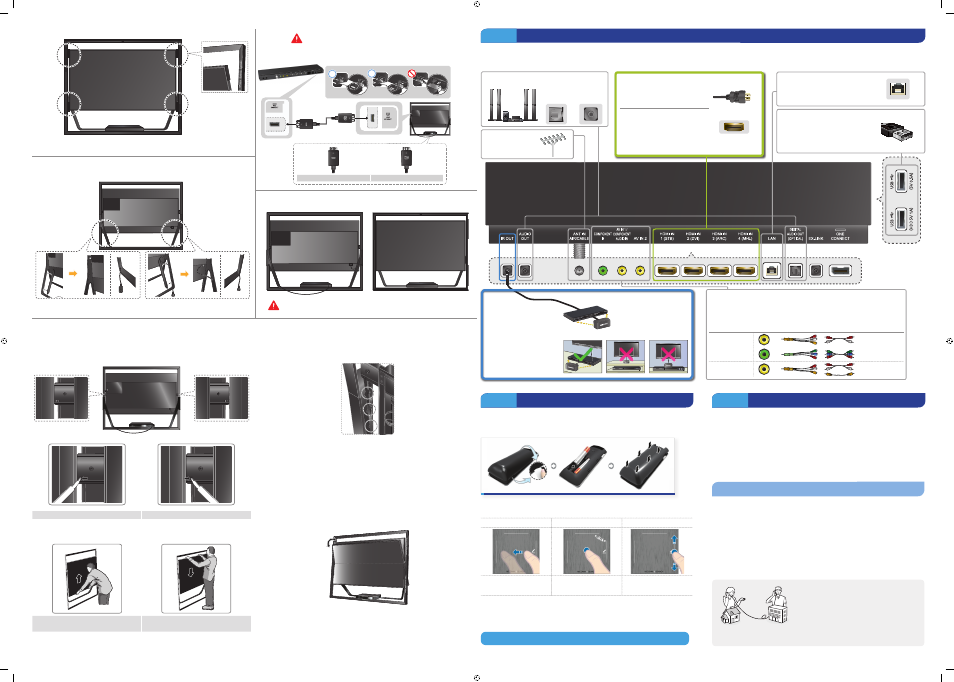
1L
Remove the stickers from the top and bottom of TV.
1M
One Connect
The connectors at both ends of the One Connect cable are different
from each other in shape. When connecting the One Connect cable
to the TV, make sure that the right connector is plugged into the TV.
Otherwise, it may cause product failure.
1N
1O
Connect One Connect to the TV, and then turn on the TV.
Step 2
Connect video devices
We suggest using HDMI connections whenever possible for the best picture quality. Use the included AV adapter to connect older devices.
✎
Please check the shape of the plugs to avoid inserting them upside down.
✎
The appearance of your TV may differ from the images below, depending on the model.
Best Connection : HDMI
We suggest using HDMI whenever
possible.
HDMI Cable
HDMI 1 is the default port for a cable
or satellite set-top box.
Use the other ports for Blu-ray
players, game consoles, and other
devices.
HDMI Port
USB Connections
You can connect USB storage devices
to the USB ports and enjoy personal
photos, videos, and music.
Wired Ethernet
Connect the IR extender to the
IR Out port to control external
devices connected to the TV
using the Smart Touch Control.
For more detailed information,
refer to the "Universal Remote
Control Setup" section in the
User manual.
Good Connection: Component (Y, PB, PR) or AV (Composite)
Match the colors on your device's cables to the colors on the device's out ports.
Connect the device's cables to the included adapters, and then connect the adapters
to the appropriate ports on the TV as shown in the table below. Make sure the colors
match. The Component connection is shown on the top. The AV connection is shown
on the bottom.
AV IN 1
Audio (L/R)
COMPONENT IN
Video
AV IN 2
Audio (L/R)
Video
You can connect home theater systems to the
OPTICAL or AUDIO OUT ports.
or
Connect the cable
from the antenna or
cable TV outlet.
Step 3
Using the Smart Touch Control
Insert the batteries into the Smart Touch Control
Insert the tip of a credit card or similar item into the notch on the side of the Smart Touch Control,
and then twist the card to open and remove the remote's back cover.
✎
The notch’s location may vary depending on the type of Smart Touch Control provided.
Using the touch pad
navigation
selection
scrolling
To control the highlight, move
your thumb across the pad.
To select an item, press the
pad until you hear a click.
Move your thumb along the
ridges to quickly scroll through
items.
Pairing the Smart Touch Control
If you need to reestablish the connection between the TV and the Smart Touch Control, press the
pairing button at the back of the Smart Touch Control, pointing at the remote control sensor of
the TV.
Congratulations on your new Smart TV!
Step 4
Power on and start the initial setup
Information required:
• Wi-Fi network password (if you use one)
• Zip code
• Cable or satellite provider info
Plug in the TV. Press the power button on the remote to turn on the TV and start the initial set-up.
✎
The TV must be connected to the Internet to use the Smart Features. If you have a wireless
network, confirm that your network router is working before you start the initial setup. If you
have a wired network, connect the TV to the network with a CAT 7 cable before you begin.
Troubleshooting
The stand is wobbly or crooked
Make sure the arrows on the stand are properly aligned.
The TV won’t turn on
Make sure all cables are fully inserted, and that the remote has batteries installed.
I don’t know where to plug in
Devices without HDMI may require the included A/V adapter.
I have extra parts
The TV includes some optional parts to help with wall mounting and cable routing.
If you experience issues, please do not take the TV back
to the store.
In the United States of America, call us at
1-800-SAMSUNG (1-800-726-7864) or visit us at www.
samsung.com or www.samsung.com/spsn for support
and warranty service.
For other countries, refer to "Contact SAMSUNG
WORLDWIDE" in the user guide.
1.
Using the provided Delphinus, unlock the frame lock on either side of the product's rear middle
as shown.
2.
Refer to the diagram and adjust the height of the TV.
holding it at the bottom center.
while holding it at the top center.
]
When moving the product, make sure there are no small children nearby. In addition, the
improper handling of the product may result in injury.
3.
When adjusting the height of the TV, make sure the frame ends up in the designated position.
4.
Use the DELPHINUS (included) to tighten the locking devices attached to the frame on both sides
and secure the TV in place.
5.
Grab the middle part of the top or bottom edge of the product and push or pull to adjust the TV
angle.
✎
Adjustable angles
Front angle:
•
When installing the TV, the maximum height is: 2.7 ± 1.0°
•
When installing the TV to the minimum height: 7.7 ± 1.0°
Rear angle: 9.5 ± 1.0°
]
When adjusting the TV angle, make sure there are no small children nearby. In addition, the
improper handling of the product may result in injury.
Installation Height & Angle Adjustment
[UN85S9AF_QSG]BN68-05196A-04ENG.indb 3
2013-10-30 �� 10:57:55