Step 6 – Samsung PN59D530A3FXZA User Manual
Page 2
Step 6
: Remote Control
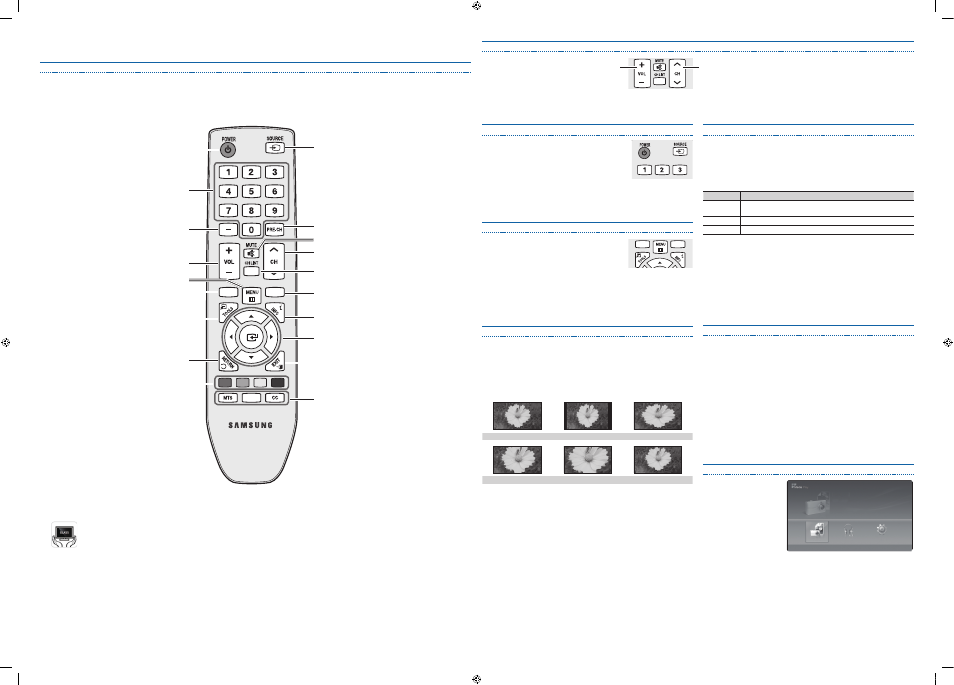
Remote Control Buttons and Functions
✎
This is a special remote control for the visually impaired and has Braille points on the Power, Channel and Volume buttons.
Selecting a Source
To watch a movie on your Blu-ray player or watch your
favorite TV show, you must select the correct source.
A source is a device, such as a Blu-ray/DVD player,
a cable/satellite box, antenna or a cable TV input.
Sources can be connected to your TV through the
HDMI, DVI, Component, Composite, or through the
Antenna or Cable In connections.
To view the signal from a source connected to the HDMI, DVI, Component, or
Composite jack, press the
SOURCE
button on your remote. Each time you press
the
SOURCE
button, you change to a different source.
Viewing the On Screen Menus
To view the On Screen Menus, follow these steps:
1. With the power on, press the
MENU
button on
your remote. The main menu appears.
The menu’s left side has the following menu
options: Picture, Sound, Channel, Setup, Input, Application, and Support.
2. Press the
▲ or ▼ button on your remote to select a menu option, and then
press the
ENTER
E button.
3. When done using the menu, press the
EXIT
button on your remote to exit.
Changing the Picture Mode
Your TV has three preset Picture modes with factory adjusted settings, each
designed to give you an excellent picture under specific conditions.
To change the Picture mode, press the
P.MODE
button on your remote. The first
time you press it, your TV displays the current setting. Thereafter, each time you
press the
P.MODE
button, you change the mode of the picture on the screen.
The Picture modes are listed and described in the table below:
Mode
Description
Dynamic
Brightens picture. For a vibrant, enhanced image in brightly lit or
sunny room.
Standard
For a bright, detailed picture in a normally lit room.
Movie
For a studio quality cinema picture in a dimly lit or dark room.
To change the Picture mode, follow these steps:
1. With the TV on, press the
MENU
button on your remote, then select Picture.
2. Select Mode, the Press the
ENTER
E button.
3. On the Mode menu in Picture, use the
▼ or ▲ on your remote to select the
picture mode you want.
4. Press the
ENTER
E button to finish the change.
FAV.CH
P.SIZE
A
B
C
D
MEDIA.P
FAV.CH
P.SIZE
A
B
C
D
MEDIA.P
Changing the Screen Size
Your TV has several screen size options, each designed to work best with specific
types of video input. If you have a cable box or satellite receiver, it may have its own
set of screen sizes as well.
To change the screen size, press the
P.SIZE
button on your remote. The first time
you press it, your TV displays the current setting. Thereafter, each time you press
the
P.SIZE
button, you change the size of the picture on the screen.
The following sizes are available:
16:9 Wide screen
4:3 Standard screen
Wide Fit
Zoom 1
Zoom 2
Screen Fit
✎
Screen Fit: Displays the full image without any cut-off when HDMI (720p /
1080i / 1080p) or Component (1080i / 1080p) signals are inputted.
Changing Channels and Adjusting the Volume
Adjust the volume by pressing the Volume button
on the remote.
FAV.CH
P.SIZE
A
B
C
D
MEDIA.P
Change the channels by pressing the Channel button on the remote.
✎
If your TV is attached to a cable or satellite box, change the channel using
the box’s remote.
✎
You can also change the channels by pressing the z button on the front panel of your TV and adjust the volume by pressing the y button.
Connecting a USB Device for Media Play
You can enjoy photo and
music files stored on a USB
device by connecting it to the
TV and using the Media Play
feature. To connect a USB
device for Media Play, follow
these steps:
1. Turn on your TV.
2. Connect a USB device
containing photo or music
files to the
USB
jack on
the side of the TV.
3. When the Input selection screen is displayed, press the r button to select
Media Play (USB), then press the
ENTER
E button.
Photo
Photo
Music
Setup
SUM
307.2MB/973.7MB
L Move E Enter R Return
Free
Setting the Clock
Before you can use your TV’s On/Off Timer, you must set the clock. To set the
clock, follow these steps:
1. Turn on your TV, press the
MENU
button on your remote, then select Setup
→
Time.
2. Select Clock Mode, and then press the
ENTER
E button.
3. Choose Auto or Manual.
x
If you select Auto, set the current time automatically using the time from
digital broadcast.
x
If you select Manual, you can set the Month, Day, Year, Hour, Minute
and am/pm directly by pressing up, down, left and right arrow button on
your remote.
4. Press the
RETURN
button on your remote when done.
FAV.CH
P.SIZE
A
B
C
D
MEDIA.P
Turns the TV on and off.
Press to directly access channels.
Press to select additional digital channels (digital) being
broadcasted by the same station. For example, to select
channel “54-3”, press “54”, then press “–” and “3”.
Adjusts the volume.
Displays Media Play (USB).
Brings up the OSD.
Quickly select frequently used functions.
Returns to the previous menu.
Use these buttons in a specific feature. For details, refer
to e-Manual.
Returns to the previous channel.
Changes channels.
Displays and selects the available video sources.
Displays information on the TV screen.
FAV.CH
: Displays Favorite Channel Lists on the screen.
Displays the channel list on the screen.
Selects the on-screen menu items and changes the values
seen on the menu.
Exits the menu.
MTS
: Press to choose stereo, mono, or Separate Audio
Program (SAP broadcast).
P.SIZE
: Lets you choose the picture size.
CC
: Controls the caption decoder.
Cuts off the sound temporarily.
y
Caution
The glass screen of your PDP TV can break if the TV is accidentally dropped and hits the ground. Care should be taken.
Ensure two or more persons help when moving the product as a safety precaution. Do not lay the product flat on one side when moving.
(Your) Samsung Plasma TV is a high quality television that has been carefully packaged to protect the integrity of its glass panel and component parts from damage
during transport. It is nonetheless a fragile piece of electronics that requires care in handling. Refrain from putting undue stress on any part of the packaging
unpacking, shipment, installation whether on a pedestal or mounted on the wall. Avoid placement of the TV that would expose its screen to any form of impact.
Breakage of the panel due to impact strike is not covered under the manufacturer’s warranty.
y
The exterior and screen of the product can get scratched during cleaning. Be sure to wipe the exterior and screen carefully using the cloth provided or a soft cloth to
prevent scratches.
[QSG-530]BN68-03690A-00Eng.indd 2
2011-05-20 오전 9:40:33