Hardware setup, Jp1/jp2, A7v266 voltage setting – Asus A7V266 User Manual
Page 20: A7v266 palo_freq setting, Palo_freq
20
ASUS A7V266 User’s Manual
3. HARDWARE SETUP
3. H/W SETUP
Motherboard Settings
5) I/O Voltage Settings (JP1, JP2)
These jumpers allow you to select the voltage supplied to the DRAM, chipset,
AGP, and PCI. The default setting for the jumpers is: JP1 [2-3] and JP2 [1-2],
2.65 volts. Use the default setting for better system reliability.
A7V266 Voltage Setting
JP1/JP2
2.5V
2.65V
1 2 3
2 3
1
2 3
1
2 3
1
2.75V
2.8V
JP1
JP2
(Default)
A7V266
0
1
0
1
0
1
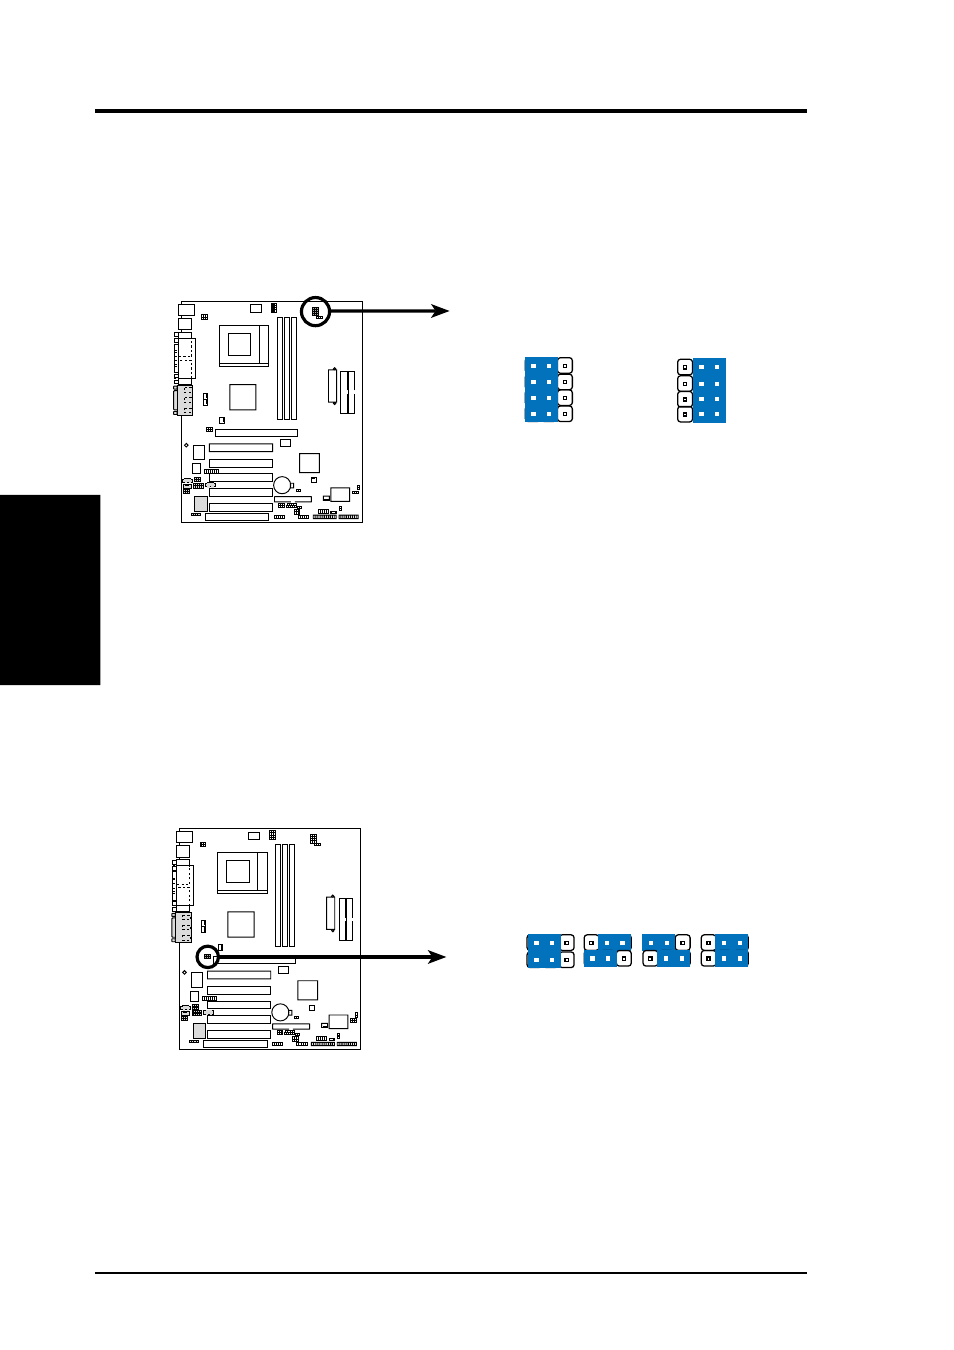
4) CPU Type Frequency Setting (PALO_FREQ)
This jumper setting accomodates the difference between the internal frequency
between standard and new AMD CPUs. If changing from one type of CPU to
another, the jumper caps must be adjusted. The factory default setting, [2-3], is
for standard Athlon/Duron CPUs. The Palomino processor will only function
on this motherboard after the jumpers are adjusted to [1-2].
A7V266 PALO_FREQ Setting
A7V266
0
1
0
1
0
1
PALOMINO
FID2
FID1
FID3
FID0
ATHLON/DURON
PALO_FREQ
FID2
FID1
FID3
FID0
3
2
1
3
2
1
(Default)
- Xonar DX (80 pages)
- Xonar DX (10 pages)
- PCI Express Audio Card Xonar DX (70 pages)
- Audio Card Xonar D2X (70 pages)
- Xonar D2X (88 pages)
- Xonar D2X (84 pages)
- D2X (88 pages)
- ROG Xonar Phoebus (72 pages)
- ROG Xonar Phoebus (122 pages)
- Xonar DSX (26 pages)
- Xonar DSX (29 pages)
- Xonar DGX (58 pages)
- Xonar DGX (38 pages)
- Xonar DGX (33 pages)
- Xonar DG (54 pages)
- Xonar DG (58 pages)
- Xonar DG (32 pages)
- Xonar DG (28 pages)
- Xonar Essence ST (52 pages)
- Xonar Essence ST (35 pages)
- Xonar Essence ST (40 pages)
- Xonar Essence ST (53 pages)
- Xonar DS (54 pages)
- Xonar DS (33 pages)
- Xonar Xense (47 pages)
- Xonar Xense (70 pages)
- Xonar Xense (45 pages)
- Xonar U3 (56 pages)
- Xonar U3 (38 pages)
- Xonar Essence STX (32 pages)
- Xonar Essence STX (49 pages)
- Xonar Essence STX (10 pages)
- XONAR D1 E4009 (72 pages)
- Xonar D1 (72 pages)
- Xonar D1 (80 pages)
- Xonar D1 (10 pages)
- Xonar Essence One (7 pages)
- Xonar Essence One (5 pages)
- Xonar HDAV 1.3 (100 pages)
- Motherboard M4A78-EM (64 pages)
- A7N8X-VM/400 (64 pages)
- K8V-XE (86 pages)
- K8V-XE (20 pages)
- M2R32-MVP (160 pages)
- M2R32-MVP (60 pages)