Complete the configuration, Set the ip address using a web browser, Modbus eia-485 connections – Chatsworth Products Remote Infrastructure Management System Protocol Converter User Manual
Page 2
3. You’ll need to change the IP address and Subnet Mask of your computer, so it can
communicate with the RIM Protocol Converter in its factory-configured state. Before you
change anything, write down the original IP address and Subnet Mask of your computer
- you’ll need to revert back to these original settings once the RIM Protocol Converter is
configured.
4. Change the IP address and Subnet Mask of the computer from its existing address to one
that will allow it to communicate with the RIM Protocol Converter, such as 10.0.0.189. It
may be beneficial to set the IP address to one that is one number different from the RIM
Protocol Converter’s IP address (10.0.0.188).
5. Connect the other end of the crossover cable to the Ethernet port on the back of the RIM
Protocol Converter.
6. Access the RIM Protocol Converter through a web browser — type the RIM Protocol
Converter’s IP address (10.0.0.188) into the location bar. When prompted, enter the RIM
Protocol Converter’s user name, which is cpi. There is no default password, leave it blank.
7. Select the Configuration link from the top menu bar, then select the Network and web
option that appears in the Configuration Menu on the left side of the screen. Change
the RIM Protocol Converter’s IP address, Subnet Mask and default Gateway to the one
provided by your IT department. Press the Submit Changes button. The RIM Protocol
Converter will save the new IP address, Subnet Mask and default Gateway and reboot.
8. Change the IP address of the computer back to its original IP address. If the computer was
configured as DHCP (the network domain controller assigns an IP address), return it to this
state. This may require assistance from your IT Department, or you may need to consult
the computer’s manual.
9. Both the computer and the RIM Protocol Converter are now configured to communicate
on the network and should be accessible via the network. Connect the PC and the RIM
Protocol Converter to the network. From the PC web browser, type in the new IP address
of the RIM Protocol Converter. Enter the user name and password as stated above to
verify network access to the device.
Complete the Configuration
Once the RIM Protocol Converter has been hardwired and the IP address has been set, it’s
ready to be fully configured. It will be able to communicate over a network and through
its communication ports, but you will still need to perform additional tasks to configure the
devices connected to the RIM Protocol Converter.
Access the web interface to complete the configuration. Download the RIM Protocol
Converter’s User Manual from the web page
.
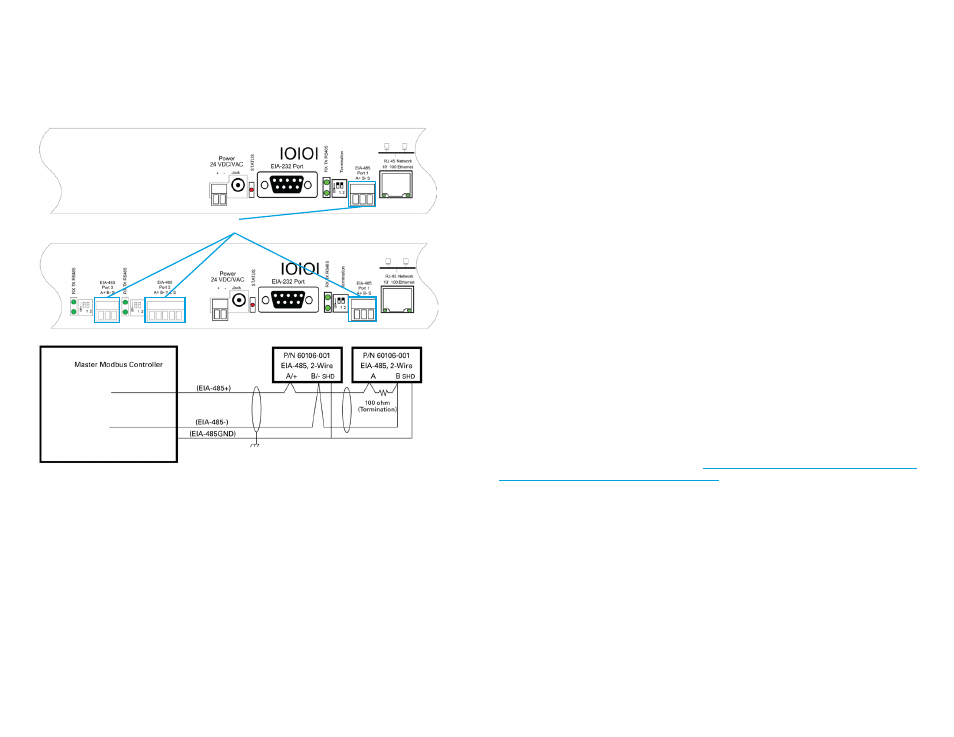
EIA-485 Ports
P/N 60106-001
P/N 60106-002
Set the IP Address Using a Web Browser
The RIM Protocol Converter will not communicate over your network the first time it is
connected. Since it is shipped with a default IP address of 10.0.0.188, you’ll need to change the
default IP address to one that will allow it to communicate over your network. If you have not
set an IP address before, consult your IT department for support.
Note:
The default IP address for the RIM Protocol Converter is 10.0.0.188
The default Subnet Mask is 255.255.255.0
The default user name is cpi (all lowercase)
There is no default password - leave the password field empty.
1. Contact your IT department to obtain an available IP address, Subnet Mask and default
Gateway.
2. Plug a crossover network cable (provided) into the laptop or workstation that will be used
to configure the RIM Protocol Converter.
Modbus EIA-485 Connections
The RIM Protocol Converter can function as a Modbus master or Modbus slave over an EIA-485
hardware connection. The single port RIM Protocol Converter (P/N 60106-001) has one 2-wire
EIA-485 connection. The dual port RIM Protocol Converter (P/N 60106-002) has two 2-wire EIA-
485 connections and one 2- or 4-wire EIA-485 connections for extended Modbus polling over
multiple trunk lines.