Electrical connections, Elektrische anschlüsse, Conexiones electricas – Kenwood KDV-7241Y User Manual
Page 3
*
*
*
3
ELECTRICAL CONNECTIONS
To prevent short circuits, we recommend that you disconnect the
battery’s negative terminal and make all electrical connections before
installing the unit.
•
Be sure to ground this unit to the car’s chassis again after
installation.
Notes:
•
Replace the fuse with one of the specified rating. If the fuse blows
frequently, consult your Kenwood Car Audio dealer.
•
It is recommended to connect to the speakers with maximum
power of more than 50 W (both at the rear and at the front, with an
impedance of 4 Ω to 8 Ω). If the maximum power is less than 50 W,
change “Amplifier Gain” setting to prevent the speakers from being
damaged (see page 35 of the INSTRUCTION MANUAL).
•
To prevent short-circuit, cover the terminals of the UNUSED leads
with insulating tape.
•
The heat sink becomes very hot after use. Be careful not to touch it
when removing this unit.
ELEKTRISCHE ANSCHLÜSSE
Zur Vermeidung von Kurzschlüssen empfehlen wir, daß Sie den negativen
Batterieanschluß abtrennen und alle elektrischen Anschlüsse herstellen,
bevor das Gerät eingebaut wird.
•
Sicherstellen erneut, daß das Gerät nach dem Einbau Chassis
des Fahrzeugs geerdet wird.
Hinweise:
•
Die Sicherung mit einer der entsprechenden Nennleistung ersetzen.
Wenn die Sicherung häufig durchbrennt, wenden Sie sich an Ihren
Kenwood-Autoradiohändler.
•
Es wird empfohlen, Lautsprecher mit einer Maximalleistung von
mehr als 50 W anzuschließen (sowohl hinten als auch vorne, mit
einer Impedanz von 4 Ω bis 8 Ω). Wenn die Maximalleistung
weniger als 50 W beträgt, stellen Sie „Amplifier Gain“ anders ein, um
Schäden an den Lautsprechern zu vermeiden (siehe Seite 35 der
BEDIENUNGSANLEITUNG).
• Zur Vermeidung eines Kurzschlusses die Anschlußklemmen der NICHT
VERWENDETEN Leitungen mit Isolierklebeband umwickeln.
• Das Abstrahlblech wird nach dem Gebrauch sehr heiß. Beim Ausbau des
Geräts darauf achten, das Abstrahlblech nicht zu berühren.
CONEXIONES ELECTRICAS
Para evitar cortocircuitos, recomendamos que desconecte el terminal
negativo de la batería y que efectúe todas las conexiones eléctricas antes
de instalar la unidad.
•
Asegúrese de volver a conectar a masa esta unidad al chasis
del automóvil después de la instalación.
Notas:
•
Reemplace el fusible por uno con la corriente especificada. Si se
funden los fusibles frecuentemente, póngase en contacto con su
distribuidor de audio para auto Kenwood.
•
Se recomienda conectar los altavoces con una potencia máxima de
más de 50 W (tanto atrás como adelante, con una impedancia de
4 Ω a 8 Ω). Si la potencia máxima es de menos de 50 W, cambie
“Amplifier Gain” para evitar daños en los altavoces (consulte la
página 35 del MANUAL DE INSTRUCCIONES).
•
Para evitar cortocircuitos, cubra los cables NO UTILIZADOS con
cinta aislante.
•
El sumidero térmico estará muy caliente después del uso. Asegúrese
de no tocarlo al desmontar esta unidad.
Heat sink
Abstrahlblech
Sumidero térmico
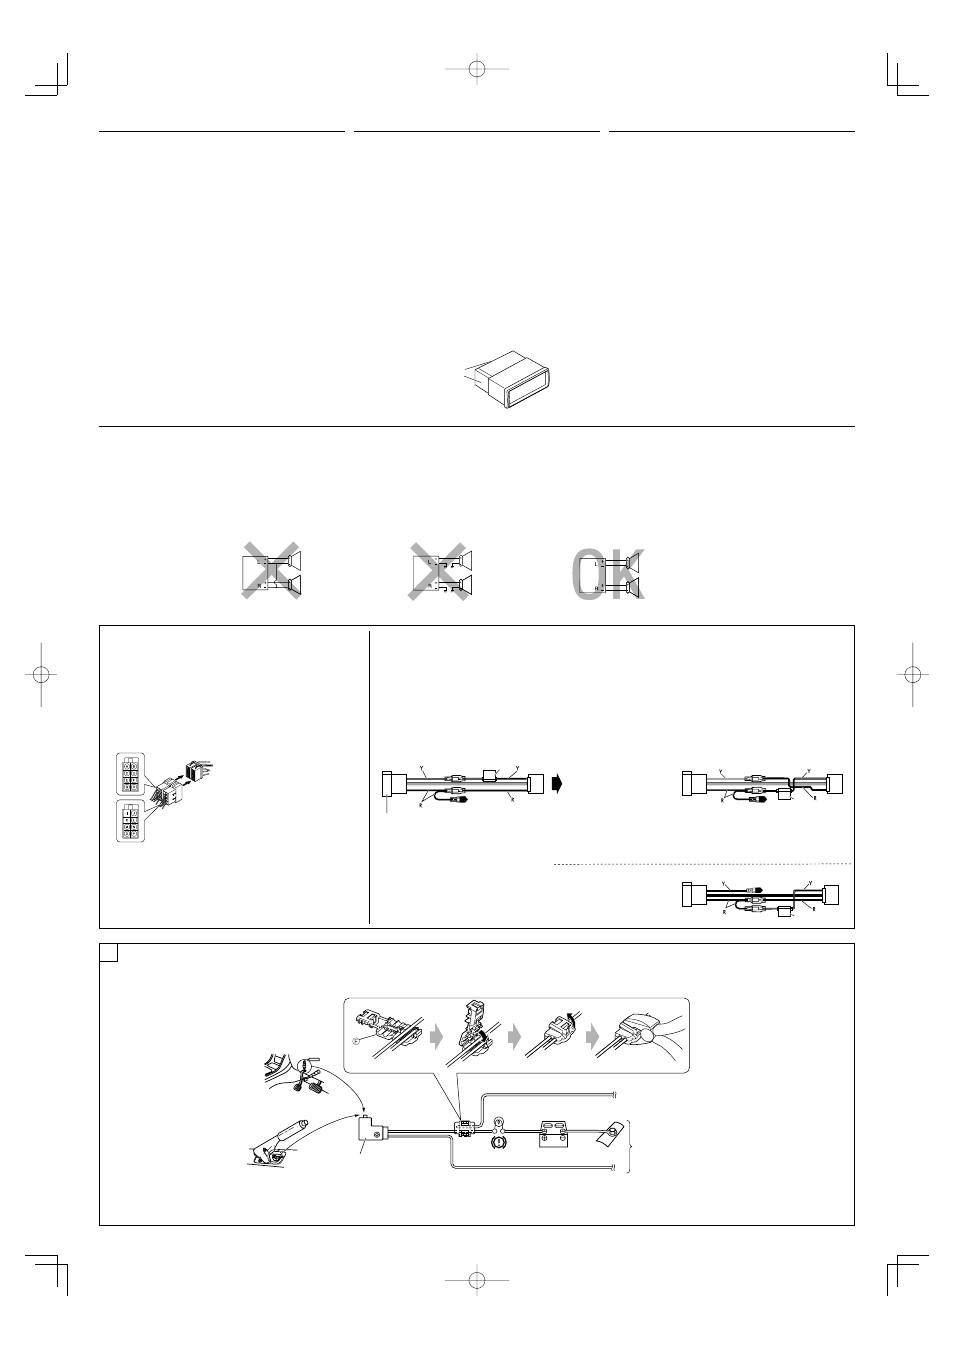
PRECAUTIONS on power supply and speaker
connections:
•
DO NOT connect the speaker leads of the power cord to the
car battery; otherwise, the unit will be seriously damaged.
•
BEFORE connecting the speaker leads of the power cord to the
speakers, check the speaker wiring in your car.
VORSICHTSMASSREGELN beim Anschließen der
Stromversorgung und Lautsprecher:
•
Die Lautsprecherleitungen des Netzkabels NICHT an der
Autobatterie anschließen, da sonst das Gerät schwer
beschädigt wird.
• VOR dem Anschließen der Lautsprecherleitungen des
Spannunsgversorgungskabels an die Lautsprecher, die
Lautsprecherverdrahtung in Ihrem Auto überprüfen.
PRECAUCIONES sobre las conexiones de la fuente de
alimentación y de los altavoces:
•
NO conecte los conductores de altavoz del cable de
alimentación a la batería de automóvil, pues podrían
producirse graves daños en la unidad.
•
ANTES de conectar a los altavoces los conductores de altavoz del
cable de alimentación, verifique el conexionado de altavoz de su
automóvil.
Y: Yellow
Gelb
Amarillo
R: Red
Rot
Rojo
If your car is equipped with the ISO connector / Wenn Ihr
Fahrzeug mit dem ISO-Steckverbinder ausgestattet ist / SSi su
automóvil está equipado con el conector ISO
•
Connect the ISO connectors as illustrated.
• Schließen Sie die ISO-Steckverbinder an, wie in der Abbildung gezeigt.
•
Conecte los conectores ISO tal como se indica en la ilustración.
From the car body
Von der Fahrzeugkarosserie
Desde la carrocería del vehículo
ISO connector of the supplied power cord
ISO-Stecker des mitgelieferten Stromkabels
Conector ISO del cable de alimentación suministrado
View from the lead side
Von der Kabelseite aus gesehen
Vista desde el lado del conductor
For some VW/Audi or Opel (Vauxhall) automobile / Bei bestimmten VW-/Audi- order Opel- (Vauxhall-)
Fahrzeugen / Para algunos automóviles VW/Audi u Opel (Vauxhall)
Original wiring
Originalverdrahtung
Conexionado original
Modified wiring
1
/
Modifizierte Verdrahtung 1 /
Conexionado modificado
1
Use modified wiring 2 if the unit does not turn on.
Verwenden Sie die modifizierte Verdrahtung 2 wenn der Receiver nicht einschaltet.
Si la unidad no se enciende, utilice el conexionado modificado
2
.
Modified wiring
2
Modifizierte Verdrahtung 2
Conexionado modificado
2
ISO connector
ISO-Steckverbinder
Conector ISO
*
Choking coil
Drosselspule
Bobina de reactancia
You may need to modify the wiring of the
supplied power cord as illustrated.
•
Contact your authorized car dealer
before installing this unit.
Es kann erforderlich sein, die Verdrahtung des
mitgelieferten Stromkabels zu modifizieren,
wie in der Abbildung gezeigt.
• Wenden Sie sich vor dem Einbau dieses
Receivers an Ihre Auto-Fachwerkstatt.
Podría ser necesario modificar el
conexionado del cable de alimentación
suministrado, tal como se indica en la
ilustración.
•
Antes de instalar esta unidad, consulte
a su concesionario de automóviles
autorizado.
Connect the parking brake lead to the parking brake system built
in the car.
Anschluss des Handbremsenkabels an das im Fahrzeug eingebaute
Handbremsensystem.
Conecte el cable del freno de estacionamiento al sistema de freno de
estacionamiento del automóvil.
Parking brake lead (light green)
Handbremsenkabel (hellgrün)
Cable del freno de estacionamiento (verde claro)
To metallic body or chassis of the car
Zur metallenen Karosserie oder zum Fahrwerk des Autos
A un cuerpo metálico o chasis del automóvil
Parking brake switch (inside the car)
Handbremsenschalter (Fahrzeuginneres)
Interruptor del freno de estacionamiento
(dentro del automóvil)
Parking brake
Handbremse
Freno de estacionamiento
A
Connecting the parking brake lead / Anschluss des Handbremsenkabels / Conexión del cable del freno de estacionamiento
KDV-7241_E_install_EGS.indb 3
KDV-7241_E_install_EGS.indb 3
08.4.18 2:53:41 PM
08.4.18 2:53:41 PM