Kenwood MGR-A7-B User Manual
Page 2
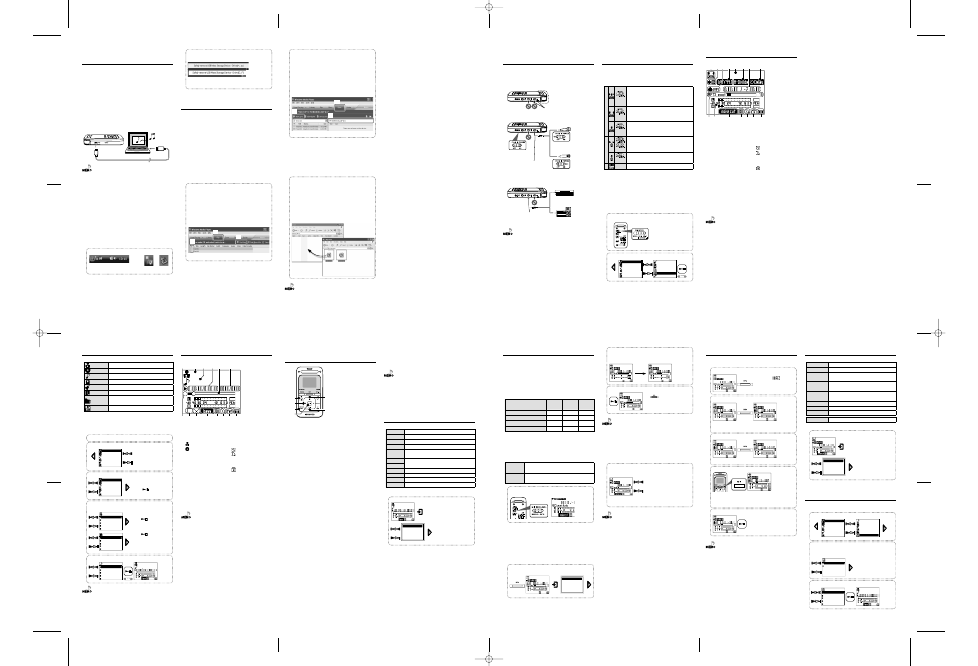
Connecting a PC/
Recharging Battery
Recharging from a PC connected with USB
connection
Using the provided USB cable, connect this unit to a PC. This
makes it possible to transfer music from the PC to this unit
and to recharge its battery.
Recharging is complete when the CHARGE indicator turns
off.
Recharging completes in about 3.5 hours.
When the USB cable is connected, this unit enter the data
transfer mode and does not accept user operations on it.
For how to disconnect the PC from this unit, see
USB cable
(provided
accessory)
• Start up the PC before connecting this unit.
• This unit is switched ON automatically at the moment it is
connected to the PC.
• When the USB connection, always use a supplied USB cable.
• This unit should be connected directly to the USB port of the
PC. We cannot guarantee the operation if this unit is connected
via a USB hub.
Reading the PDF Instruction Manual
The Instruction Manual is saved as a PDF file in the
following folder of this unit. Copy this file into your PC
before reading it.
[My Computer] – [KENWOOD_DAP] – [Manual]
After copying, you may delete the PDF file to increase the
space for transferring more files. If you delete the PDF file by
mistake, you can transfer it from the Kenwood website.
Disconnecting this unit from the PC
1
Click the [Safe To Remove Hardware] icon.
Display the indicator on the task tray if it is not
displayed.
Windows Vista Windows XP
2
Click [Safely remove USB Mass Storage
Device].
(Vista)
(XP)
When the message showing that this unit can be
disconnected safely, disconnect it from the PC.
Capturing Music in PC/
Transferring Music from PC
To play music files as tracks of this Player, first rip music files in
the PC and then transfer them from the PC to this Player.
This unit can play the following 3 types of music
files.
• MP3 (*.mp3) : MPEG-1 Audio Layer-3
• WMA (*.wma) : Windows Media Audio
• WAV (*.wav) : WAVE file (Linear PCM)
For detailed specifications, see
Using Windows Media Player 11/10/9
A music CD can be ripped into the PC using the Windows
Media Player 11/10/9.
(The following steps describes the operation with the Windows Media
Player 10.)
1
Launch the Windows Media Player.
2
Click the [Rip] button on the top.
3
Place a music CD in the CD-ROM drive of the
PC.
4
Check the checkboxes of the CD tracks to be
ripped.
5
Click the [Rip Music] button.
2
5
4
For details, refer to the Instruction Manual in the PDF file.
6
Click the [Sync] button on the top.
7
Select the the removable disk ([KENWOOD_
DAP] (internal memory), [KENWOOD_SD] (SD
card), or [Digital Player]) corresponding to
this Player.
8
Add the music files to be transferred in the
Sync List.
9
Click the [Start Sync] button.
6
9
7
For details, refer to the Instruction Manual in the PDF file.
Data transfer by drag & drop
Open the Windows Explorer and drag & drop the desired
file from the PC’s hard disk drive to this Player (expressed
as [KENWOOD_DAP] (internal memory) or [KENWOOD_SD]
(SD card) on Windows). Copy & paste can also be used for
data transfer.
1
Open the removable disk corresponding to
this Player.
Click [Start] – [My Computer] – [KENWOOD_DAP] (internal
memory) or [KENWOOD_SD] (SD card).
2
Open the folder storing the desired music
file.
3
Drag & drop the music file into the removable
disk.
• If copy protection is set, when capturing tracks of a music CD
into the PC using the Windows Media Player, transferring the
music file to this unit is limited only to the Windows Media
Player. The music files which are transferred using drag & drop
or copy & paste cannot be played.
• Before transferring a music file, view it with the Windows Media
Player to confirm that the genre, artist name, album title and
track title are set correctly.
Selecting music for playback
Select and play the desired track.
Artist
Select Artist name
= Album title = Track title.
Album
Select Album title
= Track title.
Track
Select Track title directly.
Favorite
Select one of the tracks registered as favorite tracks.
Genre
Select Genre
= Artist name = Album title = Track title.
Year
Select Year of release
= Track title.
Folder
Select Folder and then follow the hierarchy to select the music
file for the desired Track.
Recorded
Select music in one of the recorded files.
When a major item is selected, the list of intermediate items
located below it is displayed.
Press the Play/Stop button when the item to be played
(Track or item name) is displayed starts its playback.
1
Connect headphones and switch this unit ON.
2
Open the home screen.
1sec.
Album
Track
Favorite
Genre
Year
Artist
The home screen opens.
3
Select a major item ("Artist", for example).
Album
Track
Favorite
Genre
Year
Artist
The list for the major item
(intermediate items) is displayed.
Pressing
now starts playback of
all of the files in the library.
4
Select an intermediate item ("Artist name" >
"Album title", for example).
Artist name
Artist name
Artist name
Artist name
Artist name
Artist
Pressing
now starts playback of
all of the files in the selected artist .
Album title
Album title
Album title
Album title
Album title
Artist name
Pressing
now starts playback of
all of the files in the selected album.
5
Select a track ("Track title", for example).
Track title
Track title
Track title
Track title
Track title
Album title
Enter
Enter
Track title
Artist name
• A track that does not contain tag information is classified as
"Unknown".
• Press the Left button to return to the previous display page.
Display during playback
The display shows various information during playback.
Track title
Artist name
1
2
3
4 5
~
=
-
0
9
8
7
6
!
Operations available during
playback
Pop-up menu during playback
Set up functions related to playback.
To Home screen Return to the home screen.
SPRM
Set the Supreme function.
Sound mode
Adjust the sound quality.
Play mode
Set the play mode such as random play.
Add favorite/
Delete favorite
Add as Favorite or delete from Favorite.
Item skip+
Skip through the selected item.
Item skip-
Timer setting
Set the timer.
Play speed
Set the playback speed.
FF/FB Speed
Set the speed for fast-forward/fast back.
Properties
Display the file information.
For details, refer to the Instruction Manual in the PDF file.
1
Display the pop-up menu.
Track title
Artist name
To Home screen
SPRM
Sound mode
Play mode
Add favorite
1 Mode
3 : Play
None : Stop
2 : Artist name
: Album title
3 Track title
4 Elapsed play time/ Total
play time
5 Song time progress bar
6 Track No./Number of
selected tracks
7 Play speed
8 Repeat mode
9 Play mode
0 SPRM/ Sound mode
- Presence of SD card
= Sleep timer/
Alarm timer
: Alarm timer on
: Sleep timer on
None: Timer off
~ HOLD switch
: HOLD
None: HOLD canceled
• For details, refer to the Instruction Manual in the PDF file.
Resume function
This unit holds the conditions before the power is switched
off. When this unit is switched on the next time, it resumes
playback from the position where it was stopped.
• This unit switches OFF automatically after it has been left in stop
mode for a certain period of time (Auto Power-OFF). The time
until Auto Power-OFF occurs can be changed.
• The resume function is disabled in the following cases. The
home screen is displayed when this unit is switched on.
- When the SD card is inserted.
- When the USB cable is connected.
Connecting a microphone or
audio component
In addition to the built-in microphones, an external
microphone or audio component can be connected to this
unit for recording the music and voice input from it.
¡
Recording from the built-in microphones
™
Recording from an external microphone
£
Recording from an external audio component
or musical instrument connected to the line
input
Dynamic microphone, etc.
Condenser microphone with
the plug-in power type
Stereo, etc.
Musical instrument, etc.
(Line output)
• Prepare the required adapters, such as a standard stereo plug
cable or RCA pin plug – stereo miniplug adapter (commercially
available in audio stores), according to the output terminals of
the external microphone or audio component.
• When connecting a condenser microphone with built-in
battery, set the PLUG IN POWER switch to OFF.
Do not connect anything.
Built-in microphones
LINE-IN jack
PLUG IN POWER
switch
(Set to OFF.)
(Set to ON.)
MIC input jack
Selecting the recording mode/
Setting the microphone mode
Recording is possible from the built-in microphones, an
external microphone or an external device.
The microphone mode should be set when recording from
microphones.
¡
(3MIC)
Stereo recording mode using the L/R (omnidirectional) and Center
(unidirectional) built-in microphones. This mode can record audio
with high directivity in the front direction while restricting the
ambient noise.
(2MIC)
Stereo recording mode using the L/R (omnidirectional) built-in
microphones that are installed at an angle of 120°. This mode can
record stereo audio with a rich feeling of expansion.
(MONO)
Monaural recording mode using only the Center (unidirectional)
built-in microphone. This mode can record audio with high
directivity in the front direction.
™
(STEREO)
Stereo recording using an external stereo microphone.
(MONO)
Monaural recording using an external monaural microphone.
£
—
Recording of the line input.
The recording source is switched automatically when a
cable is connected to the line input or microphone input
terminal. During recording from the built-in microphones
or an external microphone, the displayed icon changes
according to the microphone mode set on the rear panel
of this unit.
1
Set the microphone mode.
(Built-in microphones or external microphone only)
2
Select "Recording" from the home screen.
1sec.
Album
Track
Favorite
Genre
Year
Artist
Year
Genre
Recorded
Recording
Settings
Folder
Enter
Enter
1 Recording Mode
2 Recording destination
3 Mode
¶ : Recording
8 : Pause
None : Stop
4 Recording format
5 Recorded file name
6 Sync recording
7 Elapsed recording time/
Remaining recording
time
8 Delay recording
9 Recording level setting)
0 Level meter
- Recording equalizer
= Presence of SD card
~ Sleep timer/
Alarm timer
: Alarm timer on
: Sleep timer on
None: Timer off
! HOLD switch
: HOLD
None: HOLD canceled
@ Remaining battery power
Display during recording
The display shows various information during recording.
080229123456.WAV
1 2 3 4 5
@
!
~
=
-
0
9
6 7
8
• For details, refer to the Instruction Manual in the PDF file.
Pop-up menu during recording
Set up functions related to recording.
To Home screen
Return to the home screen.
Recording format Set the recording format.
Recording
destination
Set the destination for the recorded files to be saved.
Sync rec
Set the synchronized recording which the recording starts
automatically as music starts.
Sync level
Set the detection level of synchronized recording in microphone
mode.
Delay rec
Start recording after the set time has elapsed in microphone mode.
Mic Gain +20dB
Raise the recording level of external microphone level.
Timer setting
Set the timer.
Auto Level Setting Set the recording level according to the maximum input level.
For details, refer to the Instruction Manual in the PDF file.
1
Display the pop-up menu.
To Home screen
Recording format
Recording destinat
Sync rec
Sync level
Playing recorded music or
voice
The music or voice recorded from microphones or the line
input can be played back as described below.
1
Select "Recorded" from the home screen.
1sec.
Album
Track
Favorite
Genre
Year
Artist
Favorite
Track
Year
Genre
Recorded
Folder
2
Select whether the file to be played has been
recorded from the microphones or the line
input.
Line
Mic
Recorded
3
Select the recorded file.
080301123456.wma
080302101010.wma
080302120000.wav
080303000100.wav
080303234500.wma
Line
Track title
Artist name
Recording music or voice
The music or voice input from microphones or an audio
component can be recorded as described below.
1
Set this unit to record-pause mode.
The record-pause (
) indicator
lights up.
2
Start
recording.
080301123456.wma
The recorded file name is displayed. (file name: Year-Month-
Day-Hour-Minute-second)
3
To pause recording:
080301123456.wma
080301123456.wma
Pressing the button again to resume recording.
4
To divide a recorded file:
080301123619.wma
Recording is continued on a new recorded file.
The sound may be interrupted at the point the recorded file
changes.
5
Stop
recording.
080301123456.wma
• The maximum recording time available per file is 2 hours.
When the maximum recording time is reached, recording
is continued on a new recorded file. The sound may be
interrupted at the point the recorded file changes.
• The recorded file is not divided even when recording pauses
temporarily.
• The recorded file is named after the date and time the
recording is started.
• The recorded file can be deleted anytime.
• To play a recorded file, select it from "Recorded" file list in the
home screen.
• The recorded file can be copied in the PC. The recorded file is
stored in either folder below.
– Internal memory:
"Computer" — "KENWOOD_DAP" — "RECORD" folder
–SD card: "Computer" — "(SD card)" — "KWD" folder
Adjusting the recording level
When recording voice of a speech from microphones, the
recording level can be adjusted so that the volume level is
uniform all over the recording (MIC REC LEVEL function).
The recording level can be adjusted either automatically
according to the maximum input level (ALS function) or
manually.
The setting items vary depending on the
recording source.
Built-in
microphones
External
microphone
Line input
MIC REC LEVEL function
✔
✔
—
Auto Level Setting (ALS) function
✔
✔
✔
Manual recording level adjustment
✔
✔
✔
External microphone gain setting
—
✔
—
MIC REC LEVEL function
When recording a speech with the built-in microphones or
an external microphone, this function records the voice so
that the volume level is as uniform as possible all over the
recording.
AUTO
This setting records audio at as uniform as possible level and is
therefore suitable for recording of a speech, etc.
MANUAL
The recording level can be adjusted either using the ALS function
or manually.
1
Set the MIC REC LEVEL function.
(Built-in microphones or external microphone only)
Auto Level Setting (ALS) function
The recording level is set according to the maximum input
level.
For instance, to record a music CD with the optimum
recording level, play the section with the largest volume
and set the ALS function.
1
Display the pop-up menu during record-
pause and select "Auto Level Setting".
Auto Level Setting
2
This unit enters the ALS mode and sets the
recording level according to the maximum
input level.
Auto Level Setting
Auto Level Setting
3
Exit the ALS mode.
Press
now to exit the ALS mode and
starts recording.
• When using the built-in microphones or an external
microphone, it is required to set the MIC REC LEVEL switch on
the rear panel of this unit to "MANUAL".
• If the ALS mode is exited immediately after a loud sound, the
recording level may not be adjusted properly. Exit the ALS
mode at least 2 seconds after a loud sound.
Manual recording level adjustment
The recording level can also be adjusted manually.
1
Adjust the recording level.
Observe the level meter, adjust the recording
level between 0 and 64 so that the recording
level does not exceed 0 dB (so that the PEAK
indicators do not light).
Pressing and holding an adjustment button
increases (
4) or decreases (¢) the
recording level gradually.
• When using the built-in microphones or an external
microphone, it is required to set the MIC REC LEVEL switch on
the rear panel of this unit to "MANUAL".
• Manual adjustment is not available when the Auto Level Setting
(ALS) function is activated.
1
2
3
4
5
6
1 Power/Menu button
Displays the pop-up menu.
Press when the backlight is off to
turn it on.
2 Left button
Displays the previous list.
Pressing and holding for more
than 1 sec.:
Open the home screen.
3 REPEAT button
Press briefly:
Each press switches the repeat
mode.
Pressing and holding for more
than 1 sec.:
Sets an A-B repeat point.
4 Play/Stop button
Play mode:
Lets playback stop temporarily.
Stop mode:
Resumes playback.
Pop-up menu:
Press while the menu is displayed
to enter a selected item.
5 Up button
Play mode:
Each press skips to the beginning
of the current track or of the
previous track (Skip-down).
Press and hold to fast reverse the
track.
Stop mode:
Each press skips to the beginning
of the current track or of the
previous track (Skip-down).
Press and hold to skip to the
previous tracks one after another.
Pop-up menu:
Press to move the cursor upward.
6 Down button
Play mode:
Each press plays the next track
(Skip-up).
Press and hold to fast forward the
music.
Stop mode:
Each press skips to the beginning
of the next track (Skip-up).
Press and hold to skip to the
subsequent tracks one after
another.
Pop-up menu:
Press to move the cursor
downward.
English
B60-5732_00_00_E_English.indd 3-4
B60-5732_00_00_E_English.indd 3-4
08.3.3 10:42:48 AM
08.3.3 10:42:48 AM