Audiovox MP7610 User Manual
Mp7610 owner’s manual, Watts rms, Preparation
MOSFET 72
WATTS RMS
/
MOSFET
72
WATTS
RMS
/
AUX IN
MOSFET POWERED
/
PTM
TEXT
MENU
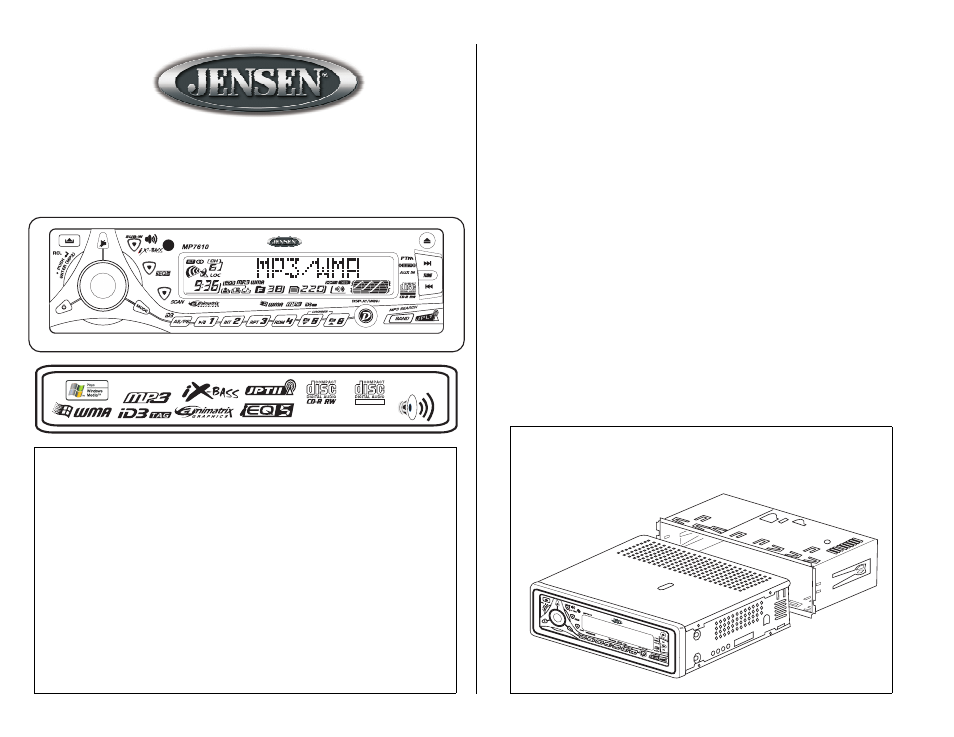
MP7610
Owner’s Manual
Thank You!
Thank you for choosing a Jensen product. We hope you will find the instructions in this owner’s
manual clear and easy to follow. If you take a few minutes to look through it, you’ll learn how to
use all the features of your new Jensen receiver for maximum enjoyment. Technical assistance is
available by phone at 1-800-323-4815.
Preparation . . . . . . . . . . . . . . . . . . . . . . . . . . . . . . . . . . . . . . . . . . . . . . . . . . . . . . . . . . . . . . 1
Wiring. . . . . . . . . . . . . . . . . . . . . . . . . . . . . . . . . . . . . . . . . . . . . . . . . . . . . . . . . . . . . . . . . . . 3
Installation . . . . . . . . . . . . . . . . . . . . . . . . . . . . . . . . . . . . . . . . . . . . . . . . . . . . . . . . . . . . . . . 5
Basic Operation . . . . . . . . . . . . . . . . . . . . . . . . . . . . . . . . . . . . . . . . . . . . . . . . . . . . . . . . . . 6
Tuner Operation . . . . . . . . . . . . . . . . . . . . . . . . . . . . . . . . . . . . . . . . . . . . . . . . . . . . . . . . . . 13
CD Player Operation . . . . . . . . . . . . . . . . . . . . . . . . . . . . . . . . . . . . . . . . . . . . . . . . . . . . . . . 15
CD Changer Operation . . . . . . . . . . . . . . . . . . . . . . . . . . . . . . . . . . . . . . . . . . . . . . . . . . . . . 16
Remote Control . . . . . . . . . . . . . . . . . . . . . . . . . . . . . . . . . . . . . . . . . . . . . . . . . . . . . . . . . . . 16
MP3/WMA Operation. . . . . . . . . . . . . . . . . . . . . . . . . . . . . . . . . . . . . . . . . . . . . . . . . . . . . . . 17
Troubleshooting . . . . . . . . . . . . . . . . . . . . . . . . . . . . . . . . . . . . . . . . . . . . . . . . . . . . . . . . . . 19
Specifications . . . . . . . . . . . . . . . . . . . . . . . . . . . . . . . . . . . . . . . . . . . . . . . . . . . . . . . . . . . . 19
Warranty . . . . . . . . . . . . . . . . . . . . . . . . . . . . . . . . . . . . . . . . . . . . . . . . . . . . . . . . . . . . . . . . 19
Preparation
Getting Started
It’s a good idea to read all of the instructions before beginning the installation.
Tools and Supplies
The following tools and supplies are needed to install the radio.
•
Torx type, Flat-head and Philips screwdrivers
•
Wire cutters and strippers
•
Tools to remove existing radio (screwdriver, socket wrench set or other tools)
•
Electrical tape
•
Crimping tool
•
Volt meter/test light
•
Crimp connections
•
18 gauge wire for power connections
•
16-18 gauge speaker wire
Speaker Requirements: Only connect speakers rated in the load impedance of 4 ohms.
Speakers with a load impedance less than 4 ohms could damage the unit.
Disconnect Battery
Before you begin, always disconnect the battery negative terminal.
Remove Radio from Sleeve
Lift latches on both sides of sleeve to remove half-sleeve from radio.
Remove Radio from Sleeve
Remueva el Radio de la Manga
Enlever la radio du manchon
Document Outline
- Preparation
- Preparación
- Operation
- Préparation
- MP3/WMA Operation
- Operación
- Opération
- Operation (continued)
- Operación (continuado)
- Opération (continué)
- Operation (continued)
- Operación (continuado)
- Opération (continué)
- Tuner Operation
- Operación de la radio
- Fonctionnement de la radio
- Tuner Operation (continued)
- Operación de la radio (continuado)
- Corrección de Problemas
- Garantia Limitade de 12 Meses
- Dépannage
- Garantie Limitée de 12 Mois
- CD Player Operation
- Operación del Reproductor de CD
- 19. Inserte y Quite CDs
- 20. Pausa
- 21. Salto de Pistas
- 22. En Rastreo (INT)
- 23. Repetición (RPT)
- Presione RPT (23) para repetir continuamente la misma pista. Presione de nuevo para detener la Repetición.
- 24. Reproducción al Azar (RDM)
- Presione RDM (24) para reproducir todas las pistas del CD en un orden aleatorio. Presione de nuevo para detener la Reproducción al Azar.
- 25. Display CD Text
- Fonctionnement du lecteur CD
- MP3/WMA Operation (continued)
- Operación de MP3/WMA (continuado)
- MP3/WMA Operation (continued)
- Operation (continued)
- Operación (continuado)
- Opération (continué)
- Operation (continued)
- Operación (continuado)
- Opération (continué)
- Operation (continued)
- Operación (continuado)
- Opération (continué)
- Operation (continued)
- Operación (continuado)
- Opération (continué)
- CD Changer Operation
- Pause, Repeat, Random, Intro Scan and Track Select features during CD changer play are accessed in the same methods as for regular disc play. Refer to the CD Player Operation sec tion of this manual for details.
- Remote Control
- Operación del Cambiador de CD
- Control remoto
- Fonctionnement de changeur de CD
- Prêt à être télécommandé
- MP3/WMA Operation (continued)
- Operación de MP3/WMA (continuado)
- Operación de MP3/WMA
- Fonctionnement de MP3/WMA
- Preparation (continued)
- Wiring
- Wiring with a Wiring Adapter (Purchased Separately)
- 1. Splice or crimp wires.
- 2. Attach wiring adapter to car wiring harness.
- 1. Power Antenna (dark blue wire) - Connect to power antenna or amplifier. If not used, tape bare end of wire.
- 2. Ground (black wire) - Connect to ground terminal or clean, unpainted part of chassis.
- 3. Memory/Battery (yellow wire) - Connect to battery or 12 volt power source that is always alive. The radio will not work if this wire is not connected.
- 4. Accessory/Ignition (red wire) - Connect to existing radio wire or radio fuse.
- 5. Left front speaker
- 6. Right front speaker
- 7. Left rear spearker
- 8. Right rear speaker
- 9. RCA Outputs to Amplifier
- 10. Auxiliary Input Cable (yellow)
- 11. Subwoofer Output (blue
- 12. Antenna
- 13. CD Changer
- Fuses
- Reconnect Battery
- Wiring with a Wiring Adapter (Purchased Separately)
- Preparación (continuado)
- Instalación de la Camisa
- 1. Instale el adaptador y kit del tablero de instrumentos, si es necesario (opcional).
- 2. Instale la media camisa en el adaptador o en tablero de instrumentos.
- 3. Hale las aletas hacia afuera para asegurar la media camisa en al apertura del radio.
- 4. Instale la abrazadera de soporte para que la unidad quede más estable.
- Instalación de la Camisa
- Cableado
- Cableado con un Adaptador de Cables (Cómprelos por separado)
- 1. Una o conecte a presión.
- 2. Una el adaptador de cableado al arnés del cableado del carro.
- 1. Alimentación Antena (cable azul) - Conectar a la antena o al amplificador. Si no se utilizara el cable, se debe recubrir la punta del cable.
- 2. Conexión a Tierra (cable negro) - Conectar a la terminal de tierra o a una superficie limpia de metal, sin pintura, del chassis.
- 3. Memoria/Batería (cable amarillo) - Conectar a la batería o a la fuente de energía de 12 voltios que está siempre viva. La radio no funcionará si este cable no está conectado.
- 4. Accesorio/Ignición (cable roja) - Conectar al cable de la radio o al fusible de la radio.
- 5. Altavoz Delantero Izquierdo
- 6. Altavoz Delantero Derecho
- 7. Altavoz Delantero Izquierdo
- 8. Altavoz Delantero Derecho
- 9. Salidas de RCA al Amplificador
- 10. Cables auxiliares de entrada (amarillo)
- 11. La salida del subwoofer (azul)
- 12. Antenna
- 13. Cambiadiscos de CD
- Fusibles
- Reconexión de la Batería
- Cableado con un Adaptador de Cables (Cómprelos por separado)
- Préparation (continué)
- Installation du demi-manchon
- 1. Installez l’adaptateur et kit de tableau de bord si nécessaire (facultatif).
- 2. Installez le demi-fourreau dans l’adaptateur de la planche de bord.
- 3. Poussez les pattes vers l’extérieur pour fixer le demi-fourreau dans l’ouverture de l’autoradio.
- 4. Installez la bande de fixation pour rendre l’appareil plus stable.
- Installation du demi-manchon
- Câblage
- Raccordement au câblage avec un adaptateur (achetér séparément)
- 1. Effectuez les branchements par raccord ou sertissage.
- 2. Fixez l’adaptateur de câblage au faisceau de câbles de la voiture.
- 1. Antenne motorisée (fil bleu foncé) - Branchez à l’antenne motorisée ou à l’amplificateur. S’il n’est pas utilisé, recouvrez l’extrémité dénudée du fil de ruban adhésif.
- 2. Mise à la tere (fil noir) - Connectez à la borne de mise à la terre ou à un point métallique propre, non peint, du châssis.
- 3. Mémoire/batterie (fil jaune) - Connectez à la batterie ou à une source d’alimentation 12 volts tougours sous tension. La radio ne fonctionnera pas si ce fil n’est pas branché.
- 4. Accessoires/allumage (fil rouge) - Connectez au fil de la radio existante ou au fusible du radio.
- 5. Haut parleur d'avant à gauche
- 6. Haut parleur d'avant à droite
- 7. Haut parleur d'arrière à gauche
- 8. Haut parleur d'arrière à droit
- 9. Sorties de RCA à l'amplificateur
- 10. Câbles d'entrée auxiliaire (jaune)
- 11. Sortie de subwoofer (bleu)
- 12. Antenne
- 13. Changeur de CD
- Fusibles
- Rebranchement de la batterie
- Raccordement au câblage avec un adaptateur (achetér séparément)
- Installation
- Instalación
- Instalación Final
- 1. Conecte el adaptador del cableado al arnés existente del cableado.
- 2. Conecte la cabeza de la antena.
- 3. Deslice el chasis del radio en la media camisa.
- 4. Asegure el radio al soporte usando una tuerca (si es posible).
- 5. Ponga en su lugar cualquier artículo que haya quitado del tablero de instrumentos.
- Instalación Final ISO-DIN
- Instalación Final
- Installation
- Troubleshooting
- Fonctionnement de MP3/WMA (continué)
- MP3/WMA Operation (continued)
- Operación de MP3/WMA (continuado)
- Operación de MP3/WMA (continuado)
- Fonctionnement de MP3/WMA (continué)
- Fonctionnement de MP3/WMA (continué)
- Fonctionnement de MP3/WMA (continué)