Vaisala PTB110 User Manual
Page 2
www.vaisala.com
M210839EN-A
2
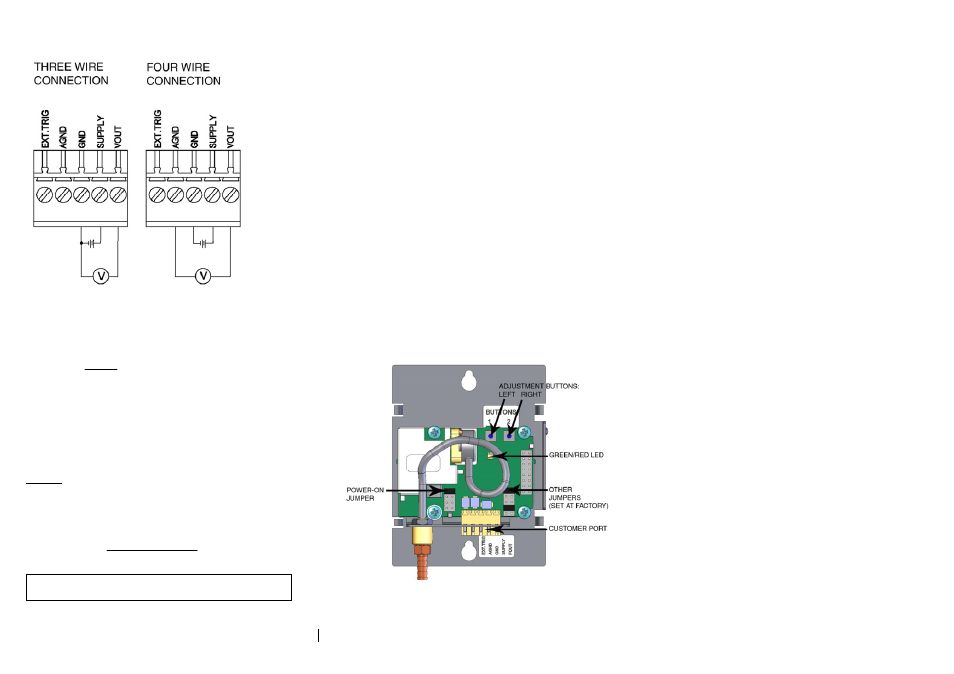
The connections can be made as illustrated below.
READING THE OUTPUT
The barometric pressure (P) can be calculated from the measured
output voltage (Uout) using a simple equation.
out
range
range
low
U
U
P
P
P
⋅
+
=
where:
P
low
= Lower limit of the pressure range [hPa]
P
range
= Pressure full range [hPa]
U
range
= Voltage full range [V]
U
out
= Measured output voltage [V]
Example
Pressure range
500...1100 hPa
Voltage output
0...5 V
Measured output voltage
4 V
(
)
hPa
V
V
hPa
hPa
P
980
4
5
500
1100
500
=
⋅
−
+
=
NOTE
The low end of the output voltage range of
the barometer saturates at about 50 mV.
In the frequency output 1 hPa equals 1 Hz.
INSERTING AND REMOVING THE COVER
The adjust buttons and the power on jumper are located inside
the barometer. In order to adjust the measurement, the plastic
cover of the barometer must be removed.
For safety reasons, turn off the power when opening the cover.
You can power off the device by pulling out the connector from
the customer port. Correspondingly, you can power on the
device by plugging the connector back into the customer port.
Removing the Cover
Stick a flat-end screwdriver between the cover and the metal
mounting plate. As you press the tool slightly, the cover will
open up.
Inserting the Cover
Place the short and solid side of the cover against the left edge of
the metal plate. Ensure that the metal clamps slide into the
hollows in the cover. Then press the cover against the metal
plate until it clicks in place.
INNER STRUCTURE OF THE BAROMETER
ADJUSTMENT AND CALIBRATION
Calibration of the PTB110 series barometers is NIST traceable
and the barometers are supplied with a NIST traceable
calibration certificate.
There are two push buttons available for the offset fine
adjustment inside the barometer (see the figure on the previous
page). The adjustment step is 0.05 hPa.
OPERATING THE BUTTONS
Restoring Adjustments
To restore the adjustments, press and hold down the left button
while switching on the barometer. After releasing the button, a
green LED starts flashing.
When the factory adjustments are in use, the green LED flashes
twice. When the user adjustments are in use, the green LED
flashes three times.
Now you can change the factory adjustments to user adjustments
or vice versa by pressing the left button.
Return to the normal operating mode by switching the power off
and on in sequence.
Using Analog Output Test Mode
To activate the test mode, press and hold down the right button
while switching on the barometer.
The function forces the voltage or frequency output to 50% of
the scale. As an indication of the test mode, the red LED is lit.
Return to the normal operating mode by switching the power off
and on in sequence.
Offset Correction
To activate the offset correction mode, press and hold down both
buttons switching on the barometer.
The green and red LEDs are lit. Now you can adjust the offset
correction upwards or downwards.
Each time when pressing the left button, the offset
goes down by one step (5 Pa), and the green LED
flashes once.
Each time when pressing the right button, the offset
goes up by one step (5 Pa), and the red LED flashes
once.
Return to the normal operating mode by switching the power off
and on in sequence.