Sheet2, Drawing view11, Winter storage – Ag Spray Equipment AG55DLXSF User Manual
Page 2: After spraying, Troubleshooting the pump
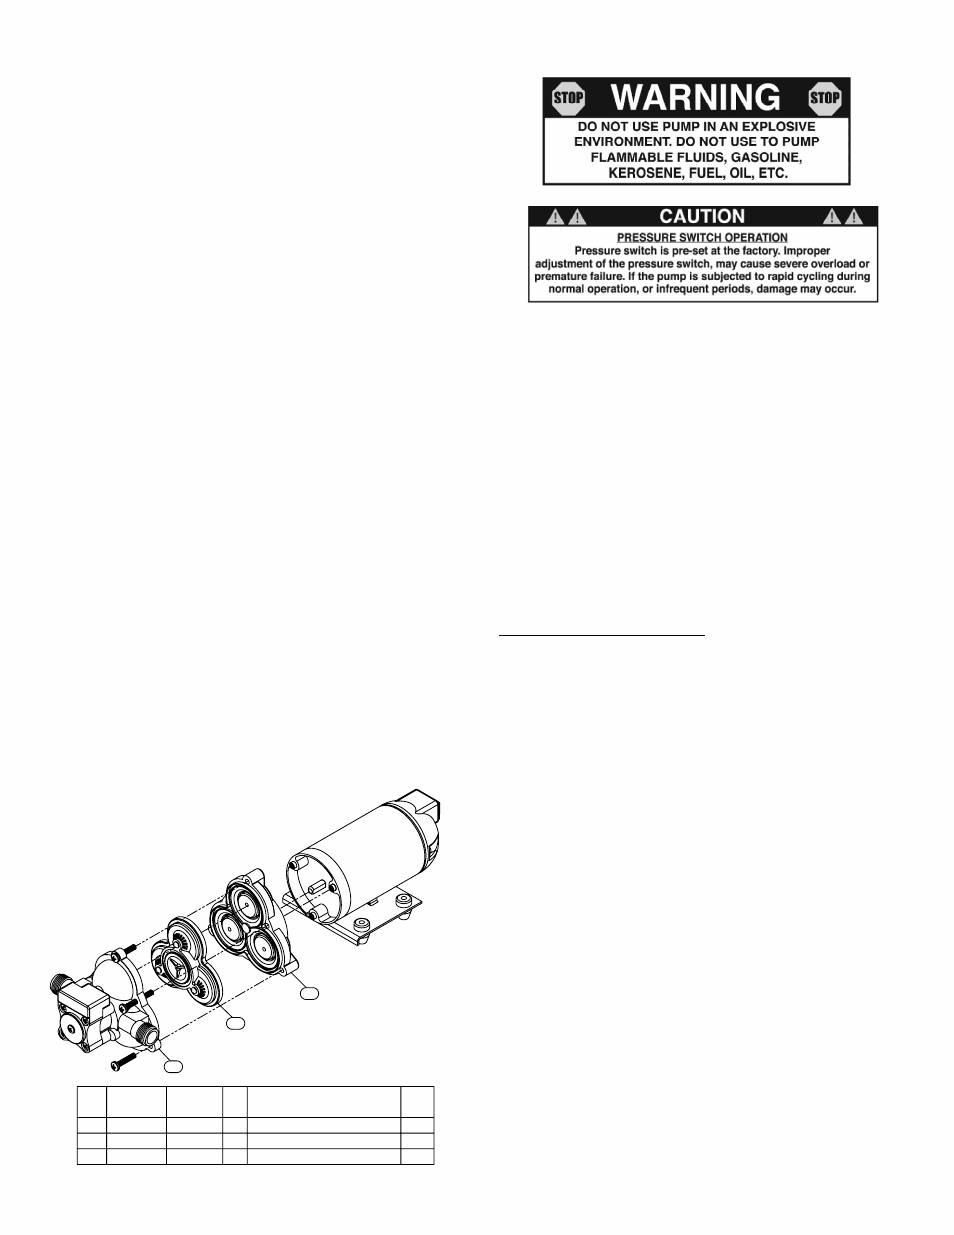
Item
No
2
3
1
Part
Number
5168767
94-231-10
94-232-06
Diaphragm/Drive Kit (SHURflo)
Switch & Upper Housing
Valve Assembly
Qty
Mfg Part
Number
94-238-04
94-231-10
94-232-06
1
1
1
Description
List
17.15
65.75
32.90
Price
SHURflo Pump #2087-593-135
(3 gpm, 45 psi, 12 Volt)
3
2
1
Page 2
Winter Storage
Drain all water out of your sprayer, paying special attention to the
pump, handgun, and valve(s). These items are especially prone to
damage from chemicals and freezing weather.
The sprayer should be winterized before storage by pumping a
solution of RV antifreeze through the entire plumbing system. This
antifreeze solution should remain in the plumbing system during
the winter months. When spring time comes and you are
preparing your sprayer for the spray season, rinse the entire
plumbing system out, clearing the lines of the antifreeze solution.
Proper care and maintenance will prolong the life of your sprayer.
Troubleshooting the Pump:
Pump will NOT run:
- Check inline fuse on the wires on the pump. (if
applicable)
- Make sure on/off switch is in the 'on' position (-).
- Make sure you 12 volt source (battery) is fully
charged.
- Insure a tight connection at the battery clips.
If none of the above will work, try pulling the wires off
the pressure switch, and short them out. If your pump
runs when you do this, you know you will need to
replace your pressure switch.
Pump runs, but does not prime:
- Check line strainer (screen) in the tank, connected to
the bottom of the intake tube. Periodically take the
screen at this location out and clean it.
- Make sure the bypass line valve is closed, to allow
the pressure to build up in your system. (If equipped
with bypass)
- Unscrew the head portion of your pump and remove
the valve assembly (Item 3) from inside. You need to
make sure the O-Ring comes out with this piece as
well. (See the exploded view to help identify these
components) These pieces can be cleaned which, in
most cases, will help restore some, if not most, of your
prime. Soak this check valve in a solution of hot, soapy
water. A good name-brand dishsoap works well for
this. A little bit of 'scrubbing' with perhaps an old
toothbrush may be required to actually break up any
build-up that may be on the check valve. Rinse off the
pieces and replace them back into your pump.
Reassemble the pump. Hook it back up and test.
After Spraying
After use, fill the sprayer tank part way with water. Start the
sprayer, and allow the clear water to be pumped through the
plumbing system and out through the spray nozzles.
Refill the tank about half full with plain water and use FIMCO Tank
Neutralizer and Cleaner, and repeat cleaning instructions above.
Flush the entire sprayer with the neutralizing/cleaning agent, then
flush out one more time with plain water. Follow the chemical
manufacturer's disposal instructions of all wash or rinsing water.
For the boom, (if applicable) remove the tips and screens from the
nozzle assemblies. Wash these items out thoroughly. Blow the
orifice clean and dry. If the orifice remains clogged, clean it with a
fine bristle (NOT WIRE) brush, or with a toothpick. Do not damage
the orifice. Water rinse and dry the tips before storing.
WARNING: Some chemicals will damage the pump valves if
allowed to soak untreated for a length of time! ALWAYS flush
the pump as instructed after each use.