Basic operations (cont) 12. relay (flip-flop™), This feature is a kind of “auto pilot." “flip-flop, Or american dj – American Audio DCD-PRO210 User Manual
Page 18: Q” deck mixer. with “flip-flop, Your programmed tracks. to flip-flop, Mode, press the relay button, Creating and playing a loop
���
�� � �
�� � �
TRACK
M
S
F
������
�������
�
�
���
�
�
TRACK
M
S
F
������
�������
���
�� � �
�� � �
TRACK
M
S
F
������
�������
�
�
���
�
�
TRACK
M
S
F
������
�������
���
�� � �
�� � �
TRACK
M
S
F
������
�������
�
�
���
�
�
TRACK
M
S
F
������
�������
���
�� � �
�� � �
TRACK
M
S
F
������
�������
�
�
���
�
�
TRACK
M
S
F
������
�������
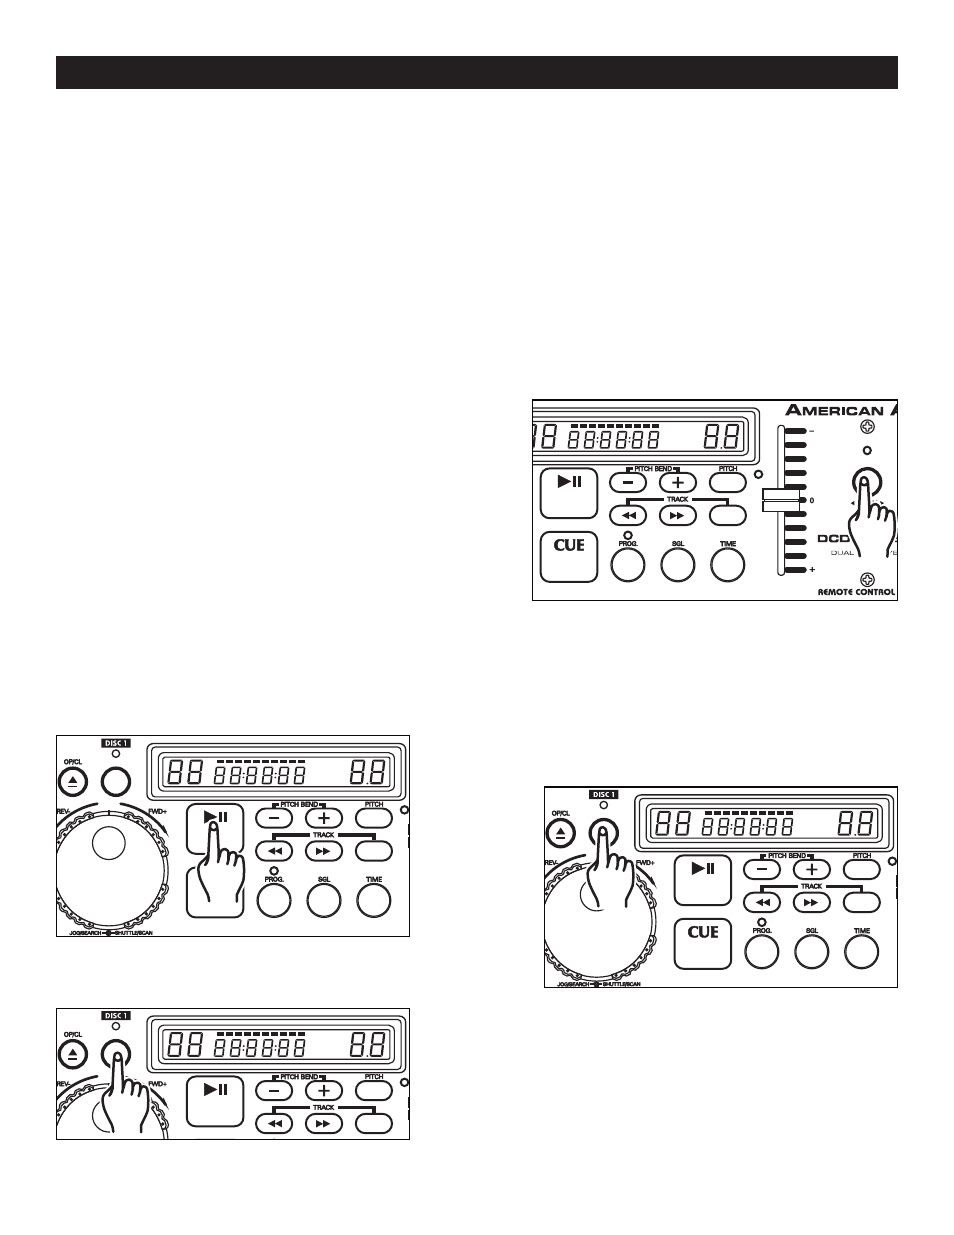
BASIC OPERATIONS (CONT)
12. RELAY (FLIP-FLOP™)
This feature is a kind of “auto pilot." “Flip-Flop
™
” mode can only function with the both drives of
the DCD-PRO210. The “Flip-Flop
™
” function may be used with or without an American Audio
®
or
American DJ
®
“Q” deck mixer. With “Flip-Flop
™
” you can have one disc drive begin playback when
the other ends. You can “Flip Flop
™
” single tracks, the entire disc, a combination of the two, or you
can even “Flip-Flop
™
” your programmed tracks.
To FLIP-FLOP
™
single tracks or programmed tracks:
1) Connect your system as described in the set up section on page 6.
2) Set your mixer’s crossfader to the center position.
3) Load disc drives with audio discs.
4) Press the RELAY BUTTON (6), the LED above the RELAY BUTTON will light up letting you know that
Flip-Flop
™
mode has been activated. Press the SINGLE BUTTON (14) to choose between SINGLE
mode or CONTINUOUS mode.
Figure 19
5) After they have both cued, press the PLAY/
PAUSE BUTTON (3) on one of your drives to
begin playback.
6) After the first cds' single track has ended the
second cds' track will immediately begin play-
back.
7) FLIP FLOP
™
will continue until you stop it or
power is interrupted.
8) To deactivate Flip-Flop
™
mode, press the
RELAY BUTTON.
©
American Audio
®
- www.AmericanAudio.us - DCD-PRO210™ Instruction Manual Page 18
Press the LOOP BUTTON (2). This will set the starting point
of the Loop (figure 21). The LED above the LOOP BUTTON
(2) will blink.
Press PLAY/PAUSE BUTTON (3) to activate playback
mode.
13.CREATING AND PLAYING A LOOP
A loop is a sound loop that plays continuously. You can use this loop to create dramatic effect in your mixing.
This loop has no time limit and you could actually loop the entire length of disc. You create a loop between
two continuous points of a disc.
2)
Press the LOOP BUTTON (2) again to set the ending point
for your Loop (Figure 22). The LED above the Loop Button
will stay lit indicating a Loop is playing. Press the LOOP
BUTTON again to cancel the Loop.
3)
1)
Figure 22
Figure 21
Figure 20