Assembly i nstr uc tions – Poolmaster 70772 Royal Hawaiian Adjustable Chaise Lounge User Manual
Page 2
A
ssembly I
nstr
uc
tions
2
Step 1
Step 2
Step 3
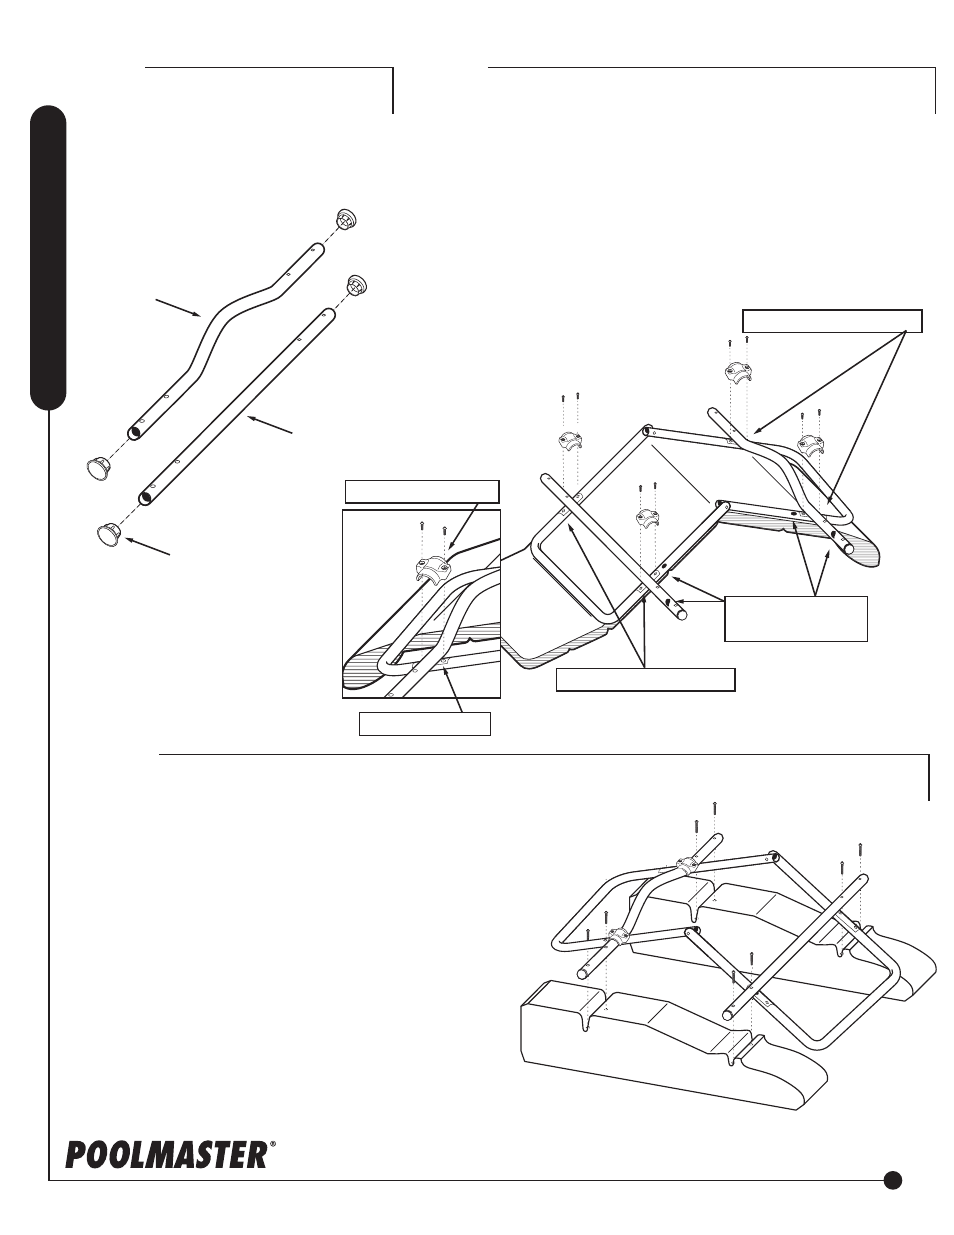
• Turn the Lounge Seat upside down.
• For proper alignment, match Color Dots on Curved Rear
Crossbar to the back of the Lounge Back. Attach to the
back of the Lounge Seat by inserting Rear Crossbar into
pre-installed Mounting Slide. Secure bar to Mounting Slide
with Mounting Caps and four 8 -32 x 5/8” Bolts.
• For proper alignment, match Color Dots on Striaght Front
Crossbar to the back of the Lounge Back. Connect Straight
Front Crossbar to the Lounge Seat by inserting Crossbar into
pre-installed Mounting Slide. Secure bar to Mounting Slide
with Mounting Caps and four 8 -32 x 5/8” Bolts.
• Insert White End Cap on each end of
both the Curved Rear Crossbar and
the Straight Crossbar.
Tip: Soften caps in warm water if difficult to insert
poolmaster.com
• Place Floats on a table, workbench or on the
original carton. Turn Polyform™ Pontoon bottom
side up with the smaller end to the back of the
table.
• Place the Straight Front Crossbar on the front
groove of the Polyform™ Pontoon and the Curved
Rear Crossbar on the rear groove of the Polyform
™ Pontoon.
• Insert a 1.5” Bolt through the hole that is closer
to the Lounge Seat Frame, one on each side of
the Crossbar and into the molded nut of the
Polyform™ Pontoon (Do not tighten until all bolts
are in place).
• Finally, insert a 1.5” Bolt through the outside hole,
one on each side of the Crossbars and into the
molded nut of the Polyform™ Pontoon. Tighten
all bolts.
Note: Complete lounge seat
assembly from step 2 not shown.
Curved Rear
Crossbar
Straight Front
Crossbar
White End Caps
Head
Foot
Note: Red Dots
(On Right hand Sides)
Front Mounting Slides
Rear Mounting Slides
Mounting Slide
Mounting Bracket
Head