Voltage conversion – Manley REFERENCE MICROPHONES - 2010 - present User Manual
Page 11
VOLTAGE CONVERSION
All servicing described below should be referred to a qualified technician.
1. Unplug PSU from wall and disconnect microphone cable(s). Let sit for at least
15 minutes to let the capacitors discharge.
2. Remove PSU cover, held in place by 4 x philips screws.
3. Observe the jumpers located on PCB0718B, and the accompanying diagram
printed on the PCB itself.
4. For 100V: solder jumpers W2, W3, W6
For 120V: solder jumpers W1, W4, W6
For 220/230V: solder jumpers W2, W5
For 240V: solder jumpers W1, W5
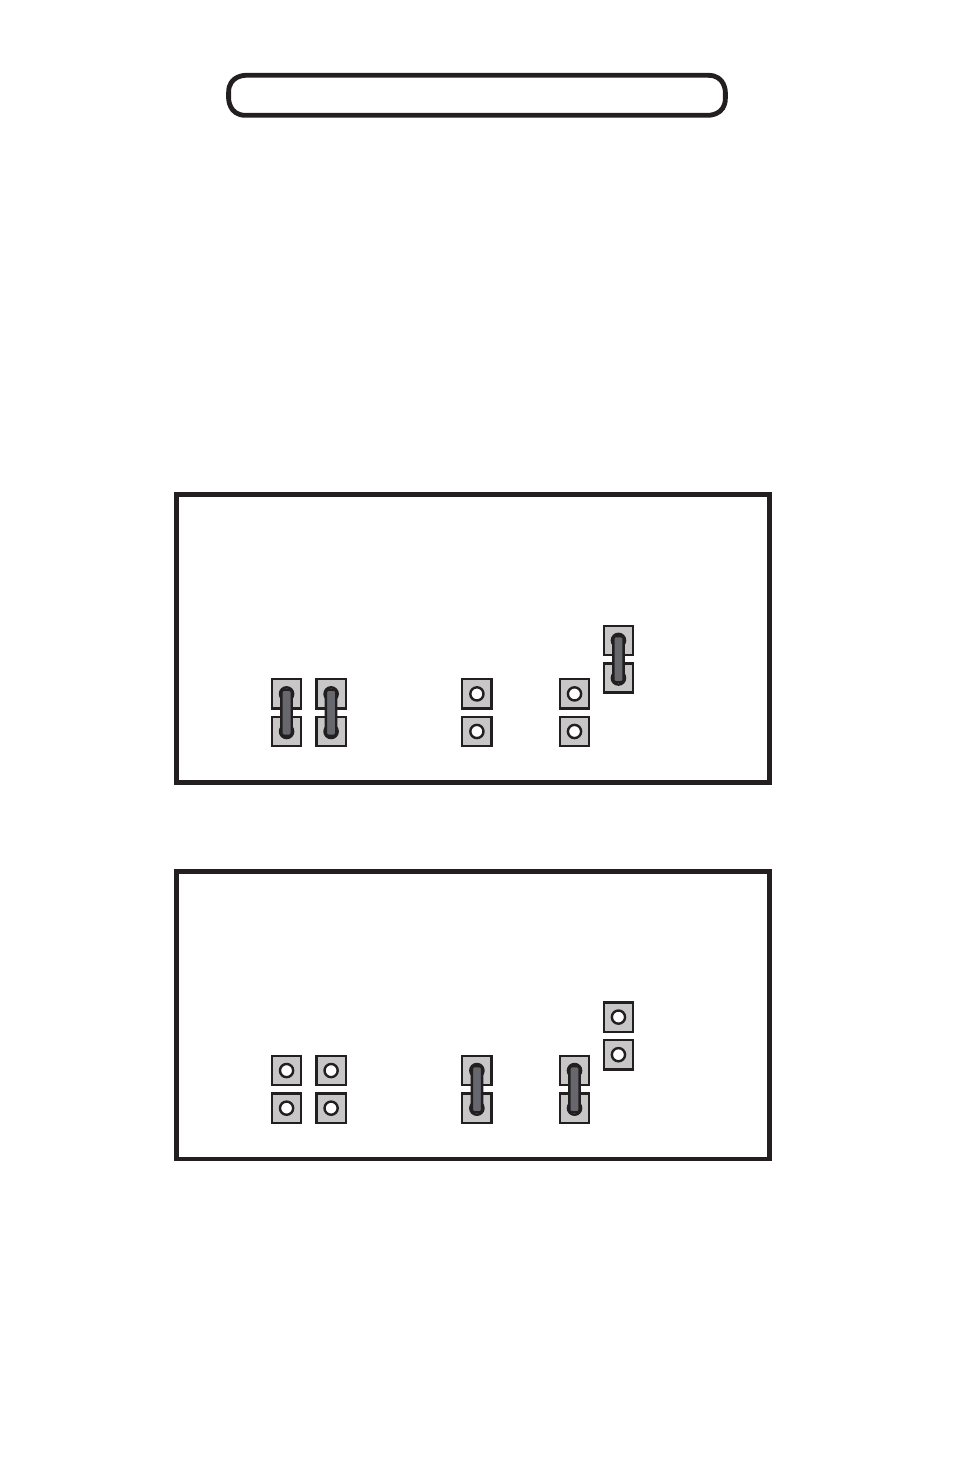
Example 1: The board below is set for 120V operation:
Example 2: The board below is set for 220/230V operation:
PCB0718B
W4 W1
W2
W5
W6
5. BE SURE TO CHANGE THE FUSE TO THE APPROPRIATE VALUE
BEFORE USING THE MICROPHONE:
100-120V: 250mA SLO-BLO
220-240V: 125mA SLO-BLO
PCB0718B
W4 W1
W2
W5
W6
11
- MONO & DUAL MONO MICROPHONE PREAMPLIFIERS (15 pages)
- MONO & DUAL MONO 40 dB MICROPHONE PREAMPLIFIERS (16 pages)
- 60 dB MICROPHONE PREAMPLIFIER (11 pages)
- MIC EQ 500 COMBO (16 pages)
- ENHANCED MID FREQUENCY PULTEC EQUALIZER (15 pages)
- ENHANCED PULTEC EQP1-A EQUALIZER (16 pages)
- MONO & DUAL MONO TUBE DIRECT INTERFACE MODELS (11 pages)
- TNT MICROPHONE PREAMPLIFIER (26 pages)
- VOXBOX - MVBXA 4/2003 (26 pages)
- VOXBOX - MVB 1996 - 2/2000 and MVBX 6/2000 - 4/2003 (25 pages)
- СORE REFERENCE CHANNEL STRIP - MCORE001-025 4/2014 - 5/2014 (15 pages)
- СORE REFERENCE CHANNEL STRIP - MCORE026 and up 7/2014 (16 pages)
- HIGH FREQUENCY (DE-ESS) LIMITER (12 pages)
- MASSIVE PASSIVE STEREO TUBE EQ - MSMPX 2/2004 (33 pages)
- MASSIVE PASSIVE STEREO TUBE EQ - MSMP 1998 - 2/2004 (33 pages)
- ELECTRO-OPTICAL LIMITER - 1994 - 1997 MANELOP020-318 (14 pages)
- STEREO VARIABLE MU LIMITER / COMPRESSOR - 3/2004 (18 pages)
- STEREO VARIABLE MU LIMITER / COMPRESSOR - 1994 - 3/2004 (18 pages)
- MONO VARIABLE MU LIMITER / COMPRESSOR 5670 MODELS (13 pages)
- ELOP (14 pages)
- ELECTRO-OPTICAL LIMITER - 1997 - 9/2000 MELOPB319 - 564 (15 pages)
- REFERENCE MICROPHONES - 1992 - 2010 (10 pages)
- MicMAID 4x4 Matrix-Switcher 10/2010 - present (12 pages)
- BACKBONE Mastering Insert Switcher 2003 - present (26 pages)
- SLAM! (29 pages)
- The WAVE DAC/Preamp 24/96 Version Serial Code WAVE016-present 2002 - present (22 pages)
- The WAVE DAC/Preamp 20 Bit Version Serial Code WAVE000-015 1999 - 2002 (20 pages)
- 500 / 200 WATT MONOBLOCK (13 pages)
- 500 / 200 WATT MONOBLOCK (12 pages)
- 250 / 100 WATT MONOBLOCK AMPLIFIER (13 pages)
- 16 x 2 TUBE MIXER 2002 - present above 106 (22 pages)
- 16 x 2 TUBE MIXER 2000 - 2002 up to 106 (22 pages)
- TAPE HEAD PREAMPLIFIERS (15 pages)
- DIGITAL TO ANALOGUE CONVERTER 1990 - 1997 (9 pages)
- DIGITAL TO ANALOGUE CONVERTER HDCD DAC 1993 - 2000 (11 pages)
- DIGITAL TO ANALOGUE CONVERTER DAC 1994 - 1995 (10 pages)
- JUNIOR DAC 1995 - 2000 (11 pages)
- LANGEVIN MINI MASSIVE STEREO EQ (31 pages)
- LANGEVIN ALL-DISCRETE PULTEC EQP1-A TYPE EQUALIZER (12 pages)
- LANGEVIN ELECTRO-OPTICAL LIMITER (14 pages)
- LANGEVIN DUAL MONO MICROPHONE PREAMPLIFIER WITH EQ (15 pages)
- Langevin Dual Vocal Combo 1999 - 4/2001 LDVC000 - LDVC178 (20 pages)
- Langevin Dual Vocal Combo 4/2001 - present LDVCP179 and up (22 pages)
- Langevin DAC 1993 - 2000 (11 pages)