Ce-dvrpvm quick guide p2v4.pdf, Lcd controls pir sensor controls, Change jpeg image – Clinton Electronics CE-20PVMDVR Quick Start User Manual
Page 2
v.01.20.10
CLINTON Electronics
6701 Clinton Road
Loves Park, IL 61111
1.800.447.3306 Sales
1.800.549.6396 Support
1.800.633.8712 Fax
www.clintonelectronics.com
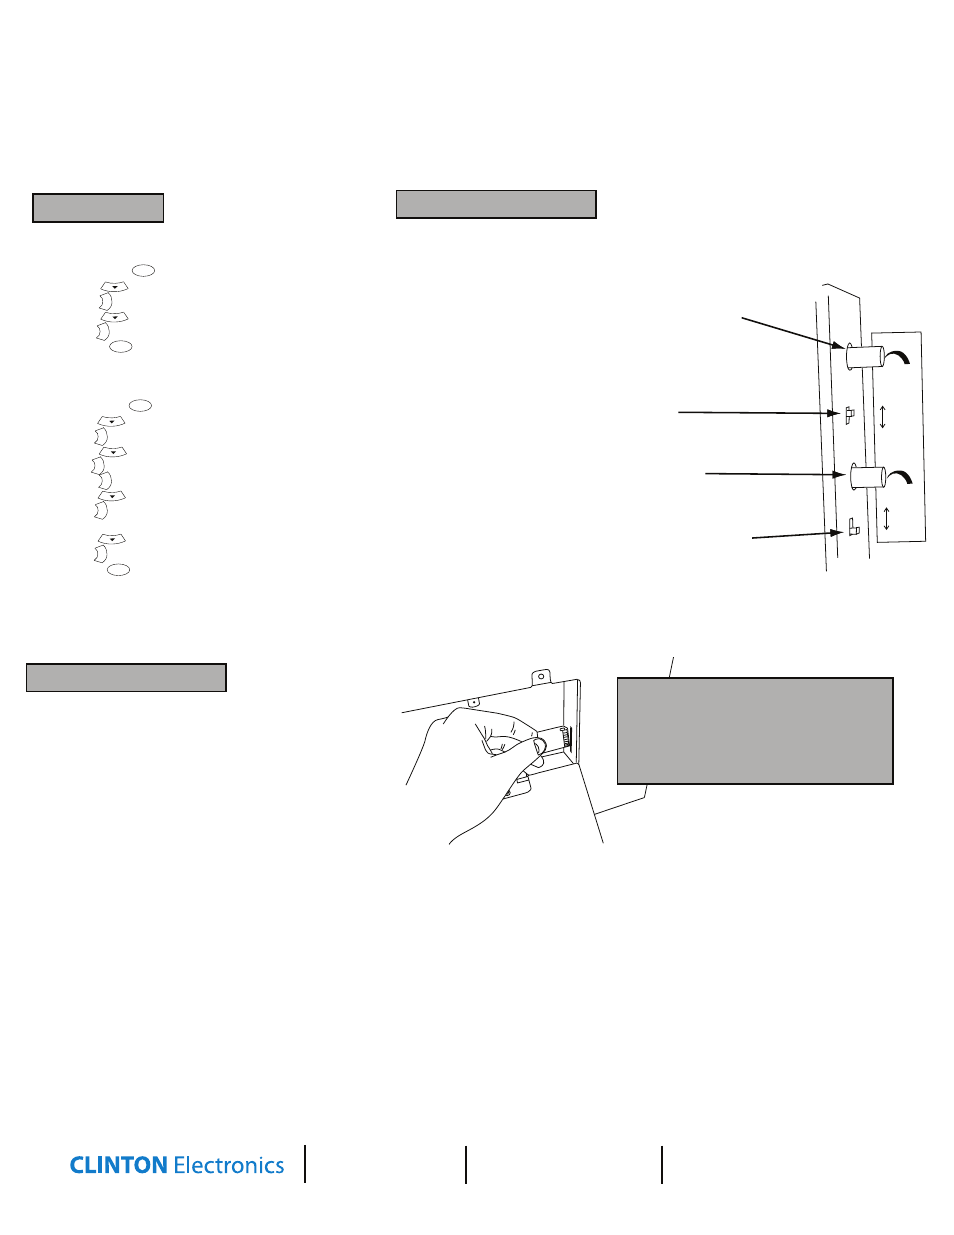
1. CHANGE THE DURATION OF CAMERA IMAGE ON SCREEN
• Increase (turn clockwise) the “Dwell Time” dial to allow the
LCD to display the camera image longer on the screen.
• Decrease (turn counter-clockwise) the “Dwell Time” dial to
allow the LCD to display to cycle back to the pre-loaded JPEG image
on the SD Card more frequently.
LCD CONTROLS
PIR SENSOR CONTROLS
2. TURN OFF THE STATIC JPEG- SD CARD IMAGE
Switching the “Sensor” switch to “OFF” disables the PIR Sensor, which
disables the JPEG image from appearing on the screen.
3. CHANGE THE SENSITIVITY OF THE MOTION SENSOR
• Turning the “Sensitivity” dial clockwise Increases the sensitivity.
• Turning the “Sensitivity” dial counter-clockwise Decreases the sensitivity.
4. TURN OFF THE MOTION AUDIO
Switching the “Chime” switch to “OFF” disables the audio that is
initiated by the motion sensor.
WHEN SD CARD IS INSERTED,
YOU MUST POWER CYCLE.
You can do this by pushing the POWER
button on the long remote,
or by unplugging the power cord from the wall.
Dwell time
Sensitivity
Sensor
Chime
ON
OFF
ON
OFF
_
+
_
+
CHANGE JPEG IMAGE
3. CHANGE THE PRE-LOADED “WARNING” JPEG IMAGE:
• Insert the SD-Card into your computer or SD Card reader.
• Move your desired JPEG image onto the SD Card folder.
• Delete the original “WARNING” JPEG image.
• Leaving more than one JPEG image on the SD Card will result
in the device cycling through all loaded images.
• Insert the SD-Card back into the CE-DVRPVM with the contacts
facing out, as shown in the image to the right - DO NOT FORCE IT IN.
•
WHEN SD CARD IS INSERTED,YOU MUST POWER CYCLE THE UNIT.
You can do this by pushing the POWER button on the long remote,
or by unplugging the power cord from the wall.
• An SD Card MUST be inserted, or you will see a “Settings” Menu when
the device is powered on.
Using the long remote:
• Press the “MENU” button.
• Scroll down to enter the “Feature Controls” menu.
• Press right to enter the feature selection.
• Press down until you reach the “LED Control”.
• Press right to switch the led to “OFF”.
• Press “MENU” to exit the menu, thus saving the new settings.
MENU
CH
PG
VOL
+
CH
PG
VOL
+
MENU
Using the long remote:
• Press the “MENU” button.
• Scroll down to enter the “Feature Controls” menu.
• Press right to enter the feature selection.
• Press down until you reach the “Message Control”.
• Press right to enter the message Control Settings.
• Press right to turn the message ON or OFF.
• Press down to select “Message”.
• Press right to change the message from
“RECORDING IN PROGRESS” to “WELCOME”.
• Press down to select “Flash”.
• Press right to a switch from a Flashing to a Steady-on message.
• Press “MENU” to exit the menu, thus saving the new settings.
MENU
CH
PG
VOL
+
CH
PG
VOL
+
VOL
+
CH
PG
VOL
+
CH
PG
VOL
+
MENU
On the CE-8DVRPVM-HD, the JPEG IMAGE SD Card slot
is located on the upper side of the access panel.
The DVR is set from the factory to record on motion. These settings have been pre-loaded and should not be changed.
The only required changes are formatting the SD card, setting the local time, and if daylight savings time (DST) is recognized in your area.
The PIR sensor (pinhole located front center on unit) controls the screen
switching of the flash card player to the built-in camera. It also controls
the audio. Be sure to keep the small hole open at all times and free of dust.
It does not control the DVR motion recording, the RECORDING IN PROGRESS
text on the screen, or the front LED.
2. TURN THE BOTTOM SCREEN MESSAGE ON/OFF/SOLID
1. TURN THE FRONT LED FLASHING ON/OFF
Quick Reference Guide for CE-20DVRPVM-HD & CE-8DVRPVM-HD