625dia9 – GE ZET1PMSS User Manual
Page 2
16
16
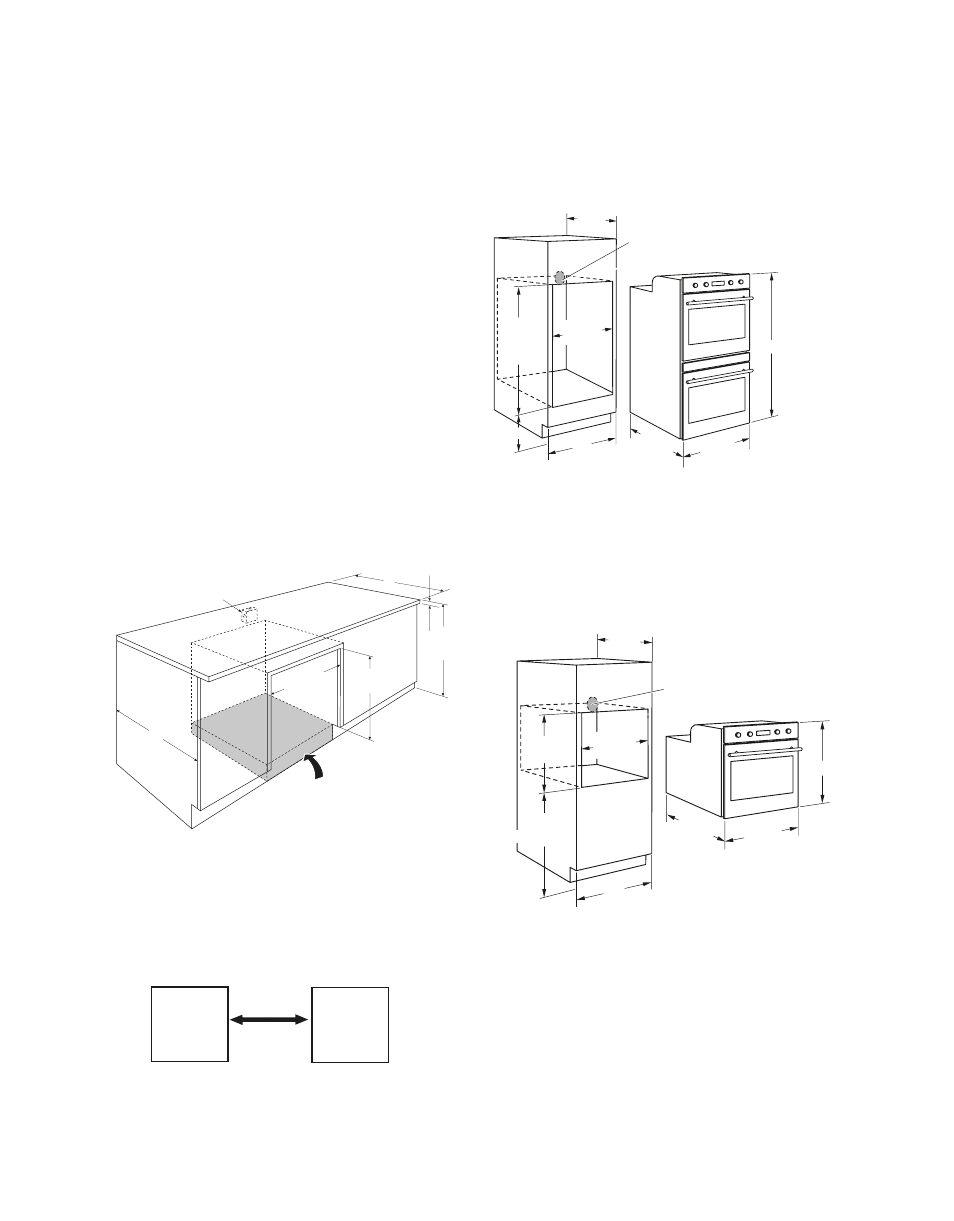
Advance planning for LCD touchscreen, European
and Professional convection wall ovens
28-1/2" Min.
28-5/8" Max.
27-1/4" Min.
27-5/16" Max.
23-1/2"
Min.
Locate Junction Box 22"
Above Cutout Floor, Within 5"
of Right Rear Wall
30"
28-1/4"
23-1/4"
Recessed
Depth*
29-3/4"
32-1/2"
Recommended
*LCD and European models:
24-1/4" to front of door
26-1/4" including tubular handle
Professional model:
24-3/4" to front of door
27-7/16" including Professional handle
LCD touchscreen single oven
ZET1RMSS Stainless steel
European single oven
ZET1SMSS Stainless steel
Professional single oven
ZET1PMSS Stainless steel
28-1/2" Min.
28-5/8" Max.
51-13/16"
Min.
51-15/16"
Max.
23-1/2"
Min.
12"
Locate Junction Box 47"
Above Cutout Floor, Within 5"
of Right Rear Wall
30"
52-7/8"
23-1/4"
Recessed
Depth*
29-3/4"
*LCD and European models:
24-1/4" to front of door
26-1/4" including tubular handle
Professional model:
24-3/4" to front of door
27-7/16" including Professional handle
Locate Junction Box Within
5" of the Right Rear Wall
23-1/2" Min.
27-1/4" Min.
27-5/16" Max.
25"
36"
Countertop
Height
1-1/2" Cabinet Top
Elevate the oven floor to desired height.
The support must be level, rigidly mounted
and capable of supporting 175 lbs.
625Dia9
28-1/2" Min.
28-5/8" Max.
LCD touchscreen double oven
ZET2RMSS Stainless steel
European double oven
ZET2SMSS Stainless steel
Professional double oven
ZET2PMSS Stainless steel
Cutout and product dimensions
The LCD touchscreen ovens with proximity sensor provide easy,
intuitive access to oven functions and options. The European
ovens offer contemporary styling with the signature Monogram
®
tubular handles. The Professional oven design combines rugged
stainless steel construction with refined styling. All three are
designed to fit into a 30"-wide cabinet.
Electrical requirements
Product rating is 208 or 240V, 60Hz. Connect to a 40-amp circuit
for double ovens and 20-amp circuit for single ovens. The ovens
must be connected to a supply circuit of the proper voltage and
frequency and protected by a time-delay fuse or circuit breaker.
Installation below a countertop
A single oven can be installed beneath countertops and below
approved cooktops. Always refer to the cooktop installation
instructions for electrical requirements and clearances.
monogram.com
Side-by-side installations
Install two ovens in separate cutouts. Allow 2" minimum
between the cutouts.
2
"(5.1 cm)
Min.
Cutout
–
Observe all
dimensions
and
requirements.
Cutout
–
Observe all
dimensions
and
requirements.
28-1/2" Min.
28-5/8" Max.
51-13/16"
Min.
51-15/16"
Max.
23-1/2"
Min.
12"
Locate Junction Box 47"
Above Cutout Floor, Within 5"
of Right Rear Wall
30"
52-7/8"
23-1/4"
Recessed
Depth*
29-3/4"
*LCD and European models:
24-1/4" to front of door
26-1/4" including tubular handle
Professional model:
24-3/4" to front of door
27-7/16" including Professional handle