AquaStar 80 VPS User Manual
Page 19
19
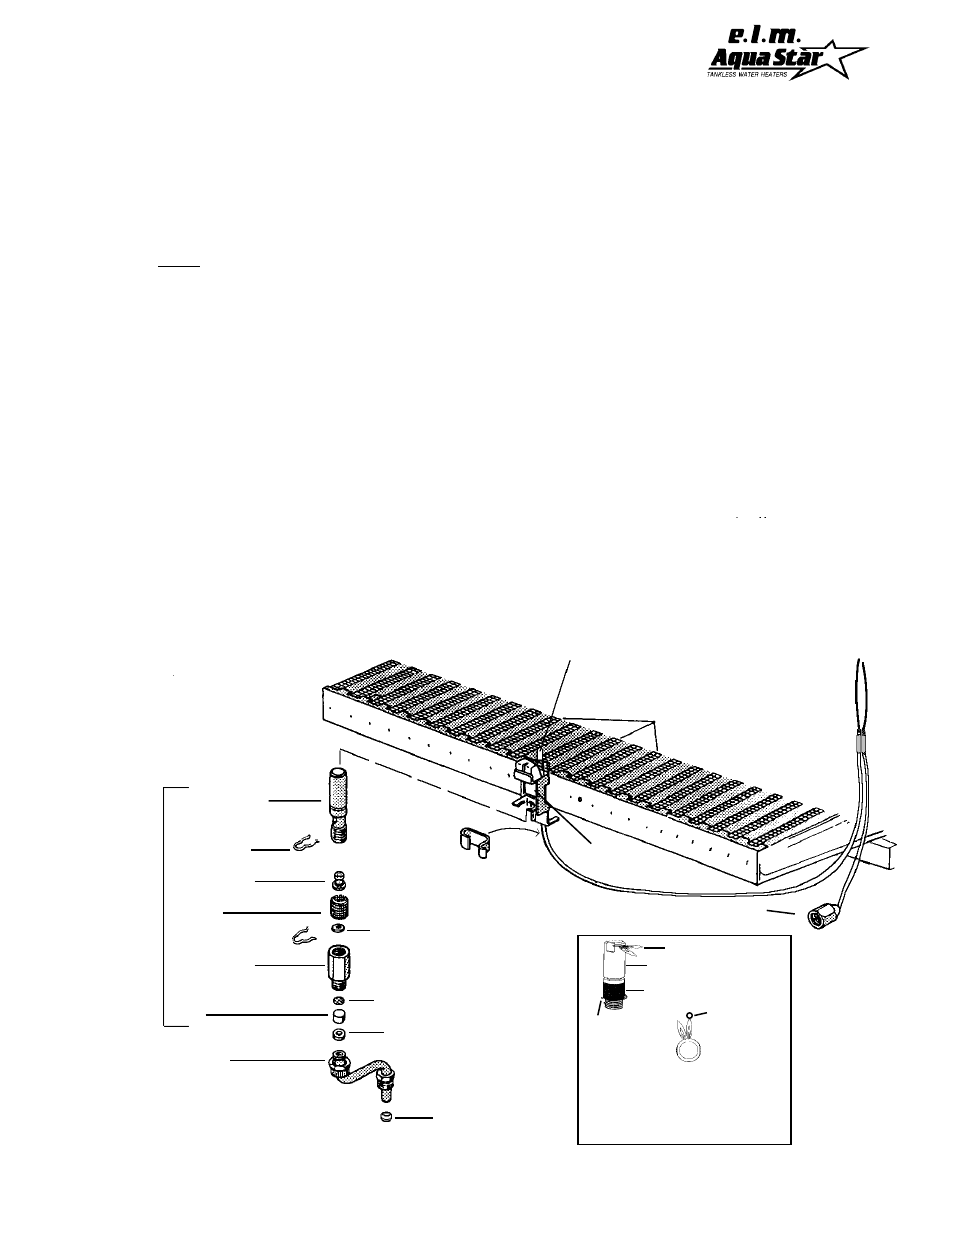
Pilot Burner
Hairpin
Retaining Clip
Thermocouple
Retaining Clip
Pilot Injector
Pilot
Filter Housing
Gasket
Gasket
Filter
Pilot Tube
To Electromagnet
To E.C.O.
Screen
Retaining
Clip
Pilot Burner
Pilot Flames
NOTE: Pilot flame must be
sharp blue, not soft and yellow
View of Pilot Flame
as seen from
above
Thermocouple
Screen
Air Screen
Main
Burners
Screen
Thermocouple
Pilot Burner
Retaining Bracket
Compression Ring
Pilot
Assembly
suspect that it might be partially obstructed. If you do
not have a replacement orifice, you may blow through
it or use a non-residue aerosol cleaning agent (like
that used for electronics) can be sprayed through
the orifice.
5. Clean any combustion residue from the Pilot Burner
tip. Make certain that both holes and the slit are clean.
C. Reinstalling Pilot Burner to Main Burner Bracket
1. Insert injector into base of Pilot Burner. Reattach
Filter Housing to base of Pilot Burner, making sure
to have the Gasket in between.
Be certain that the brass Gas Pilot Filter Housing is
snug to the Pilot Burner — use two wrenches to
tighten.
2. Pilot holes face in towards Main Burners. Slide Pilot
Burner ALL the way up into the bracket.
a) Insert Hairpin Retaining Clip to hold Pilot Burner in
bracket. Pivot the Pilot Tube back into position below
Filter Housing.
b) Insert the other Gasket between tube and Filter
Housing.
c) Use two wrenches to tighten Pilot Tube to Filter
Housing.
1) One wrench should hold Pilot Burner in right most
position, making sure right side flame is aimed
precisely on tip of Thermocouple.
2) Use second wrench to tighten Pilot Tube nut — DO
NOT OVER-TIGHTEN
A. Removing Pilot
1.Hold Gas Pilot Filter Housing in place with one
wrench.
2. Unscrew Pilot Tube nut with second
wrench.
3.Save the little white Gasket for reassembly.
4. Pivot the tube to the left (loosen base fitting if needed).
5. Remove upper “hairpin” retaining clip.
6. Pull Pilot Assembly downward out of bracket.
B. Cleaning the Pilot
1. Separate the chrome Pilot Burner from the brass Gas
Pilot Filter Housing. Save the white Gasket for
reassembly.
2. Examine the Filter material for dirt. Blowing from the
top gets the filter material out of the brass housing.
Since the material is layered; dirty layers can be
removed. The remaining portion of the filter can be
loosely reinserted into the housing. Do not pack the
material into the housing as this can obstruct gas flow
to the pilot.
3. Check that the Air-Pilot Screen is clean and
unobstructed.
4. The pilot injector (orifice) must not be enlarged. The
natural gas orifice is large enough that you can
visually inspect and clean it. The LP orifice, however,
is so small that it is difficult to inspect or clean. We
recommend that you change the LP orifice if you
CLEANING THE PILOT ASSEMBLY
AquaStar models 80/125/170