Svenska, English – Electrolux ZEG301 User Manual
Page 10
7
8
10
11
13
14
17
18
19
15
16
12
Innan du börjar
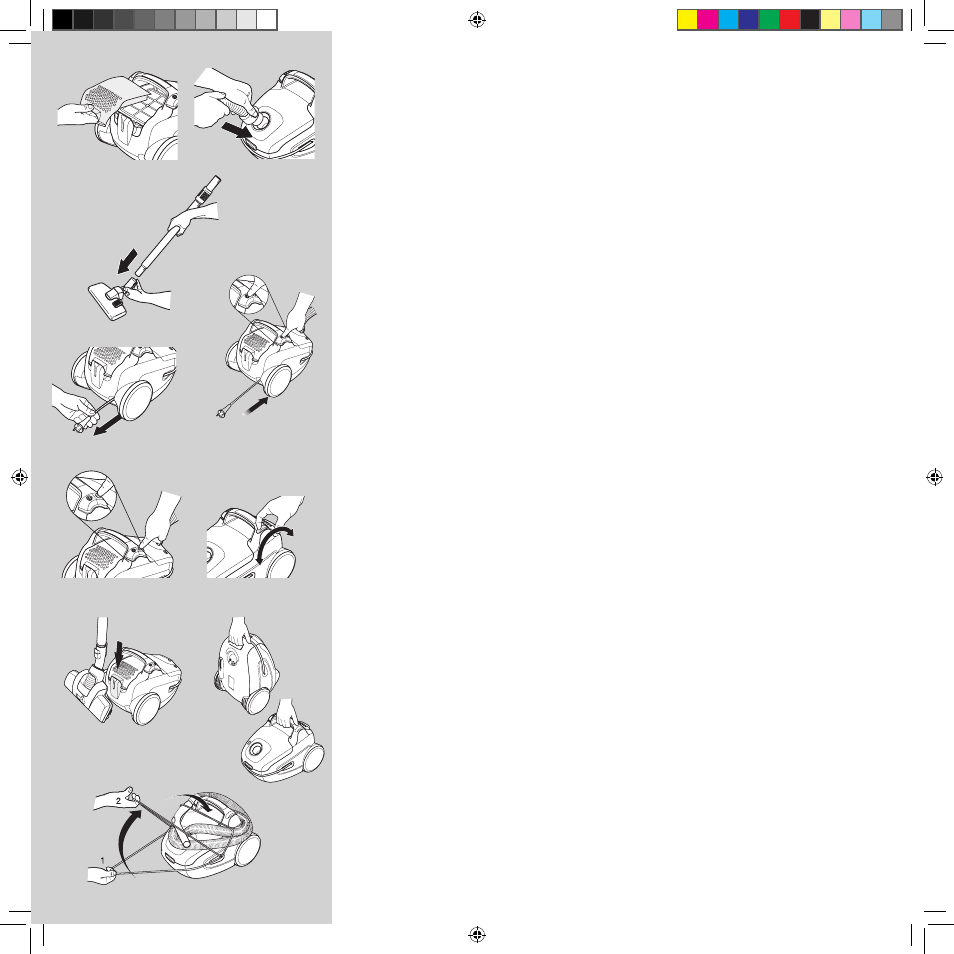
Öppna det främre locket och kontrollera att dammsugarpåsen
s-bag
®
och motorfiltret sitter där de ska. (Se även Byte
av filter.)
10 Öppna luckan baktill och se till att utblåsfiltret sitter där
det ska.
11 Sätt i slangen tills hakarna klickar fast (tryck in hakarna
för att lossa slangen). (2). Koppla ihop slangen med
slanghandtaget tills fästena snäpper fast (tryck på fästena
när du vill koppla loss slangen).
12 Anslut förlängningsröret* eller teleskopröret* till
slanghandtaget och munstycket genom att trycka och
vrida ihop dem. (Vrid och dra isär när du vill ta bort
rören.)
13 Dra ut sladden och anslut till vägguttaget. Dammsugaren
är försedd med en kabelvinda. När sladden har dragits ut
förblir den utdragen.
14 Mata in sladden genom att trycka på
indragningsknappen. Då matas sladden in.
15 Knapp för PÅ/AV: Tryck på PÅ/AV-knappen när du vill
starta dammsugaren. Tryck på knappen en gång till för
att stänga av den.
16 Sugeffektsreglering: Vrid reglaget mot högsta läget för
att öka sugeffekten. Vrid reglaget mot lägsta läget för
att minska sugeffekten. Ytterligare sugeffektreglering:
Använd sugkontrollen på slanghandtaget.
17 Praktiska parkeringslägen (och samtidigt en funktion som
skonar ryggen) när du gör en paus i städningen eller när
du bär och förvarar dammsugaren.
18 Du kan också bära dammsugaren genom att hålla
i handtaget upptill eller med hjälp av handtaget i
maskinens undre framkant.
19 Håll slangen på plats när du förvarar dammsugaren
genom att dra ut den elastiska snodden från stötfångaren
och placera den över slangen.
Svenska
* Endast vissa modeller.
Before starting
Open the front cover on the machine and check that the
dust bag, s-bag
®
and the motorfilter are in place. (See also
Replacement of filter(s))
10 Open the back lid on the machine and check that the
exhaust filter is in place.
11 Insert the hose until the catches click to engage (press
the catches to release the hose). (2). Insert the hose into
the hose handle until the catches click to engage (press
the catches to release the hose).
12 Attach the extension tube* or telescopic tube* to
the hose handle and nozzle by pushing and twisting
together. (Twist and pull apart to dismantle.)
13 Extend the electric cable and connect it to the mains. The
vacuum cleaner is fitted with a cable winder. Once the
electric cable has been extended, it stays in that position.
14 To rewind the cable, press the cord rewinder button. The
cable will then rewind.
15 ON/OFF control: Push the ON-OFF button once to start
the vacuum cleaner. Push same button once more to turn
it off.
16 Power Regulation: Twist the power control towards „max”
to increase the suction power. Twist the power control
towards „min” to decrease suction power. Additional
suction power control: Use the suction control on the
hose handle.
17 Practical parking positions (and at the same time a
backsaving feature) when you pause during cleaning or
when you carry and store the vacuum cleaner.
18 You can also carry the vacuum cleaner using the handle
on top or on the lower front edge of the machine.
19 Keep the hose in place while storing the vacuum cleaner
by extending the elastic bumper cord and placing it
across the hose.
English
* Certain models only.