UEi Test Instruments DM397 User Manual
Page 8
Another useful feature of this meter is AC/DC dual display mode. AC
voltages riding on power supplies can cause problems with electronic
circuits. If the meter is set to DC volts mode, the display shows the DC
component of 6.0000V. However, the AC component may be missed. It
is recommended that you set the meter to AC/DC dual display mode by
pressing menu key 4 twice. The primary display shows the 1.2000 V AC
and the secondary display shows the 6.000 V DC. This is a method to
take both the AC and DC readings on a source without changing the
meter settings.
Frequency (Hz) Measurements
The meter auto-ranges to one of six frequency ra n g e s :
NOTE: The 1mS Peak push-button cannot be used in the frequency
mode. The meter will beep to indicate this when the 1mS Peak
push-button is pressed.
• The meter defaults at negative edge triggering in the frequency
measurement mode - You can select positive edge by pressing
menu key 4. The secondary display will indicate either “EdGE”
for positive or “-EdGE” for negative
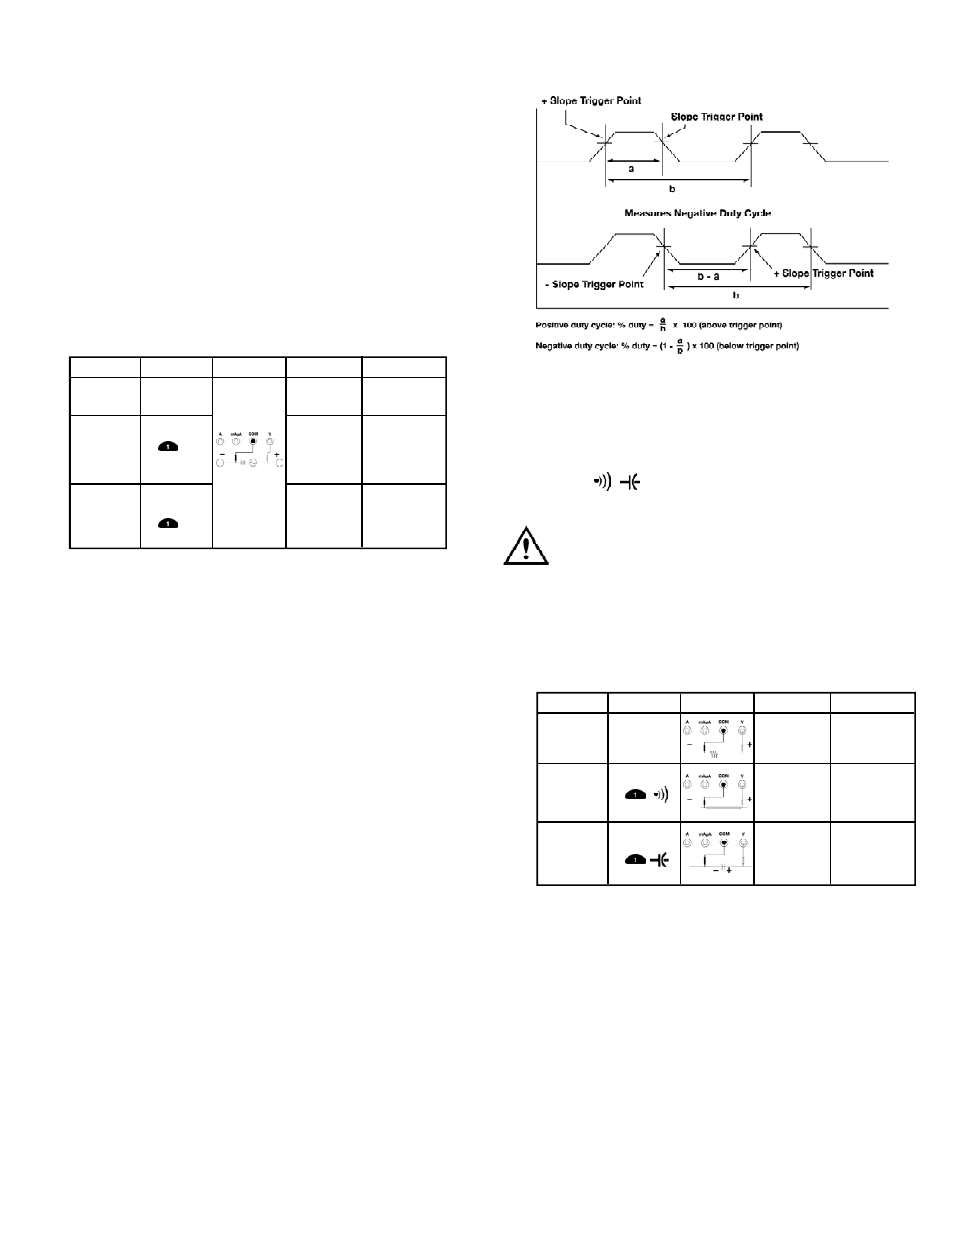
Duty Cycle Measurement
D u ty cycle (or duty factor) is the percentage of time signal is above or
b e l ow a trigger level during one cy c l e .
The duty cycle mode is optimized for measuring the ON and OFF time of
logic and switching signals. Systems such as electronic fuel injection and
switching power supplies are controlled by varying pulse-widths which
can be checked by measuring the duty cy c l e .
Positive and Negative Duty Cycle
To measure duty cycle, set duty cycle to either positive or negative by
using menu key 4. When you measure negative duty cycle a “-” symbol
s h ows in the secondary display.
Measure Positive Duty Cycle
Pulse Width Measurement
The pulse width measurement function allows you to measure the
amount of time a signal is high or low within a given period. The
measured waveform must be periodic.
Resistance (Ω, , ) Measurement
(Ohms, Continuity and Capacitance)
CAUTION!
To avoid damaging the meter or the equipment under test, remove all
power from the circuit and discharge all high-voltage capacitors before
measuring resistance.
The available resistance ranges are 50 . 0 0 0Ω, 50 0 . 0 0Ω, 5.0000kΩ,
50 . 0 0 0 kΩ, 50 0 . 0 0 kΩ, 5.0000MΩ and 50 . 0 0 0 MΩ.
Tips for measuring resistance:
• Because the meter’s test current flows through all possible paths
between the test probe tips, the measured value of a resistor in a
circuit is often different from the resistor’s rated value
• The test leads can add 0.1Ω to 0.2Ω of error to resistance
measurements - To measure the resistance of the leads, touch the
probe tips together and read the resistance - If necessary, you
can press the “REL∆” push-button to automatically subtract
this value
• The resistance function can produce enough voltage to
f o rward-bias silicon diodes or transistor junctions causing them
to conduct to avoid this, and possibly damaging circuit components -
Do not use the 50 MΩ range for measuring in-circuit resistance
DM397-MAN
P. 7
Measurement
Frequency
Frequency
and duty
cycle dual
display
Frequency
and pulse
width dual
display
Menu key
(no selection)
%
ms
Connect Le a d s
P r i m a ry Display
Hz
Hz
Hz
S e c o n d a ry Display
-EdGE
Duty Cycle (%)
Pulse Width (ms)
Measurement
Resistance
(default)
Continuity
Capacitance
Menu key
(no selection)
Connect Le a d s
P r i m a ry Display
Ω
Ω
Ω
S e c o n d a ry Display
S
(conductance)
OPEn or Short
(beeps on short)
-