UEi Test Instruments DM383B User Manual
Page 6
DM383B-MAN
P. 5
1
2
4
2
To measure AC or DC current flow, (in amps), insert the test leads into
the meter as previously instructed (selecting the proper test lead ports),
then follow these steps:
1. Ensure power is off to the circuit to be tested.
2. Turn the meter on.
3. Set the rotary switch to the appropriate AC or DC amp position.
4. Break the circuit as described earlier and connect the meter
leads to the points created by the break.
Note: When performing flame safeguard testing (a low DC
amperage test) on some gas furnace models, an adapter
(sold by UEi) can be placed in-line with the flame sensor to
make testing fast and easy.
5. Apply power to the circuit.
6. Note your measurement value.
7. When measuring DC current, a minus sign will be displayed
if the current is flowing opposite to the connection polarity.
8. Disconnect power to the circuit. Do not remove either test
lead from the circuit until power is disconnected.
M a i n t e n a n c e
Periodic Service
WARNING!
Repair and service of this instrument is to be performed by qualified
personnel only. Improper repair or service could result in physical
degradation of the meter. This could alter the protection from
electrical shock and personal injury this meter provides to the
operator. Perform only those maintenance tasks that you are
qualified to do.
These guidelines will help you attain long and reliable service from
your meter:
• Calibrate your meter annually to ensure it meets original
performance specifications
• Keep your meter dry. If it gets wet, wipe dry immediately.
Liquids can degrade electronic circuits
• Whenever practical, keep the meter away from dust and
dirt that can cause premature wear
• Although your meter is built to withstand the rigors of daily
use, it can be damaged by severe impacts. Use reasonable
caution when using and storing the meter
Cleaning
Periodically clean your meter’s case using a damp cloth. DO NOT use
abrasive, flammable liquids, cleaning solvents, or strong detergents as
they may damage the finish, impair safety, or affect the reliability of the
structural components.
Battery Replacement
Always use a fresh replacement battery of the specified size and type.
Immediately remove the old or weak battery from the meter and
dispose of it in accordance with your local disposal regulations. Batteries
can leak chemicals that corrode electronic circuits. If your meter is not
going to be used for a month or more, remove and store the battery in
a place that will not allow leakage to damage other materials.
WARNING!
Disconnect the test leads from the circuit under test and from the meter
prior to removing or installing batteries.
To install a new battery, follow these procedures:
1. Turn off the meter.
2. Remove the rubber boot from the meter, starting at the top.
3. Place meter face down on a clean cloth.
4. Remove the screws from the rear case. Two machined screws
fasten the bottom and two self-tapping screws fasten the top.
5. Separate the two halves to expose the battery.
6. Remove and discard the old battery. Always dispose of old batteries
promptly in a manner with local disposal regulations.
WARNING!
Under no circumstances should you expose batteries to extreme heat or
fire as they may expose and cause injury.
7. Place a fresh 9V battery in the battery clip.
8. Reassemble the meter.
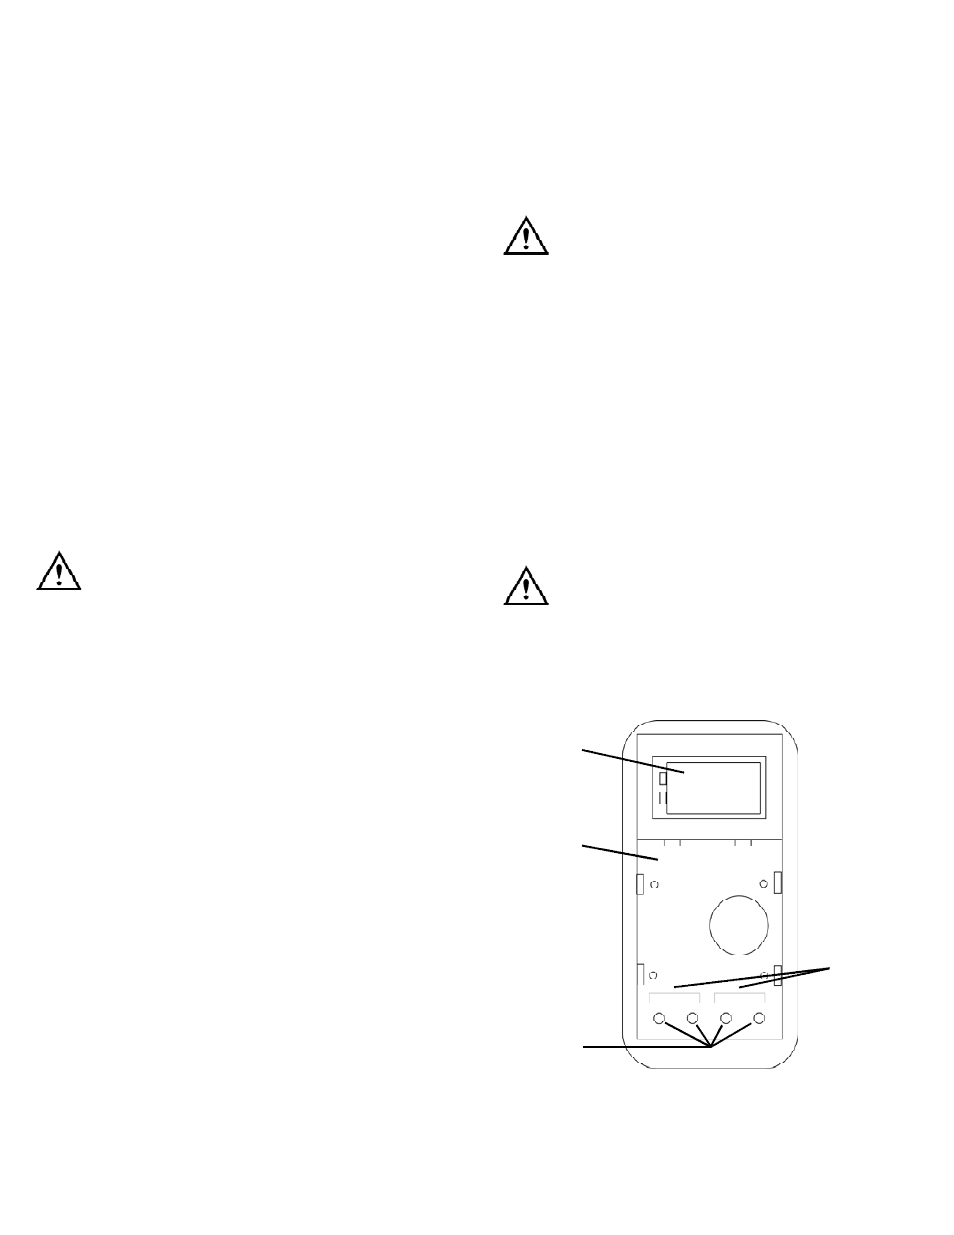
View of meter face down with back cover off.
1. B a t t e ry
2. P CB
3. Test lead ports
4. Fuses, under PCB