Pumps: ½ hp – 3 hp, Tools needed, Operation & installation – Sterlco 4300 Series Stainless Steel Condensate Pumps User Manual
Page 6
Page 6 of 10
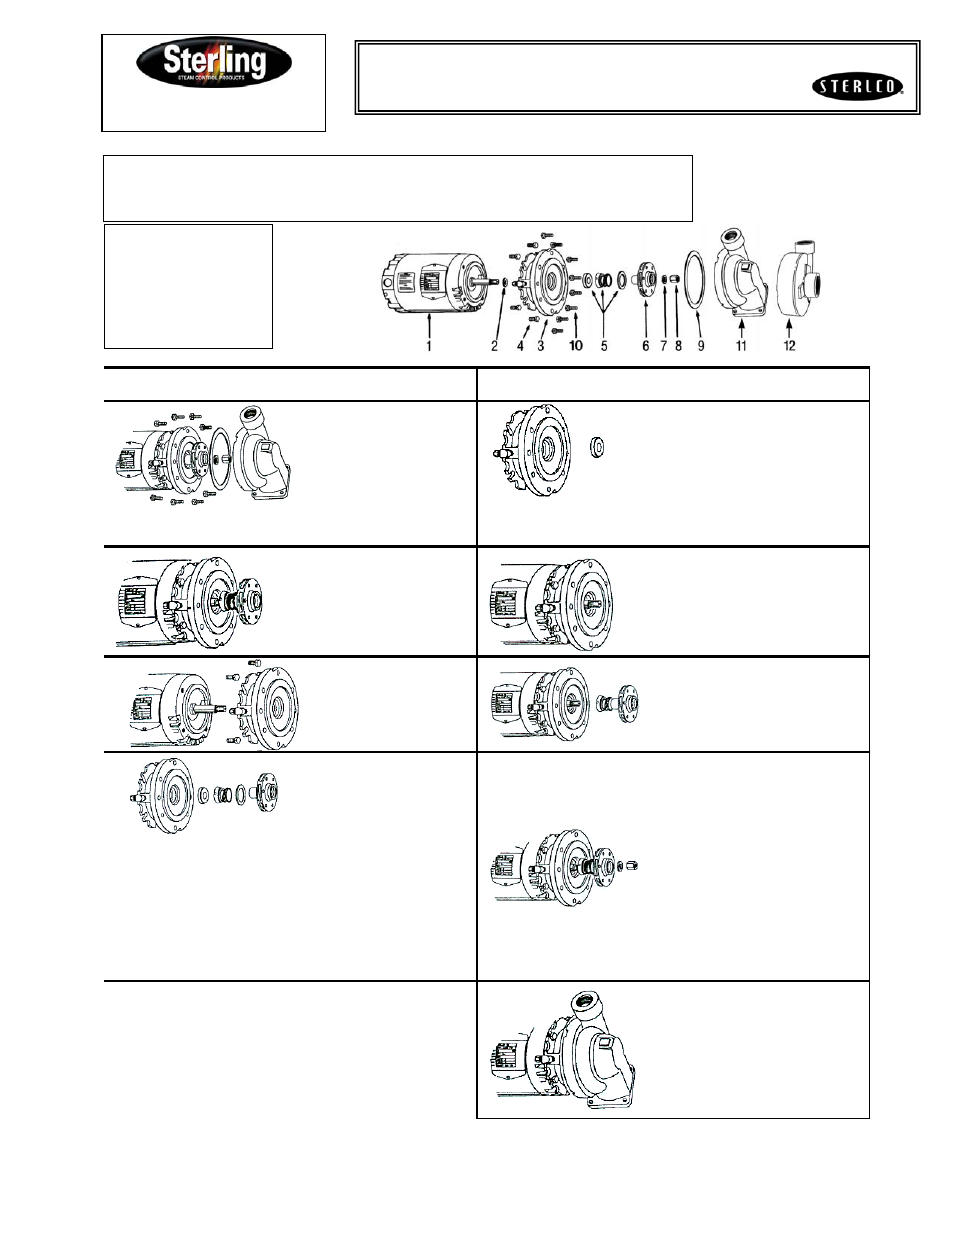
Replacing the Rotary Seal Assembly
On J Series Sterlco
®
Pumps: ½ HP – 3 HP
1. Motor
5. Rotary Seal Assembly
9. Housing Gasket
2. Water Slinger
6. Impeller
10. Pump Screws (8)
3. Bracket
7. Lock Washer
11. Vertical Inlet Casting
4. Motor Screws (4)
8. Impeller Nut
12. Horizontal Inlet Casting
REMOVAL OF OLD SEAL ASSEMBLY
INSTALLATION OF NEW SEAL ASSEMBLY
A) Remove 8 pump screws
and lift out pump and motor;
remove drip cover. Insert
large screwdriver into slot at
end of motor shaft; hold
shaft steady and remove
impeller nut and washer
from nose of impeller by
turning counterclockwise.
E) Coat outside edge of new seat
with seal lubricant and slip it into the
bracket. Press into bracket with
thumbs or wooden dowel. Handle
seat carefully so sweating surfaces
are not scratched or chipped…be
sure it is squarely seated.
B) While still holding motor
shaft steady with
screwdriver, use 1"”socket
to remove impeller by
turning counterclockwise.
F) Remount bracket on motor.
C) Remove the 4 motor
screws and separate the
bracket from the motor.
G) Lubricate impeller hub with seal
lubricant, Slip new bellows and
spring onto impeller hub. Be sure
bellows slide freely on impeller hub.
D) Remove old seal parts from impeller hub and bracket. Be
sure water slinger is in place. Clean the recess in the bracket so
that the new seat will fit perfectly and make a watertight joint. If
bracket is badly eroded at recess, through severe use, casting
should be replaced. Clean all gasket surfaces. Clean impeller
hub thoroughly; remove loose particles of dirt, etc. Check prime
tube or seal flush line and clean as required.
H) Thread impeller on motor shaft
extension and secure with washer
and impeller nut. Hold shaft with
screwdriver slot while tightening.
I) Replace motor assembly onto
volute; using new housing gasket.
Secure with pump screws. Be
certain gasket is seated properly.
Operation & Installation
Tools Needed:
Large Screwdriver
7/16” Wrench
9/16” Wrench
5/8” Socket
1” Socket