MXL 990 USB User Manual
Page 6
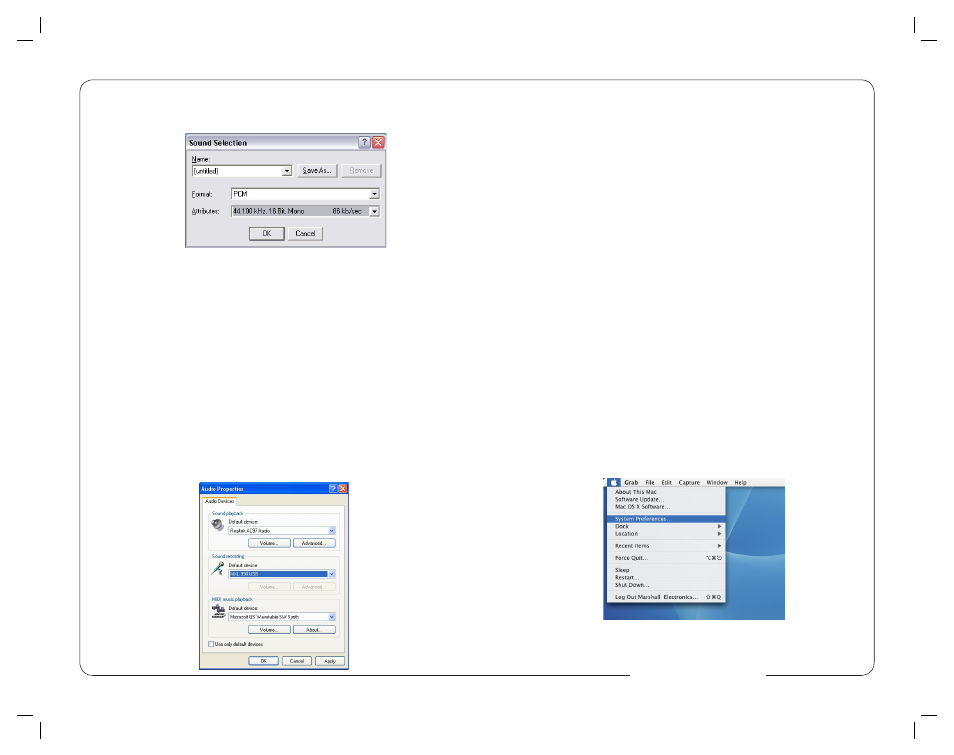
6. In the Attributes drop down Window, select 44.100 kHz, 16-Bit, Mono as
shown in Figure #5.
7. Click OK, then Click OK to close the Properties for Sound Window.
8. You are now ready to record!
9. With your mouse, click the RED record button to start recording.
Speak (or sing) into your microphone.
10. Click the BLACK, rectangular button to end recording.
11. Press the ◄◄ button to reset to the beginning of the recording.
12. Press the ► button to start playback.
If You Don’t Hear Anything…
If you followed the directions and have been unable to record a sound, please
check Window’s Audio Properties dialog window, shown in Figure #6, and
ensure that Sound recording is set to MXL 990 USB and Sound playback is set
for your computer’s sound card/audio chip. If you are uncertain of this setting,
consult your computer’s owner’s manual.
To access the Audio Properties dialog window from within Sound Recorder:
1. Click Edit, then Audio Properties
6
PLEASE NOTE: Each new recording made with this basic sound recording
utility will require you to re-select the 44.1 kHz sample rate. Sound Recorder
defaults to the 8 kHz Mono setting, which produces unwanted noise.
You are now ready to use the recording application of your choice.
PLEASE NOTE: Professional recording applications typically default to the
highest sample rate allowed by your computer’s sound card/audio chip. Usu-
ally, this is 44.1 kHz, which is the same sample rate used for conventional CDs,
however the MXL 990 Supports up to 48kHz.
Connecting the Microphone to Your MAC
As is the case with a Windows PC, the MXL 990 USB microphone will operate
with both USB 2.0 (high speed USB) and USB 1.1 data buses. All current Macs
operate with USB 2.0. We recommend you connect your microphone directly to
the computer’s USB port as opposed to using a USB hub. USB hubs have been
known to interfere with the performance of various USB devices.
PLEASE NOTE: Audio and video recording can be very taxing to a computer’s
resources. For this reason, you should close any and all running applications that
are non essential.
Please take the following steps to get connected:
1. Make certain that any audio applications are closed.
2. Connect the remaining end of the USB cable to the computer’s USB port.
3. To set the USB microphone as the default audio input for audio, click on the
Apple icon in the upper left hand of the screen and select System Preferences
as shown in Figure 7 below.
Figure #7
Figure #5
Figure #6
7
www.mxl-usb.com