Operating instructions, Ecotestr tds low waterproof pocket tester – Thermo Fisher Scientific EcoTestr TDS Low User Manual
Page 2
Conditioning Before First Use:
1. Remove the transparent cap and add 20 mm of tap water or calibration standard
(approximately ½ full)
2. Recap the EcoTestr and soak* for at least 15 minutes
3. Rinse the cap after use
4. The sensor is now activated and ready for use
Measurement:
1. Remove cap and press
to turn on the tester
2. Dip sensor into the test solution
3. Stir once and let the reading stabilize. Note the measured value
4. To hold reading, press
. Screen flashes
HO
once, then displays measurement
with blinking unit (ppm) to indicate that tester is in the hold mode. Press
again to
cancel hold mode (
HC
)
5. Press
to shut the tester off
Note: Tester automatically shuts off after 8.5 minutes of non-use to conserve batteries.
TDS Factor Setting: The EcoTestr TDS Low has a default factor setting of 0.71. If this is
suitable for your application, please skip this section and proceed on to calibrate.
1. Press
to turn off the tester
2. Press and hold
, then press
to turn the tester on. The display shows
dS
3. Press
to scroll to TDS factor value
4. Release
and wait for the auto confirmation
5. To abort TDS factor setting, press
to escape (
ESC
)
Calibration: The EcoTestr is factory calibrated. However, to ensure accuracy, calibration
is recommended. Note: Calibration standard sold separately.
1. If the sensor was stored dry, follow “Conditioning Before First Use” steps for
best results
2. Press
to turn on the tester
3. Dip sensor into calibration standard solution and wait for the value to stabilize
4. Press
to begin the calibration. Display shows
CAL
momentarily and blinks the
default reading
5. Press
until the blinking value matches the value of your calibration standard
at 25 ºC. Note: to set a calibration standard value that is lower than the blinking
value, continue to press
past the maximum value to continue with the lowest
adjustable value
6. Release
to accept the calibration value. After a few seconds, (
En
) is shown and
measurement is resumed
7. To abort calibration, press
to escape (
ESC
)
Maintenance: Clean the stainless steel sensors by periodically soaking them in alcohol
for 10 - 15 minutes. Rinse sensor with clean water after each use.
Useful Notes: To avoid cross contamination, rinse between samples and calibration
standards with clean water.
* The tester cap is not leak-proof. Please keep tester upright during soaking.
EcoTestr TDS Low Waterproof Pocket Tester
Eutech Order Code Oakton Order Code Description
ECOTDSTESTLOW
35462-10
EcoTestr TDS Low
ECPOUCH01
35624-45
Soft carrying case with belt-loop
EC442300BT
00653-47
300 ppm 442 calibration solution
EC4421000BT
00653-18
1000 ppm 442 calibration solution
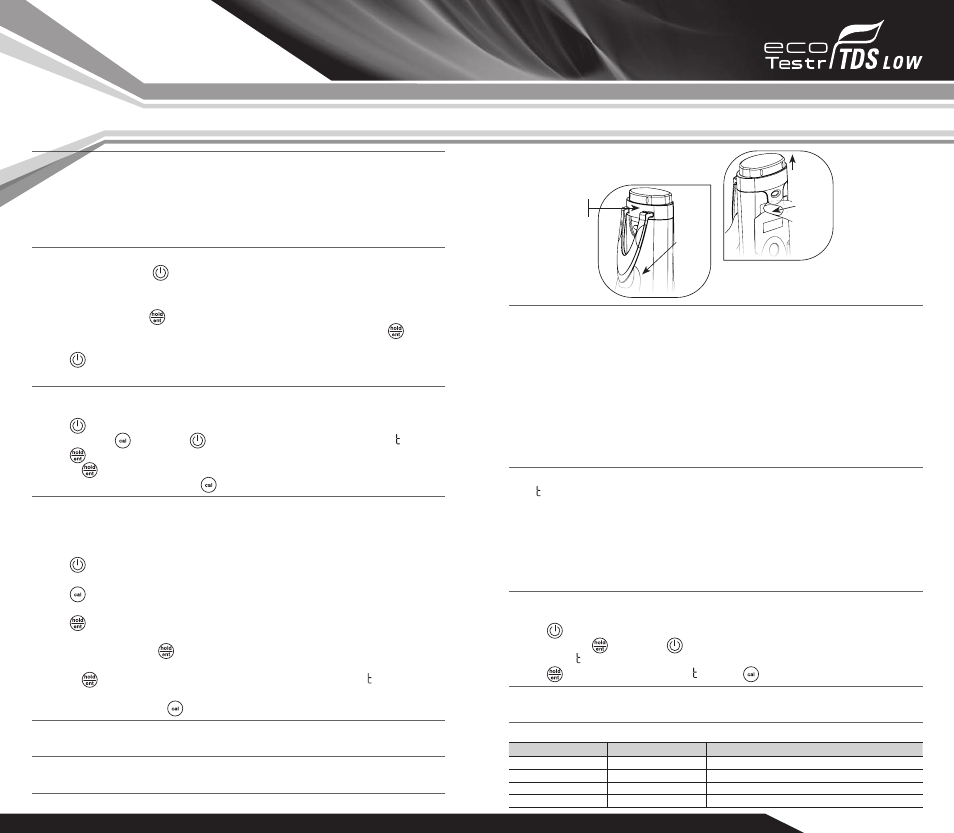
Changing Batteries:
1. To remove batteries, hold the tester on the left hand with the left thumb slide under
the back clip of the cover. This will release the back catch
2. Next, hold the cover with your right hand, at the same time release the front catch
with your right thumb. Slide up to remove the battery cover (Figure 1)
3. Replace old batteries with fresh ones. Note polarity as shown in battery compartment
4. No re-calibration is required after battery change. The tester’s non-volatile memory
function retains calibration settings
Your EcoTestr includes (4) pre-installed 1.5V alkaline batteries. LR44 or A76 battery types are
suitable and commonly available. Replace all (4) batteries together. Waiting too long to replace
the batteries can lead to inaccurate readings and is the most common cause of problems.
Error Messages:
1.
bA
– Batteries are weak and need replacement
2.
Er
– Calibration was attempted with a value that is <5 % of the full-scale range;
use a calibration standard with a higher value
– Use fresh calibration standard
– Sensor is dirty or has not been soaked
3.
Or
– Over Range. The measurement is above the range of the instrument
(including temperature measurement)
Reset Option: Reset option allows you to restore the calibration back to factory
default settings.
1. Press
to turn off tester
2. Press and hold
, then press
to turn the tester on. The display shows a
flashing
rS
(reset)
3. Press
again to confirm reset (
En
) or press
to escape (
ESC
) reset option
Warranty: This instrument is supplied with a warranty against manufacturing defects
for a period of one year from date of purchase.
Tester & Accessories Ordering Information:
Figure 1:
Removing battery cover
to change batteries
Battery
cover
Step 3
Slide out
the cover
LIFT
FT
Step 1
Slide in
left hand
thumb to
clear the
back
catch
LIFT
Step 2
Slide in
right hand
thumb to
clear the
front
catch
Operating Instructions