Martel Electronics MECP2000 User Manual
Page 2
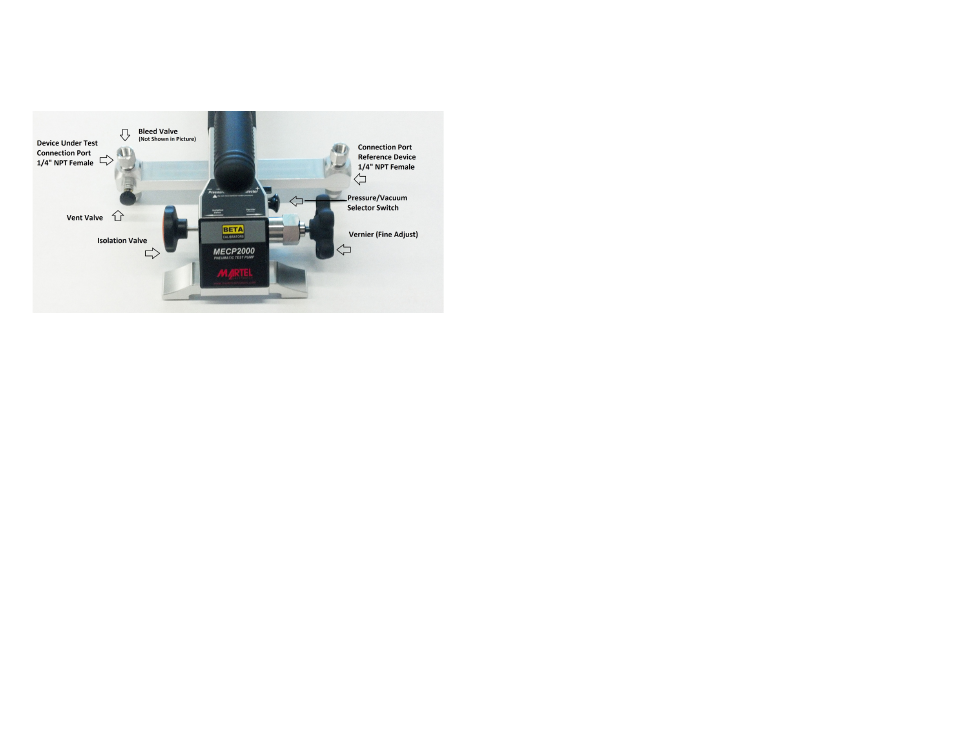
Operation
Before you begin to use the pump familiarize yourself with the
controls and connections on the pump. The drawing below highlights
these components.
1. Inspect the fitting or device to be installed on the pump to be sure it
is clean and the threads are in good condition. Clean or replace if
necessary.
2. Using approximately 6" (150 mm) of the provided Teflon tape, wrap
around the threads on the fitting or device in a clockwise direction
(facing the open side of the fitting). Using too much Teflon tape is a
common error. In the event that the use of Teflon tape is not
permitted, an alternate thread sealant may be substituted. If an
alternate is used, it should exhibit both sealing and lubricating
properties.
3. Apply a thin coating of the supplied anti-seize lubricant over the
Teflon tape. This lubricant prevents extrusion of the Teflon tape and
galling as the threads mate.
4. Install the male threaded fitting into the pump fitting hand tight
making sure the threads are not cross-threaded. It should go in 2
turns to hand tight. If not, remove and retry hand tightening.
5. IMPORTANT! Use a ¾" (19 mm) backup wrench on the pump fitting
as well as a properly sized wrench for the fitting to be installed. The
use of adjustable wrenches is NOT recommended for this
application.
Failure to use a backup wrench may result in damage
to the threads in the crossbar manifold. THIS WILL VOID THE
PUMP WARRANTY.
6. Continue to tighten the fitting 2 turns clockwise past hand tight. If
necessary, the fitting can be tightened up to 3 turns only.
7. Check for leaks. Do not continue to tighten the fitting if leaks occur.
Instead, remove the fitting from the pump, clean any Teflon tape and
lubricant from the fitting and repeat this procedure beginning at step
2 above.
8. Connect the device under test to the left side output port. Again be
sure to use Teflon tape. A BSPP adapter is provided if needed.
9. Place the pressure/vacuum selector switch into the desired mode.
Note that the selector switch has a spring loaded safety interlock. You
must move the interlock out from under the selector switch in order to
push the selector switch in to activate the vacuum mode. To avoid
damage to the pump, please make sure that all pressure is released
before the Pressure/Vacuum Selector switch is toggled in either
direction.
10. Set the valves in the following positions (these settings apply to both
pressure and vacuum).
11. Close the vent valve (gently turn it clockwise unit it bottoms out).
12. Open the isolation valve (for best performance make sure that it is at
least one turn open from being fully closed).
13. Place the vernier (fine adjustment knob) near the middle of it’s travel.
14. Slowly raise the pump handle and begin to pump to the desired
pressure. It’s important that you use the full range of stroke to
generate the pressure to minimize the amount of strokes needed. It’s
even more important if the desired pressure is above 500 psi (35 bar)
as without a full stroke the secondary pressure chamber is not fully
activated.
15. Once the desired pressure (or vacuum) is reached gently close the
isolation valve and use the vernier knob to make the final pressure
adjustments.
16. To release the pressure (or vacuum) SLOWLY open the vent by
turning the vent knob counterclockwise to release the pressure.
17. Open isolation valve to relieve any trapped pressure.
Tips for using the pump
• Try to always use the isolation valve especially at high pressure to
reduce the leak rate and stabilize the pressure. The internal pump
leak rate is very small even without using the isolation valve but using
the valve also helps prevent contaminates from entering the pump
during the venting process.
• Always be gentle with the valve controls to prevent damage to the
valve seats. It doesn’t take much torque to fully close a valve.
• When using the pump in the vacuum mode take care to insure that
any liquid or dirt is has been removed or cleared from the device