Measurement display, Battery, Settings – KYORITSU 5510 User Manual
Page 2: Usage and part names display
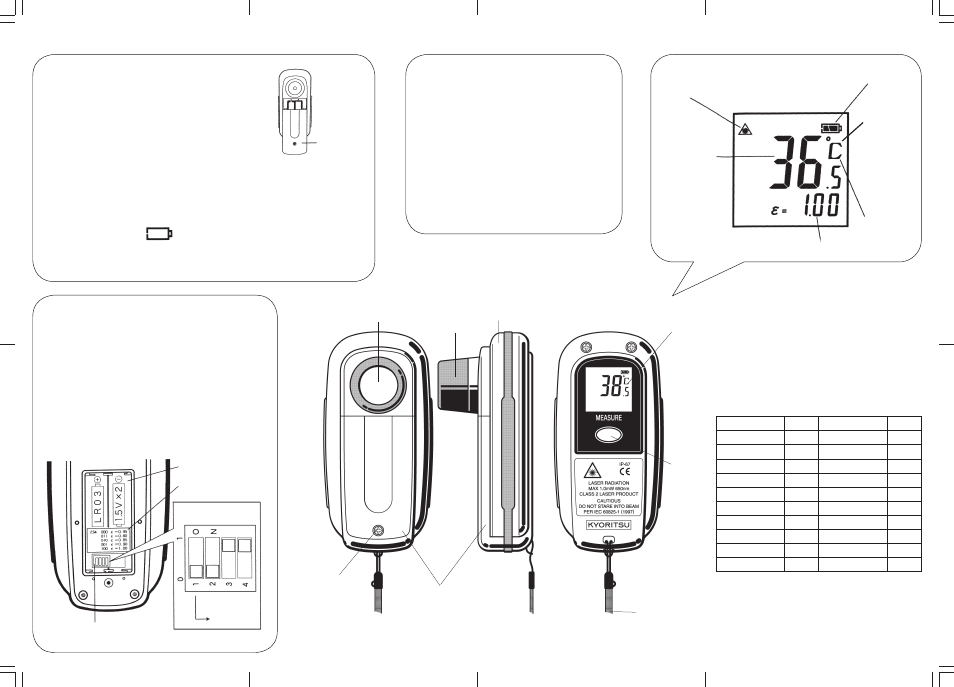
Measurement Display
Aim the measuring window at the measuring target, and press
the MEASURE key. Holding down the MEASURE key, confirm if
the laser beam irradiates the measuring position properly. Adjust
the position, if the laser beam does not irradiate the measuring
position properly. During holding down the MEASURE key,
measuring continues. When the MEASURE key is released, the
measured value is hold for about 30 seconds, and then the
power is shut off with the Auto Power Off function.
If the measuring window is aimed at a new target and the
MEASURE key is pressed while the measured value is being
hold, the temperature of the new target will be measured. When
the MEASURE key is released, the newly measured temperature
will be hold.
Battery
(1) Installing Batteries
Loose the screw at the lower part of the battery cover, pressing the
battery compartment cover as shown and remove it. Install batteries
positioning the negative and positive poles properly as shown inside
the compartment, and bolt up the screw, put the cover back.
Note:
If the battery cover does not fit tightly, water-proof property will be deteriorated, or the performance
will be deteriorated due to water penetration in the unit.
Don't bolt up the screw too tightly, as putting the battery compartment cover.
(2) Replacing Batteries
Residual quantity of the batteries is displayed on the low battery symbol in the display part. When the
low battery symbol becomes the batteries have been exhausted. Replace the batteries with
new batteries.
Note:
When replacing batteries, do replace 2 batteries at the same time.
Settings
Normally only the object emissivity is selectable. The emissivity is set
at 0.95 at the factory. The emissivity is displayed during measurement
(except for emissivity 0.95. When nothing appears on the display, it
means that the emissivity is 0.95.) Five variations of emissivity
ranging from 0.8 to 1.0 can be set per 0.05 steps.
The emissivity can be altered by setting the 3 digits (2nd, 3rd and 4th
digits from left) of the 4-digit slide switch in the lower part of the
battery compartment. The setting mode of the slide switch is
displayed below the battery part. Remove the batteries, and set as
required according to the displayed setting mode.
If necessary, the measurement unit can be switched to Fahrenheit (F)
(with the left most digit of the 4-digit slide switch.)
■ Setting Emissivity (Reference)
Quantity of infrared radiation emitted from objects depends on the objects' material,
surface conditions, measuring temperatures and so on. The table below shows
emissivity of some objects. Please note that these values are just for reference. Please
also refer to the estimated emissivity using the separately sold black body tape.
◆ Emissivity of Objects
◆ Estimated Emissivity Using the Black Body Tape
If a measuring object accepts sticking of adhesive tapes, stick a piece of the
black body tape (emissivity: 0.94) to the object, and measure the temperature
after setting the emissivity to 0.95.
Material
Water, Ice
Soil
Concrete (wet)
Concrete (dry)
Ceramics
Stone, Asbestos
Plastics
Rubber (black)
Wood
Paper
Emissivity
0.98
0.92to0.96
0.96to0.98
0.91to0.95
0.85to0.95
0.92
0.90to0.95
0.95
0.98
0.92
Material
Cloth, Fabric (colored)
Leather, Fur
Human skin
Vegetable, Fruit
Dough
Meat
Copper oxide
Ferric oxide
Painted surface
Tile
Emissivity
0.95
0.96
0.99
0.98
0.98
0.98
0.50to0.60
0.70to0.80
0.80
0.80
Battery Cover
Laser Mark
Lighting during measurement
Display
measured value
Low Battery Symbol
Display
measurement unit
Display emissivity
(except emissivity 0.95)
Battery compartment
Setting mode display
4-digit side switch
(Emissivity setting example)
0 1 1
ε
= 0.80
℃ /°F switching
Display part
Hood
Measuring Window
MEASURE
key
Battery Cover
Strap
Usage and Part Names
Display
0:℃ 1:°
F
Screw for the battery
compartment cover
Body
Lighting during
measuring
Blinking during
holding