Elitegroup L51RI v.4 User Manual
Page 13
■ chapter 4 upgrading your computer
4-13
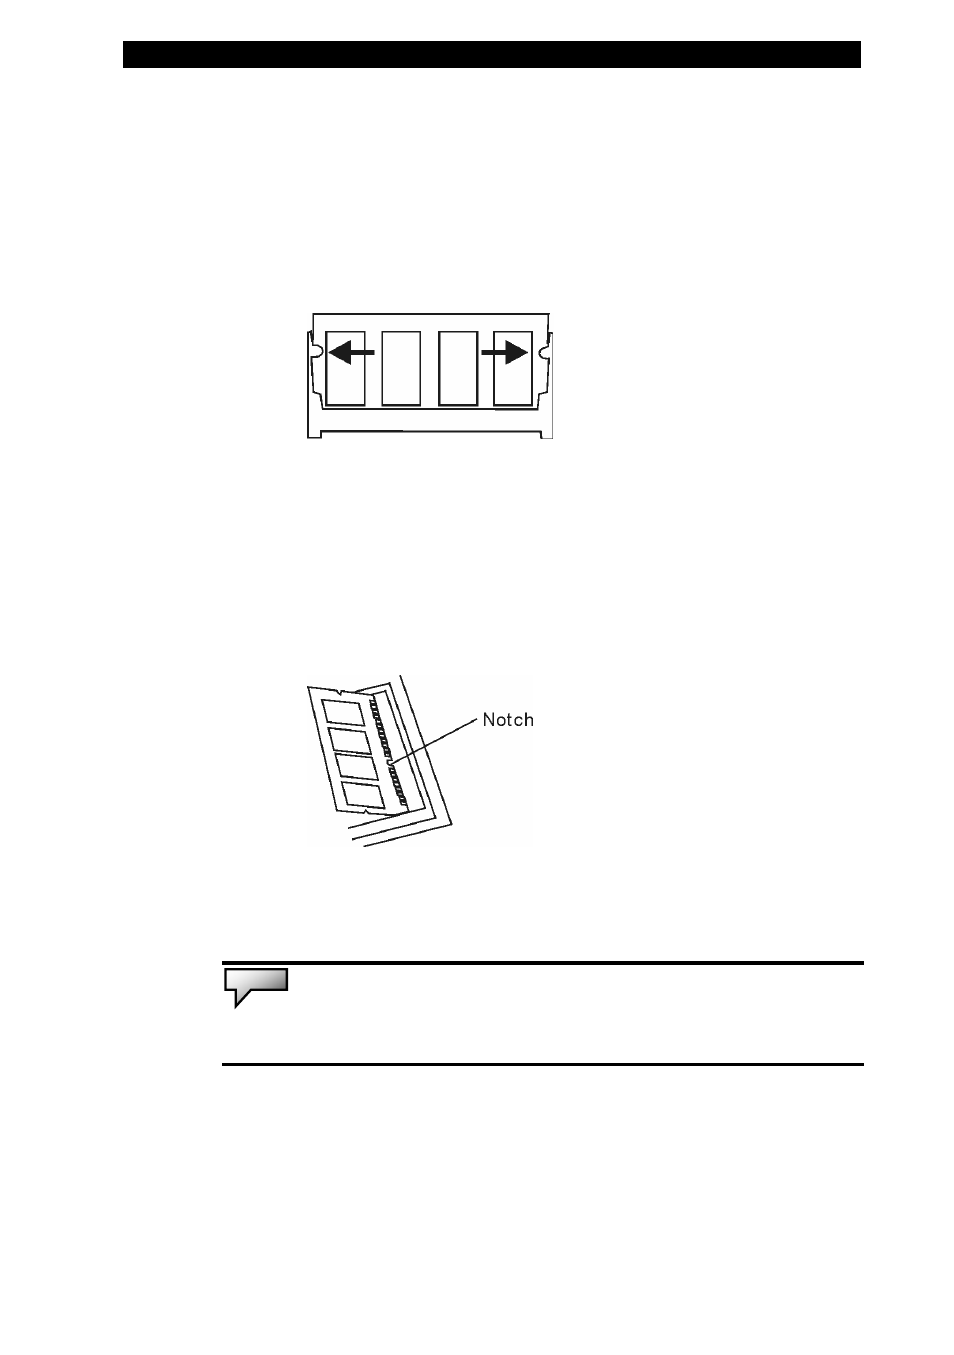
press out on the latches located on both edges of the socket at
the same time. The DIMM should pop up to an angle of 30
degree (see diagram below). Pull the DIMM module out of the
memory socket. Store away the DIMM for the future use.
5.
Install the new DIMM module into the memory socket.
The DIMM will only fit in one orientation. Insert the DIMM at an
angle of approximately 30 degrees into the empty memory
socket. Then press it firmly so that the contact edge is driven
into the receiving socket.
6.
Pivot the DIMM until the latches on both sides of the
socket snap into place.
Note:
Notice the notch on the DIMM. The notches should fit nicely with the
socket.
7.
Put the keyboard back to its original position. Make sure
the edge of the keyboard now resides under the spring-loaded
latches.
- MB50II / IA ID 1 (72 pages)
- MB40II ID 9 (73 pages)
- MB40II / IA ID 8 (73 pages)
- MB40II ID 7 (71 pages)
- MB40II ID 6 (57 pages)
- MB40II ID 5 (56 pages)
- MB40II ID 4 (53 pages)
- MB40II / IA ID 3 (73 pages)
- MB40II / IA - 41II ID 2 (72 pages)
- MB40II ID 1 (73 pages)
- L41II (69 pages)
- U40-50SA (70 pages)
- U41II (65 pages)
- U10IL (84 pages)
- A900 (V2.1) (85 pages)
- A535 (117 pages)
- A531_TM5800 (110 pages)
- 755SI4 v.1 (22 pages)
- 755SI4 v.2 (17 pages)
- 755SI4 v.3 (6 pages)
- 755SI4 v.4 (7 pages)
- 755SI4 v.5 (8 pages)
- 755IN v.1 (22 pages)
- 755IN v.2 (10 pages)
- 755IN v.3 (14 pages)
- 755IN v.4 (10 pages)
- 755IN v.5 (17 pages)
- 755IN v.6 (6 pages)
- 755IN v.7 (7 pages)
- 755IN v.8 (9 pages)
- 755II1 v.1 (22 pages)
- 755II1 v.2 (10 pages)
- 755II1 v.3 (14 pages)
- 755II1 v.4 (10 pages)
- 755II1 v.5 (17 pages)
- 755II1 v.6 (6 pages)
- 755II1 v.7 (7 pages)
- 755II1 v.8 (9 pages)
- 557 (81 pages)
- 536 (71 pages)
- 532 (83 pages)
- 332 (73 pages)
- 331 (75 pages)
- 330 (73 pages)
- 331 (77 pages)