UView Combustion Leak Tester User Manual
Page 2
1. Open the radiator cap (CAUTION: Be extremely careful
if engine is hot, let it cool sufficiently to avoid burns).
Determine whether there is sufficient air in the top of the
radiator (approximately 1.5 inches) so that the rubber intake end can seat
against the inside of the radiator filler neck without touching the coolant.
If it is necessary to drain some coolant from the radiator, run the engine for
a few minutes before proceeding with the test.
IMPORTANT: Avoid sucking coolant into the Leak Tester
– it will contaminate
the fluid.
2. After opening the radiator cap and checking (and correcting) the coolant level,
insert the rubber intake end of the Leak Tester into the radiator filler neck.
3. Squeeze the rubber bulb completely and slowly about 3-5 times for gasoline
(5-10 times for diesel), sucking the air up through the two fluid-filled chambers.
As the air bubbles up through the fluid, it will cause a chemical reaction if
combustion gas is present which will change the color of the blue fluid to yellow
for gasoline (green for diesel).
IMPORTANT: It is the upper fluid chamber which will give the correct reading.
If the fluid in the upper chamber remains blue, no combustion gas has escaped
into the coolant and there is no leak. Since this “routine maintenance” procedure
will reveal even small leaks which may not require immediately attention, it is
suggested that a second, “major leak” test be made if the first test is positive.
1. With the engine off and the radiator cap open, fill the radiator with coolant to
the top of the filler neck.
2. The new coolant will displace the stale air which has already given a positive
reading. Now remove the excess coolant to restore the air cushion as described
in step 1 of the “routine maintenance” test.
3. You are now ready to take the reading for the “major leak” test. While you hold
the Leak Tester in position in the radiator filler neck, have an assistant start the
engine and accelerate approximately 15 times. After each acceleration, allow
the engine to slow to idle for a few seconds before speeding up again. This
procedure creates high combustion pressure in the engine by simulating an
actual driving cycle. During this procedure, squeeze the rubber bulb about
15 times.
4. Watch the fluid in the upper chamber of the Leak Tester as you perform the
above test. If it turns yellow for gasoline (green for diesel), you have confirmed
that combustion gas has leaked into the coolant within a very short time, meaning
there is a serious leak that requires immediate attention.
Note: Although in most cases the leak will be caused by a faulty head gasket,
it may be the result of a cracked, warped and corroded head and/or block, or another
problem. The cause must be determined by a competent professional mechanic.
“ROUTINE MAINTENANCE” TEST
“MAJOR LEAK” TEST
Replacement
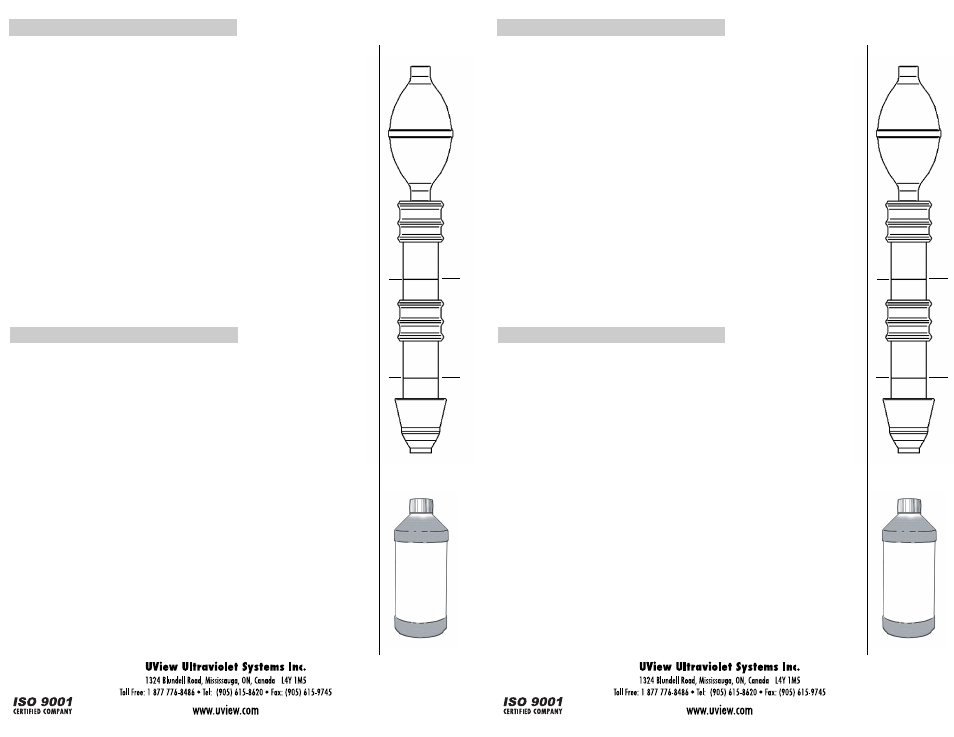
Tester Fluid
16 oz./480 ml
bottle
560500
Contact your distributor to order additional Tester Fluid, Parts and/or additional Tools
#99081870 Rev.0-0
Made in Canada
Top
Chamber
Bottom
Chamber
Fill
Line
Fill
Line
1/2 oz.
1/2 oz.
1. Open the radiator cap (CAUTION: Be extremely careful
if engine is hot, let it cool sufficiently to avoid burns).
Determine whether there is sufficient air in the top of the
radiator (approximately 1.5 inches) so that the rubber intake end can seat
against the inside of the radiator filler neck without touching the coolant.
If it is necessary to drain some coolant from the radiator, run the engine for
a few minutes before proceeding with the test.
IMPORTANT: Avoid sucking coolant into the Leak Tester
– it will contaminate
the fluid.
2. After opening the radiator cap and checking (and correcting) the coolant level,
insert the rubber intake end of the Leak Tester into the radiator filler neck.
3. Squeeze the rubber bulb completely and slowly about 3-5 times for gasoline
(5-10 times for diesel), sucking the air up through the two fluid-filled chambers.
As the air bubbles up through the fluid, it will cause a chemical reaction if
combustion gas is present which will change the color of the blue fluid to yellow
for gasoline (green for diesel).
IMPORTANT: It is the upper fluid chamber which will give the correct reading.
If the fluid in the upper chamber remains blue, no combustion gas has escaped
into the coolant and there is no leak. Since this “routine maintenance” procedure
will reveal even small leaks which may not require immediately attention, it is
suggested that a second, “major leak” test be made if the first test is positive.
1. With the engine off and the radiator cap open, fill the radiator with coolant to
the top of the filler neck.
2. The new coolant will displace the stale air which has already given a positive
reading. Now remove the excess coolant to restore the air cushion as described
in step 1 of the “routine maintenance” test.
3. You are now ready to take the reading for the “major leak” test. While you hold
the Leak Tester in position in the radiator filler neck, have an assistant start the
engine and accelerate approximately 15 times. After each acceleration, allow
the engine to slow to idle for a few seconds before speeding up again. This
procedure creates high combustion pressure in the engine by simulating an
actual driving cycle. During this procedure, squeeze the rubber bulb about
15 times.
4. Watch the fluid in the upper chamber of the Leak Tester as you perform the
above test. If it turns yellow for gasoline (green for diesel), you have confirmed
that combustion gas has leaked into the coolant within a very short time, meaning
there is a serious leak that requires immediate attention.
Note: Although in most cases the leak will be caused by a faulty head gasket,
it may be the result of a cracked, warped and corroded head and/or block, or another
problem. The cause must be determined by a competent professional mechanic.
“ROUTINE MAINTENANCE” TEST
“MAJOR LEAK” TEST
Replacement
Tester Fluid
16 oz./480 ml
bottle
560500
Contact your distributor to order additional Tester Fluid, Parts and/or additional Tools
#99081870 Rev.0-0
Made in Canada
Top
Chamber
Bottom
Chamber
Fill
Line
Fill
Line
1/2 oz.
1/2 oz.