En g l is h english, Maintenance & care trouble shooting tips – Pfister 808-TMKK User Manual
Page 5
E
N
G
L
IS
H
ENGLISH
ENGLISH
MAINTENANCE & CARE
TROUBLE SHOOTING TIPS
CAUTION: Maintenance
DISASSEMBLY
1. Replacement parts may be available at the store where you purchased
your faucet.
2. When replacement parts are not available, please write or call Price
Pfi ster Consumer Service.
3. Always turn off water and relieve pressure before working on your
faucet.
NOTE: Trim Care
Cleaning Instructions:
For all Handles and decorative fi nishes, use only a soft damp
cloth to clean and shine. Use of polish, detergents, abrasive
cleaners, organic solvents or acid may cause damage. Use of
other than a soft damp cloth will nullify our warranty!
Special Trim:
Trim products which contain Porcelain or other similar
substance are not acceptable for public areas or Commercial
use. Installation of Said Trim is at Users Risk!
1–800–PFAUCET (1–800–732–8238)
For Toll-Free Pfaucet information call
1–800–PFAUCET (1–800–732–8238)
or visit www.pricepfi ster.com
• Installation Support
• Care and Warranty Information
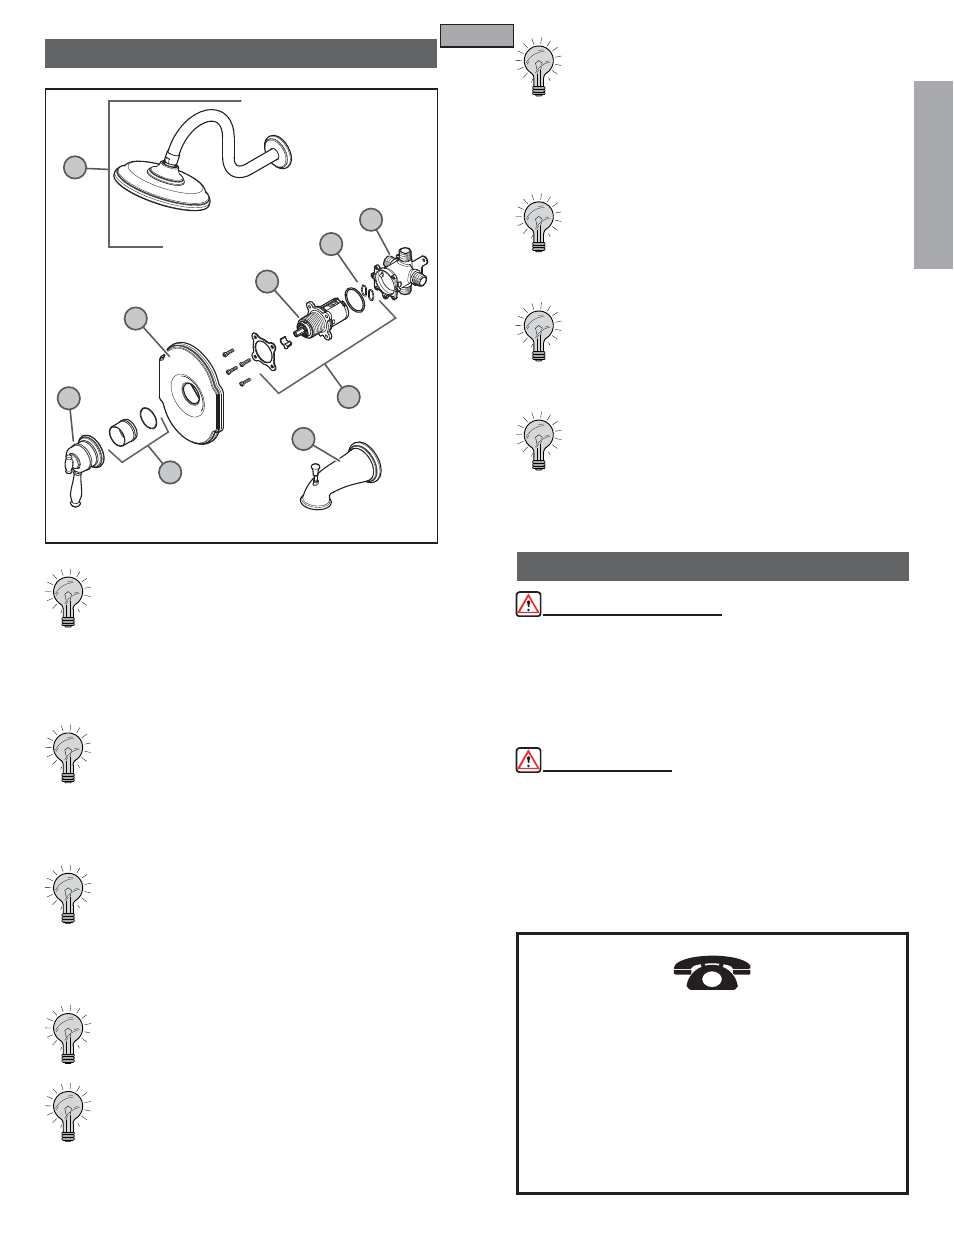
Temperature or fl ow does not remain consistent.
The Cartridge Assembly (D) may need cleaning. Shut off water supply. Remove
Handle Assembly (A), unscrew Retainer Sleeve (B) and remove Flange (C).
Remove Cartridge assembly (D) and inspect Cartridge (E) and inlets for debris
or sediment and fl ush with water. Reassemble whole unit and test. If problem
persists you may need to replace the Cartridge (E).
Sleeve (B) is too short.
Extension kit 910-563 is available at a nominal charge for valves which have
been roughed-in too far back in the wall. The kit contains a one inch stem
extension, and longer screw and a sleeve which is one inch longer than the
972-300.
Dripping from either the tub spout or shower head.
Clean the Cartridge Assembly (D). Check to ensure the two Oval O-Rings (F)
on the back of the Cartridge (E) are in place. Reassemble cartridge, stem and
bonnet assembly and handle. Turn on the water and test. If the unit still leaks,
replace the Cartridge (E).
Make sure that both hot and cold water inlets are turned on.
Water fl ow is very low.
Check the Cartridge Assembly (D), for debris. Sediment where the water enters
the Shower Head (G) can also cause this symptom.
Water starts out hot and becomes cooler as handle is rotated counter
clockwise.
This is a potentially hazardous situation and should be corrected before using
the unit. Check the hot and cold inlet positions (hot- left cold-right). If you have
a back to back installation, (where hot and cold inlets are reversed) refer to
Valve Body instruction sheets for back to back installation.
Water fl ows from the shower head while fi lling the tub.
Check the position of the Valve Body (J). The letters “SHWR” should be cast
into the top and “TUB” on the bottom.
Water doesn’t get hot enough.
Remove Handle (A), Sleeve (B) and Flange (C) and then refer to Valve Body
instruction sheets for adjusting temperature range.
Water fl ows from the tub spout while using the shower.
The seal inside of the diverter mechanism may have become dislodged. The
Spout (H) may need replacement.
5
G
A
C
E
F
J
D
B
H