Powermate 024-0181CT User Manual
Page 4
4 - ENG
OPERA
OPERA
TING INSTRUCTIONS
TING INSTRUCTIONS
TYPICAL
TYPICAL
INST
INST
ALLA
ALLA
TION
TION
To begin using the tool:
1.
As a standard practice, drain water from the air compressor tank and air lines prior to use each day
(reference your compressor operators manual for detailed instructions).
2.
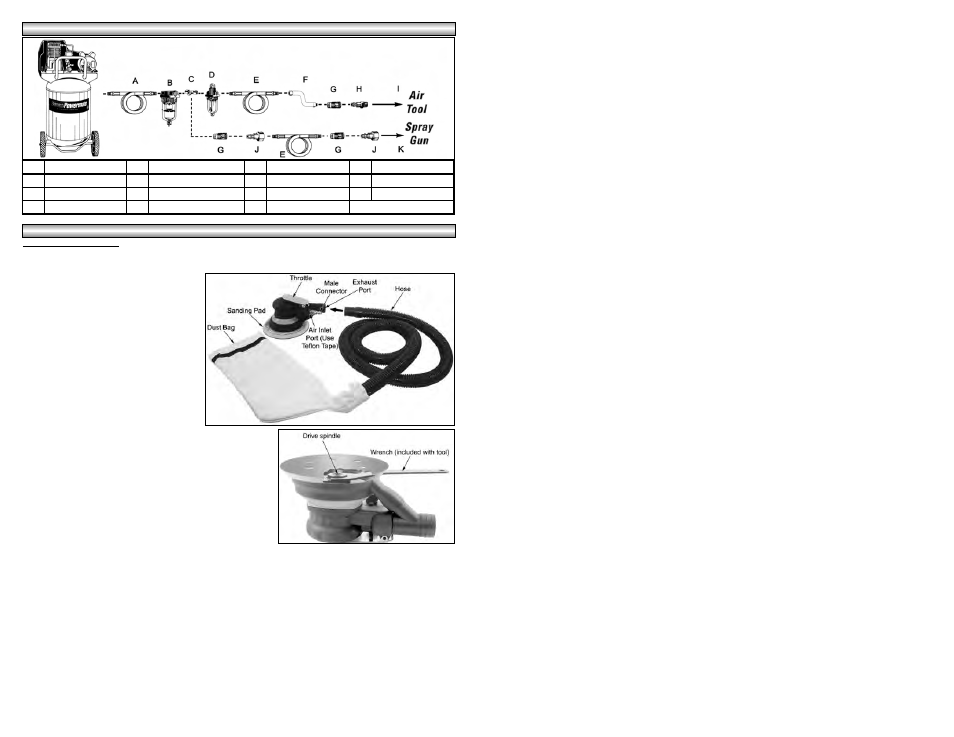
Install a 1/4” NPT male connector (not
included) into the air inlet port on the tool
(see Figure 2). Note: Use Teflon® Tape
on all threaded connections.
3.
Turn on the air compressor and allow it to
build up pressure.
4.
Assemble the sanding pad to the sander:
a.
Position the wrench (included with
the sander) onto the flattened area
on the drive spindle (see Figure 3).
b.
Hold the drive spindle stationary
with the wrench and screw the
sanding pad clockwise into the drive
spindle until the pad is tight.
5.
Adjust the air compressor’s regulator or the supply line
regulator to 90 PSI.
6.
Attach a hook and loop (Velcro) 6 hole sanding disk (not
included), to the sander pad, by aligning the holes and
pressing it onto the sander pad. Clean the Velcro
occasionally by brushing lightly with a small brush to provide
the best attachment.
Note: Holes in sanding disk must line up with holes in
the sanding pad in order for the dustless feature to work
properly.
7.
Attach one end of the hose to the sander and tie the dust bag
to the other end of the hose as shown in Figure 2. This is to collect dust during sanding operation. Note:
Empty the dust bag when it’s no more than half full by unzipping the zipper located towards the
bottom of the bag and emptying the contents. This will allow the air to flow through the bag better.
8.
Connect the tool to the air hose quick coupler. NOTE: It is recommended that a whip hose with a swivel
(P012-0079SP - not included) be used to prevent twisting, kinking, and excessive wear to the air hose
(see figure 1 for recommended connections).
9.
Place the sander on the work surface. Grip the sander in the palm of your hand and gently apply pressure to
the throttle by pushing down with the palm of your hand. Move the sander slowly across the work surface by
either moving it up and down or by moving it in circles while progressing in a sideways direction. Let the
sander do the work. Do not put additional pressure on the sander. This slows down the speed of the pad,
reducing sanding efficiency and puts additional burden on the air tool motor.
10.
When finishing sanding, release the throttle and wait until the sanding disc has come to a complete stop
before removing it from the work surface.
Key
Description
Key
Description
Key
Description
Key
Description
A
Air hose
D
In-line Oiler
G
Quick Coupler
J
Female Connector
B
In-line Filter
E
Air Hose
H
Male Connector
K
Spray Gun
C
Tee Fitting
F
Whip Hose
I
Air Tool
Figure 1
Figure 2
Figure 3