Powermate 009-0002CT User Manual
Page 5
5 - ENG
After each use:
Clean the surface with an air blaster or medium
bristle brush to remove any remaining abrasive material.
Always disconnect the tool from
the air supply before performing
any maintenance.
Changing ceramic nozzles:
Periodically (depending on the amount of grit accu-
mulated in the nozzle and the amount of use), the ceramic
nozzle will become worn, causing the spray to become
irregular or to stop.
1.
Disconnect the sandblaster from the air supply.
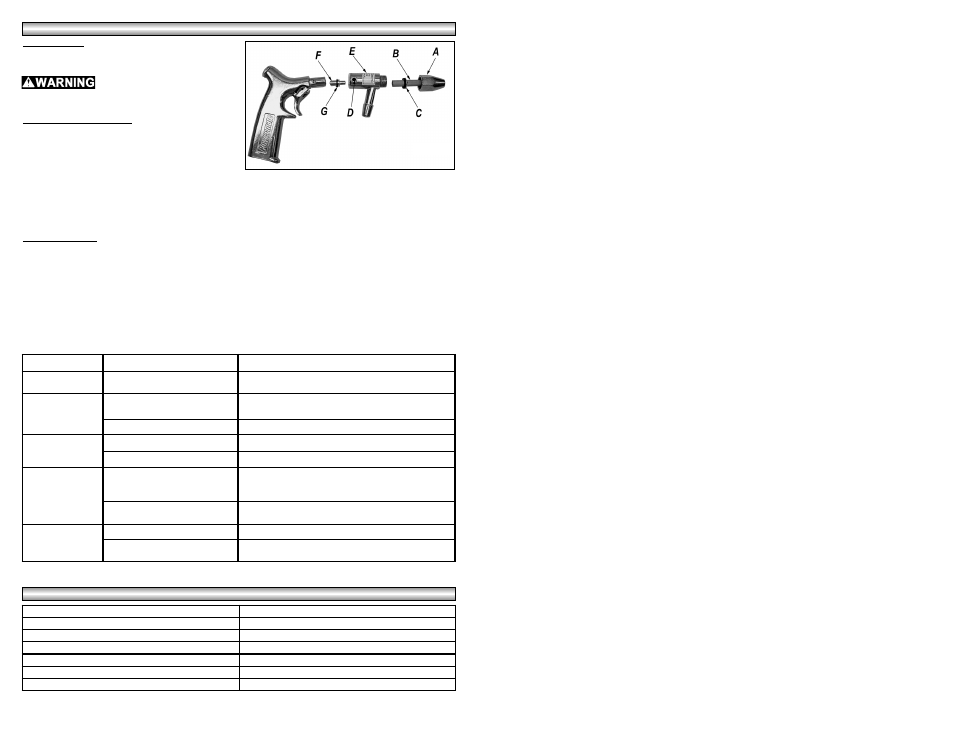
2.
Remove the nozzle tip (A) and carefully pull out the ceramic nozzle (B) .
3.
Gently insert the new ceramic nozzle, being careful not to dislodge the internal tooth washer (C).
4.
Replace the nozzle tip (A).
NOTE: For replacement ceramic nozzles, contact Coleman® Powermate® at the number on the back of this
manual
Changing orifices:
Occasionally (after approximately 6-8 nozzle replacements), the nozzle orifice will need to be replaced.
1.
Disconnect the sandblaster from the air supply.
2.
Loosen the allen socket screw (D) from the tool with the hex key wrench (included).
3.
Remove the nozzle assembly (E).
4.
Remove the orifice (F). NOTE: If the orifice is stuck, tap the nozzle assembly lightly until the orifice is
dislodged.
5.
Place a new washer (G) on the new orifice (F).
6.
Gently drop the new orifice into the nozzle assembly.
7.
Reassemble the nozzle assembly and tighten the allen socket screw.
This sandblaster kit comes with standard 1/8”, 3/32” and 5/64” orifices.
USER-MAINTENANCE INSTRUCTIONS
USER-MAINTENANCE INSTRUCTIONS
SYMPTOM
POSSIBLE CAUSE(S)
CORRECTIVE ACTION
Sputtering-vacuum
leak
Damaged o-ring
Replace o-ring.
Gun does not spray
material
Wet or damp material
Replace wet abrasive material with dry material. Damp
material can be reused after it has dried.
Water in air lines
Drain compressor tank and install and in-line filter.
Sputtering-air/mate-
rial leaking at nozzle
tip area
Damaged o-ring
Replace o-ring.
Loose nozzle or orifice
Tighten nozzle tip or orifice (nozzle assembly).
Material slow out of
gun
Clogged siphon hose
Reduce the air pressure to 30 PSI and hold the gun
nozzle tip against a flat surface. Pull the trigger to force
any stuck material back out of the siphon hose.
Wet or damp material
Replace wet abrasive material with dry material. Damp
material can be reused after it has dried.
Sputtering-low vacu-
um
Worn orifice and/or ceramic nozzle Replace orifice and/or ceramic nozzle.
Abrasive material buildup around
orifice and/or ceramic nozzle
Remove and clean orifice and ceramic nozzle.
T
T
OOL
OOL
SPECIFICA
SPECIFICA
TIONS
TIONS
Average SCFM Requirements - 1/8” Orifice
6.0 SCFM @ 90 PSI
Average SCFM Requirements - 3/32” Orifice
3.0 SCFM @ 90 PSI
Average SCFM Requirements - 5/64” Orifice
1.5 SCFM @ 90 PSI
Air Inlet
1/4” NPT (female)
Siphon Hose
10 Feet
Recommended Hose Size
3/8”
Maximum Working Pressure
90 PSI
Figure 4