Powermate 009-0002CT User Manual
Page 4
4 - ENG
OPERA
OPERA
TING INSTRUCTIONS
TING INSTRUCTIONS
TYPICAL
TYPICAL
INST
INST
ALLA
ALLA
TION
TION
To begin using the tool:
1.
As a standard practice, drain water from the air
compressor tank and air lines prior to use each day
(reference your compressor operators manual for
detailed instructions). IMPORTANT: Installation of
appropriate water/oil removal equipment is
recommended. Failure to do so will cake the
abrasive material and clog the sandblasting gun,
causing the gun to not operate (follow the
recommended installation for the spray gun in
Figure 1).
2.
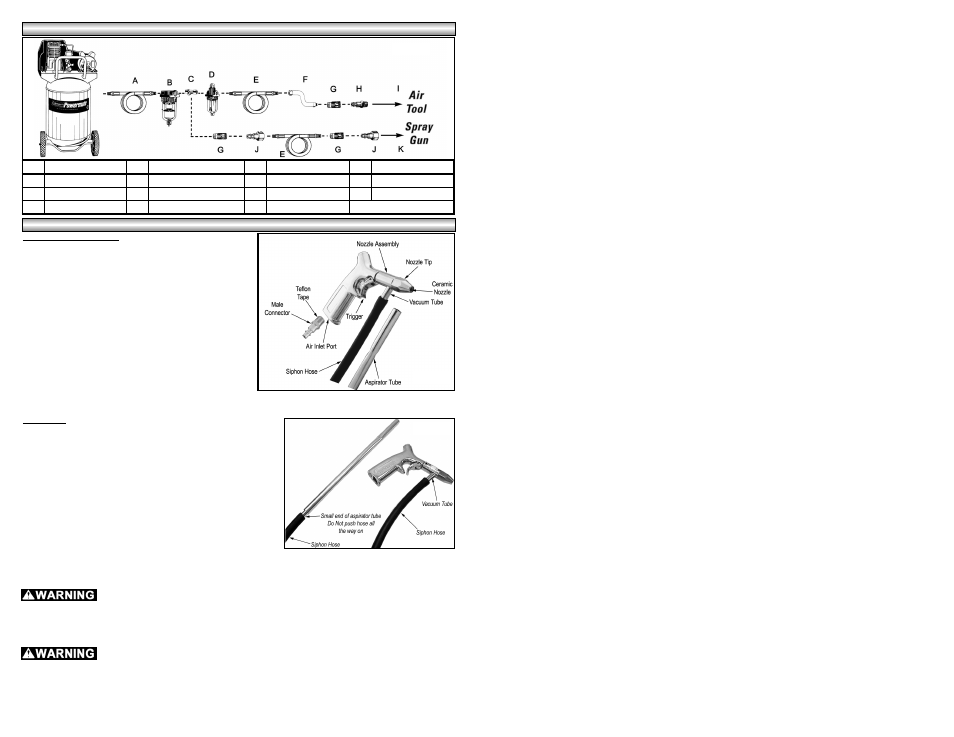
Install a 1/4” NPT male connector (not included) into the
air inlet port on the tool (see Figure 2). Note: Use
Teflon® Tape on all threaded connections.
3.
Turn on the air compressor and allow it to build up
pressure.
4.
Adjust the air compressor’s regulator or the supply line regulator to 90 PSI.
Assembly:
1.
Push one end of the siphon hose onto the small end of the
metal aspirator tube (see Figure 3). NOTE: Do not push the
siphon hose all the way onto the aspirator tube, only push
on about an inch.
2.
Push the other end of the siphon hose onto the vacuum tube
(See Figure 3).
3.
Insert the aspirator tube into the abrasive material, making
sure that the shorter tube remains above the material (the tube
can be placed directly into the bag). Silica (playground sand) or
hard sand, ground nut shells or aluminum oxide carbide are all
abrasive materials that can be used. NOTE: Make sure that
the abrasive material is dry.
4.
Connect the tool to the air hose quick coupler. NOTE: It is recommended that a whip hose with a swivel
(P012-0079SP - not included) be used to prevent twisting, kinking and excessive wear to the air hose
(ref. item “F” in figure 1 for recommended connections).
Always disconnect the sandblaster from the air supply before changing accessories,
relocating or performing any maintenance.
5.
To start sandblasting, gently pull back on the trigger using smooth and even strokes accross the blasting
surface. NOTE: The nozzle should be positioned at an angle to the surface being sandblasted rather
than perpendicular, to reduce work surface material from rebounding back at you.
Risk of Injection. The high pressure and abrasive materials that are used during
sandblasting can penetrate skin and cuase serioius injury. Wear ANSI A87.1
approved safety glasses or face shield, gloves and a MSHA/NIOSH approved
resiprator during operation. Always direct spray away from self and others or
serious injury could occur.
6.
To stop sandblasting, release the trigger.
Key
Description
Key
Description
Key
Description
Key
Description
A
Air hose
D
In-line Oiler
G
Quick Coupler
J
Female Connector
B
In-line Filter
E
Air Hose
H
Male Connector
K
Spray Gun
C
Tee Fitting
F
Whip Hose
I
Air Tool
Figure 1
Figure 2
Figure 3