Debris screen feature, How to adjust handle position and handle tension, Cleaning aerator – Waterstone PLP PULLDOWN FAUCET 5800 User Manual
Page 4: Contemporary traditional
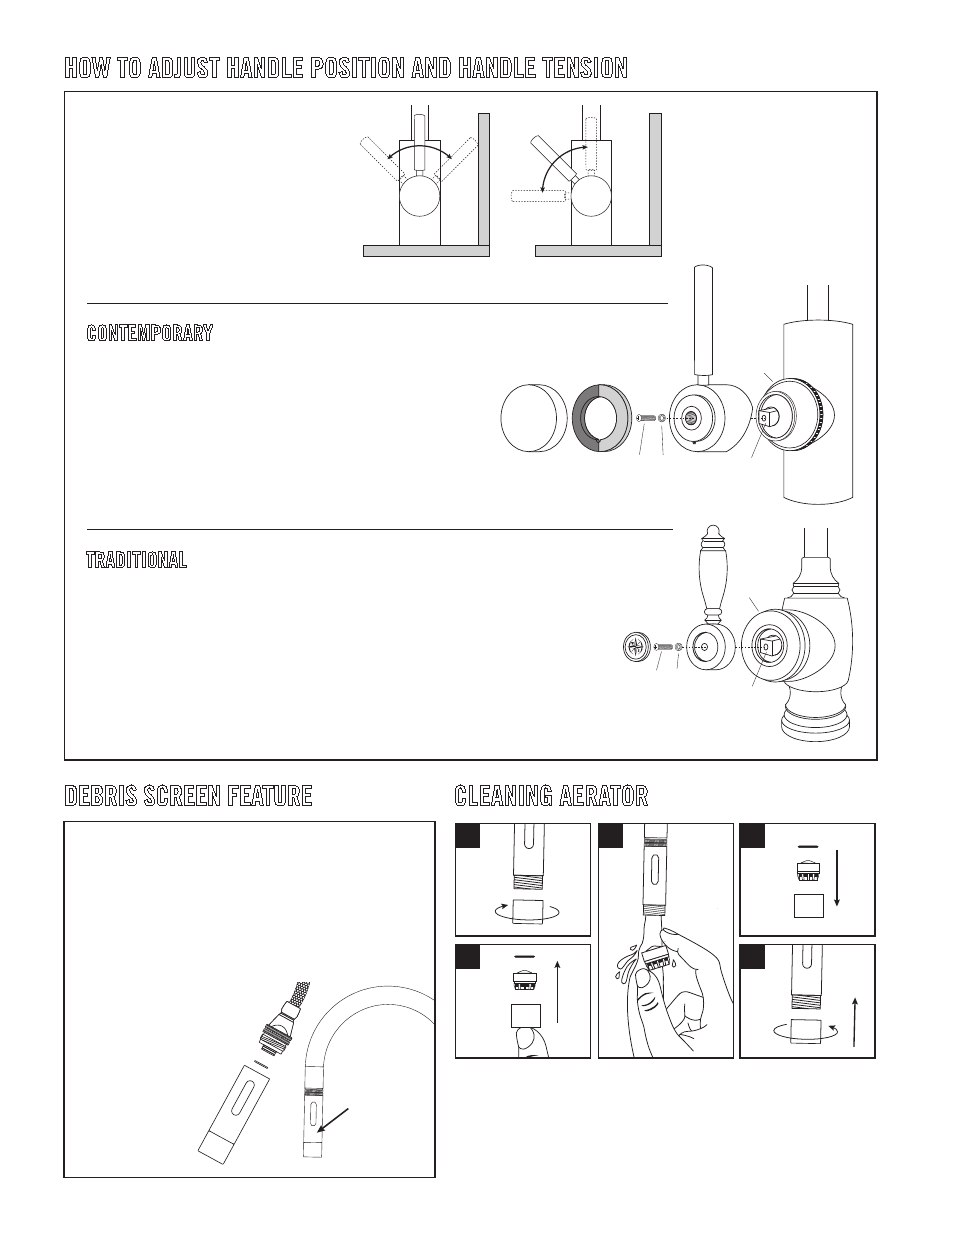
DEBRIS SCREEN FEATURE
A
C
B
SPRAYER
1. Turn off water supplies underneath sink and remove any
water pressure by opening the faucet handle.
2. Unscrew sprayer (A) from spray hose by holding knurled
swivel (B).
3. Inspect, remove and clean debris screen (C) in sprayer.
Once cleaned, replace debris screen and reattach to swivel.
4. Close faucet handle and turn
on water supplies. Make
sure sprayer is secure and
sealed by running faucet.
HANDLE ON LEFT
HANDLE IN FRONT
HANDLE ON RIGHT
ORIGINAL FACTORY POSITION
MAY HIT BACKSPLASH
NEW ADJUSTED POSITION
CLEARS BACKSPLASH
H
C
A
B
C D
A
B
E
E
G
C D
F
F
HANDLE ON LEFT
HANDLE IN FRONT
HANDLE ON RIGHT
ORIGINAL FACTORY POSITION
MAY HIT BACKSPLASH
NEW ADJUSTED POSITION
CLEARS BACKSPLASH
H
C
A
B
C D
A
B
E
E
G
C D
F
F
1. Unscrew and remove the metal cap (A). Remove Hot and Cold Indicator Ring (B).
2. Unscrew and remove holding screw (C) and washer (D).
3. Hold handle (E) in a vertical position. Pull straight off faucet. Rotate handle
away from backsplash then slide handle back onto valve stem (F).
4. Insert holding screw with washer and tighten. Slide Hot and Cold Indicator
Ring onto handle and thread metal cap back into place.
5. To adjust handle tension, turn ring (G) clockwise to increase or
counterclockwise to decrease handle tension.
1. Place a small standard screwdriver in the slot at the bottom of metal ring that surrounds the
handle caps (A). Gently pry the cap from faucet handle (B).
2. Unscrew and remove holding screw (C) and washer (D).
3. Hold the handle (B) in a vertical position. Pull straight off faucet. Rotate handle away from
backsplash then slide handle back onto valve stem (E).
4. Insert holding screw with washer and tighten. Snap handle cap back into place.
5. To adjust handle tension, turn ring (F) clockwise to increase or counterclockwise to decrease
handle tension.
HOW TO ADJUST HANDLE POSITION AND HANDLE TENSION
CONTEMPORARY
TRADITIONAL
1. Gently unscrew and remove spout tip (A) by hand.
2. Remove O-ring (B). To remove aerator (C), push with finger from bottom.
3. Thoroughly rinse aerator with water until all debris is removed.
4. Place aerator, then O-ring back into spout tip.
5. Gently screw spout tip, by hand, snuggly back onto spout.
CLEANING AERATOR
On some kitchen countertops, the handle
may hit the backsplash when the faucet
handle is positioned to the left or right
(Fig. 1). Waterstone gives you the option of
adjusting the handle 45 degrees to avoid
hitting backsplash.
FIG.1
B
C
A
1.
2.
3.
4.
5.