Using the control box & 4 button wireless remote – LEDGlow 7 Color Slimline LED Underbody Kit User Manual
Page 2
.
11. This underbody kit can be powered one of two ways.
a.
Connect the red power wire to any 12 volt source. If you need to extend the
power wires, be sure to only use 14 or 16 gauge automotive grade wire. If you are running the
power wire to the battery, it must go through the firewall by using an existing grommet or by
drilling a hole and adding a new grommet which is available at any auto parts store. Be sure to
install a fuse within 6 inches of the power source. (You will have to install an additional fuse if
you have to extend the wires.) If you connect the power wire to a switched 12 volt source, the
underbody kit may not remember the color and pattern it was last on before turning off the vehicle.
If you connect the power wire to a constant 12 volt source, the underbody kit will remember the last
color and pattern it was on prior to turning the vehicle off. Do not run the wire through the door
jam, the wire can be pinched and will void all warranties.
b.
This underbody kit can also be powered directly from your vehicle’s fuse box.
If you are powering the kit via the fuse box, LEDGlow recommends that you install the wire using
LEDGlow’s Add-a-Circuit which is available on LEDUnderbody.com.
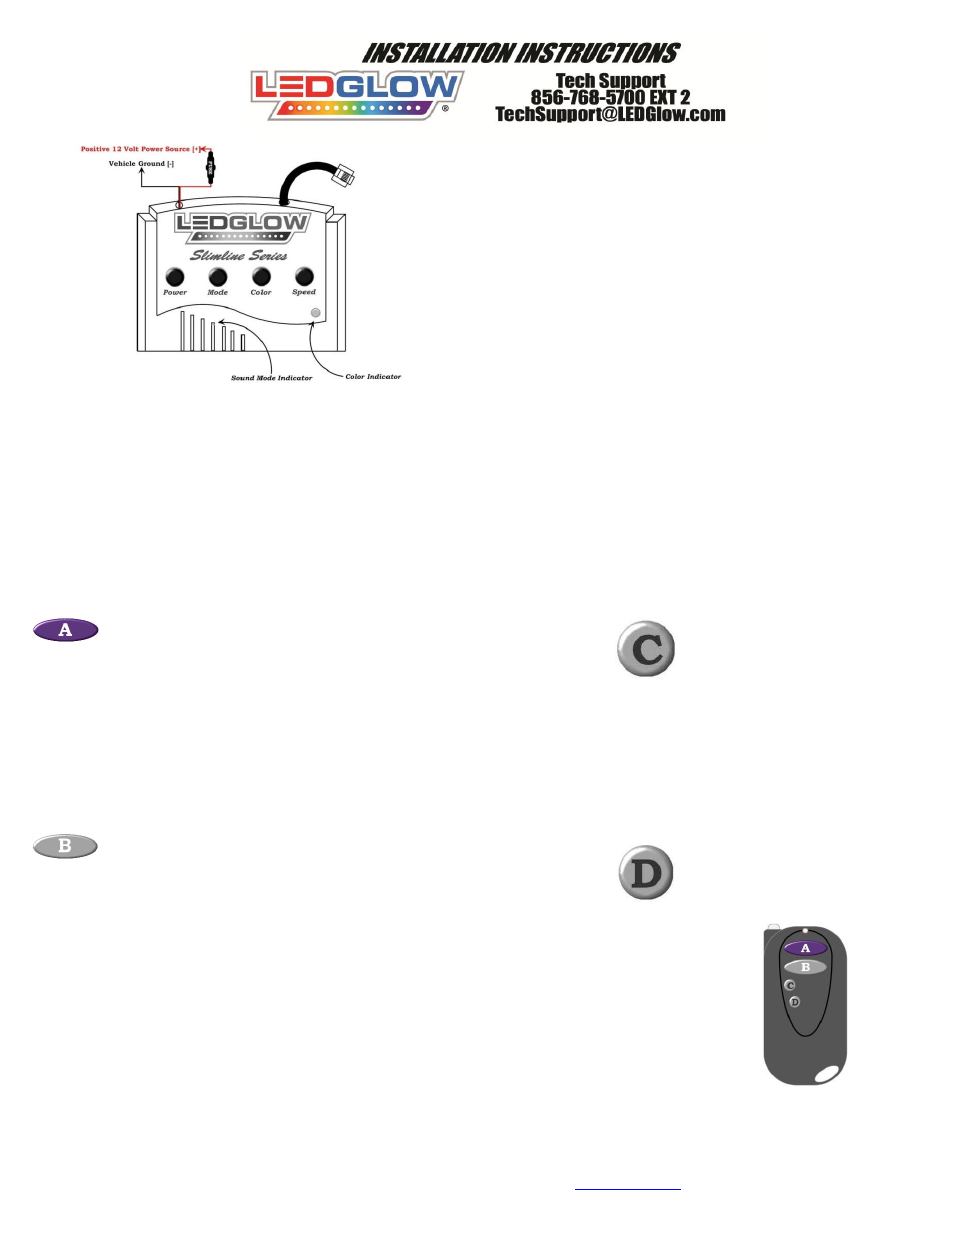
12. Connect the black wire to a good, unpainted ground source. A couple of good ground sources
are under the dash at any main bracket or grounding block, the negative post on your battery, or any
engine ground.
13. Beginning with Tube A, connect each tube to the next using the modular connectors. Make sure to secure the wires tightly when going around the suspension part and/or
exhaust. Leave at least 8 inches between the exhaust and the underbody tube. If a power wire is pinched, the kit may malfunction and the warranty could be voided. Run
the rear tube’s power wire along one of the side tubes and make sure it is tightly secured.
14. Once all of your connections have been made, and you have tested the kit to ensure all connections are good, seal each connection using the included
self-sealing tape. This ensures the connections will not get wet and cause your kit to fail.
15. It is imperative to make sure that the wires are not mounted to any direct heat source or to any moving parts. Any excess length on the tube power wire will have to be
bound up and secured tightly.
16. DO NOT SHORTEN OR CUT ANY OF THE UNDERBODY TUBE POWER WIRES. This will destroy the kit and void all warranties.
17. Lower the vehicle if it was raised, power on and test the underbody kit for full functionality.
18. Once the vehicle is on the ground, turn the steering wheel as far as it can go in both directions to ensure the tubes and/or wires are not coming in contact with your tires or
any other moving parts. If a tube or wire is damaged by the tire and/or any moving parts the warranty will be voided.
For accessories, replacement parts and/or technical support please visit
or more information.
Using the Control Box & 4 Button Wireless Remote
Mode Change Button
Pressing this button on the control box or wireless remote allows you to select from 17 distinct
patterns. The 17 available patterns are listed below.
Solid On
Solid Flash
Solid Flash 2
Flashing Scan
Counter Clockwise
Circle
Counter
Clockwise Off
Counter Clockwise
Section Flash
Clockwise Section
Flash
Center to End Section
Chase
End to Center
Section Chase
End to Center Section
Flash
Music Mode A:
Brightness Fade
Section Flashing Scan
Counter
Clockwise Scan
Scan
Center Flash to Solid
Flash
Music Mode B: Counter Clockwise Scan
Speed Change Button
Pressing this button on the control box or
wireless remote will allow you to select
from 5 different speeds for your selected
pattern.
If your kit is in music mode, this button will
adjust the sensitivity of the selected music
mode.
Color Change Button
This button is used to select from the 7 distinct solid color modes, as well as 1 multi-color flash
and 1 multi-color fade mode. The available solid color modes are listed below.
Red
Green
Blue
Yellow
Purple
Teal
White
7 Color Flash Mode
7 Color Fade Mode
Power Button
This button is used to power your kit on and
off.