Adesso WKB-4100UB User Manual
Quick guide, Wireless slimtouch™ ergo keyboard, English
QuickGuide
English
Model: WKB-4100UB
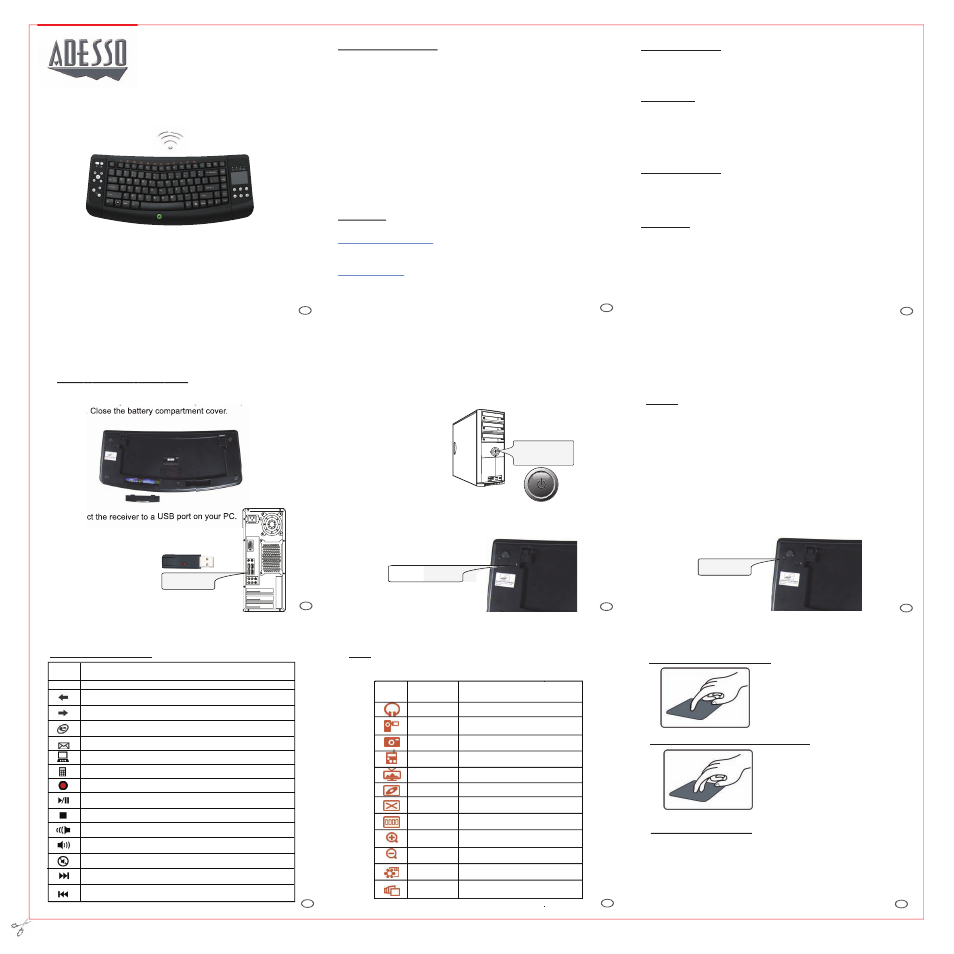
SETUP AND INSTALLATION
1.Open the battery cover under the keyboard and place 2 AA batteries
inside. Close the battery compartment cover.
3.Power ON your computer.
www.adesso.com
WARNING
Long-term repetitive use of any keyboard could cause injury to
user. Adesso recommends users avoid excessive use of this or any
keyboard.
NOTE
A Windows dialog box New Found Hardware will appear and the
system will install the driver automatically and complete the
installation. You may start using your wireless touchpad keyboard
after it completes installation.
•
Place one finger on the touchpad
and move index finger as the mouse
cursor moves on your screen.
•
Tapping once functions as a left
mouse click.
•
Place two fingers on right side of
the touchpad to move up or down for
scrolling mouse function.
REQUIREMENTS
• Intel Pentium III and above PC
• Available USB port
• Windows Vista and XP with MCE
FEATURES
• 2.4 GHz Wireless connectivity up to 100 ft from the receiver.
• A space saver with integrated touchpad that functions as a mouse
• Small and lightweight, fits anywhere, extremely portable.
• Low-profile keys for quieter typing.
• MCE, Multimedia and Internet hotkeys
• Ideal for your LCD monitor, Plasma TV, Tablet PC, Notebook or in presentations.
INTRODUCTION
Congratulations on your new Adesso Wireless Touchpad Ergo Keyboard. This
User’s Guide contains information that will help you to operate your keyboard as well
as answer questions about certain special keys and buttons.
1
3
6
5
4
TROUBLESHOOTING
If you cannot get your keyboard to work after installation, please try the
following:
• Make sure you have connected the receiver correctly.
• Make sure you have installed the batteries correctly. Check the batteries
you have installed are not dead. Try the batteries in another device.
• Try unplugging then reconnecting the receiver to the computer and press
the ID button at back of the keyboard.
• When it’s connected, the led of the receiver will start flashing.
Note:
Enhanced Function Keys: (12 embedded Vista Keys that are controlled
by the “Fn Key”)
8
7
9
Wireless SlimTouch™ Ergo Keyboard
WKB-4100UB V1.5 060809
How to use the touchpad?
HOTKEY FUNCTIONS
How to use the scrolling function?
Fn
Fn key
F1: My Music
Open My Music application.
F2: My Video
F3: My Picture
F4: My Radio
Open My Radio application.
F5: My TV
Open My TV application.
F6: DVD
F7: Close
F8: Win Select
F9:Zoom in
Zoom in the picture.
F10:Zoom out
Zoom out the picture.
F11:Gadget
F12: Flip 3D
Call the Flip 3D function.
Enables the 12 Embedded Keys.
By default, the function is OFF.
Open My Videos application.
Open My Pictures application.
Open DVD menu application.
Close the active Windows® application.
Call the Win Select function.
Open the Gadgets application.
Power ON/OFF
Goes back to a previous item that was already viewed in programs that support the
“Back” command, such as a Web browser
Goes to the next item—if it was previously viewed in the same session, in programs
that support the “Forward” command, such as a Web browser.
Starts the default Web browser and goes to the home page. If the Web browser is
active, it opens the home page.
Starts the default e-mail program.
Opens My Computer.
Starts Microsoft Calculator
Record the TV or copy the media to PC.
Switches between Play and Pause of DVD/VCD/MP3/Audio media. Once Pause is
pressed, pressing this button again resumes play.
Stops playing the media.
Decreases the computer’s volume. Hold down to decrease volume more quickly.
Increases the computer’s volume. Hold down to increase volume more quickly.
Mutes the computer’s volume. Press it again to turn the system volume back on.
Switches to the next media track. Press once for each subsequent media track.
Switches to the previous media track. Press once for each preceding media track.
Function
Name
Function Description
Start
Opens MCE Application
LIMITED WARRANTY
ADESSO provides one year limited warranty for the quality of all its products in materials and
workmanship.
During this period, ADESSO will repair or replace all merchandise, which proved to be
defective. However, ADESSO will not warranty any product which has been subjected to
improper freight Handling, shipping abuse, neglect or unauthorized repair or installation. The
warranty also will not cover products installed with Non-ADESSO components and product
with broken sealed and assembly trace. After replacement of RMA, ADESSO reserves the
right to request the total cost of the replacement products with broken seals or assembly
trace.
If you discover a defect, Adesso will, at its option, repair or replace the product at no charge
to you, provided you return it during the warranty period with transportation charges pre-paid
to Adesso. You must contact Adesso at [email protected] for a Return Merchandise
Authorization number (RMA) prior to returning any product. For each product returned for
warranty service, please include your name, shipping address (no P.O. Box), telephone
number, copy of the bill of sale as proof of purchase and have the package clearly marked
with your RMA number.
SUPPORT
We have listed most of our FAQ’s (Frequently Asked Questions) at:
http://www.adesso.com/faqs.asp.
Please visit our FAQ Service & Support pages before you
contact our E-mail or Telephone Support.
Email Support: If our FAQ’s do not help you resolve your issues, please email
Telephone Support:
Toll Free: (800) 795-6788
9:00AM to 5:00PM PST Monday - Friday
2
2.Connect the receiver to a
USB port on your PC.
USB Wireless
Receiver
USB Port
4. Power the keyboard by switching it “
ON”. The switch is found at the
back of your keyboard.
If keyboard is not connecting reset the keyboard ID found at the back of
the keyboard. Press the “
ID” button for 2-3 seconds then release. Con-
nection will be successful once the LED light of the receiver will stop
blinking.
ON/OFF Switch
ID Button