Rivers Edge RE509 Big Foot XLT User Manual
Page 16
Check for parts online at
www.huntriversedge.com or call 800-450-EDGE (3343) M-F 8-5
Check for parts online at
www.huntriversedge.com or call 800-450-EDGE (3343) M-F 8-5
16
Operator's Manual
Rivers Edge Hang-On Stands
AssEMBlY INsTRuCTIONs (RE511)
Tools needed – two 7/16" wrenches
IMPORTAnT AssEMBLY TIP: do not tighten any nut and bolt combina-
tions completely until all parts are assembled together! Finger tighten
plus one turn of a wrench only! This will temporarily hold the lock nut on
the bolt while helping alignment of all parts! After all parts are assembled
together, all nut and bolt combinations must be completely tightened.
1. Attach the seat frame weldment (CXR15) to the seat post (CXR14) using
(2) provided 1/4-20 x 2-1/2” bolts, locknuts and (6 to 8) nylon washers.
sEE fIGuRE 1. DO NOT tighten all nuts and bolts completely!
nOTE: You may need to place 2 nylon washers between seat post
upright and seat frame to take up necessary gap.
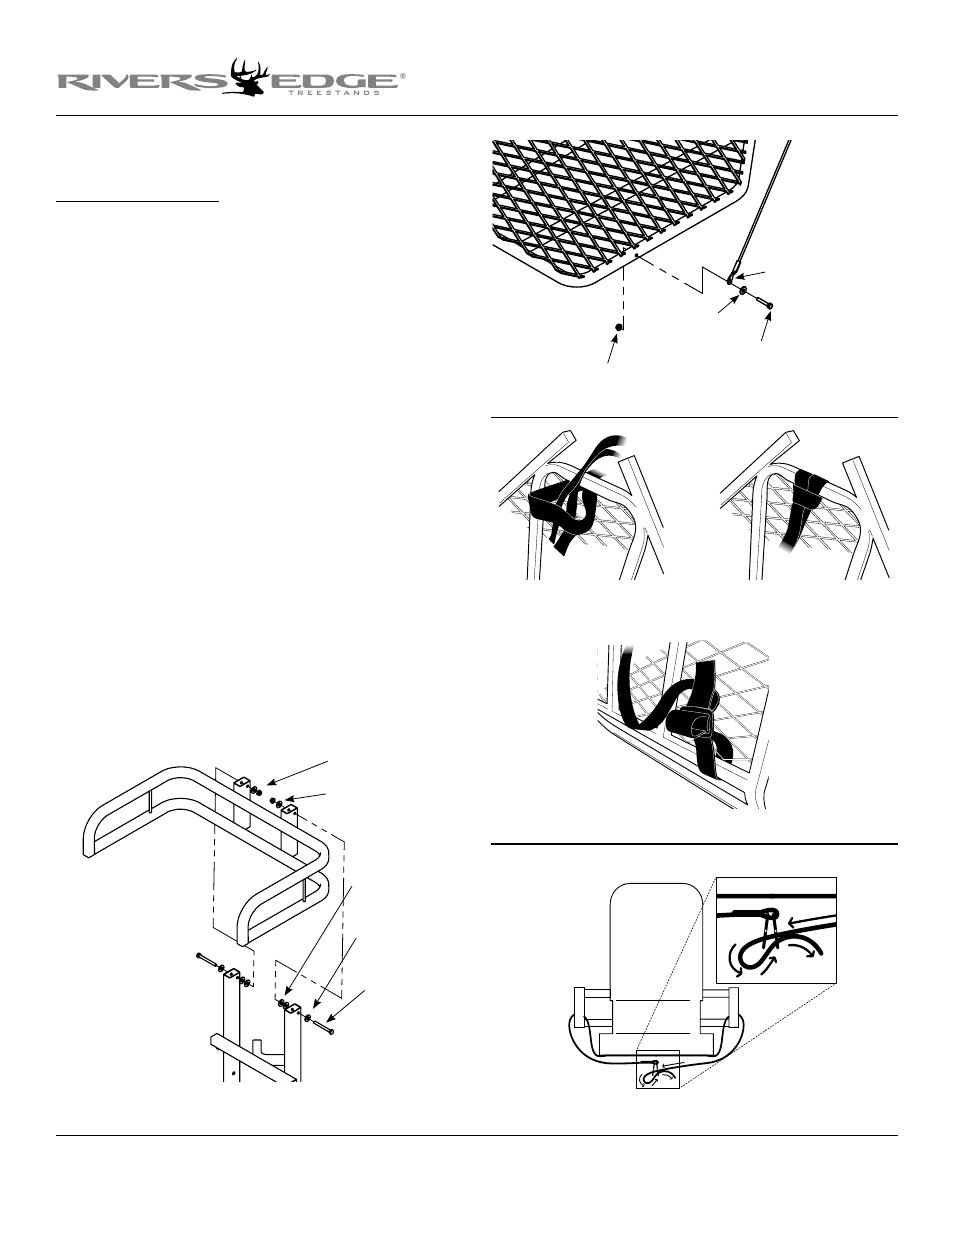
2. Attach cable (48212) ends to the platform (CXR12) using (2) provided
1/4-20 x 1-1/2” bolts, locknuts and steel washers. sEE fIGuRE 2. You
must now tighten all nut & bolt assemblies securely. Be sure not
to over tighten or crush tubing when tightening!
nOTE: using powder graphite lubricant during assembly of
moving parts will help eliminate noise during use!
3. Attach backpacking straps (48067) at desired location on platform.
Fold strap in half. Feed folded strap through platform mesh. Feed the
two loose ends of strap through folded loop and pull tight forming a
cinch knot. sEE fIGuREs 3A AND 3B. Feed straps through platform
mesh and secure with provided tri-slide buckles. sEE fIGuREs 3C.
4. Attach padded seat (48103) by feeding straps around the lower portion
of seat frame. Feed the long strap through both metal tri-slides that are
sewn to opposite side of strap. Wrap the long strap back around one
tri-slide and through the second tri-slide and pull tight. sEE fIGuRE 4.
Repeat the same operation for the other seat strap. Adjust as needed to
achieve desirable seat height. Excess strap can be tucked away using
provided Velcro tabs under the seat.
5. Attach (2) provided 9" camo arm pads (48736) to upper portion of
seat frame weldment by wrapping around tubing and attaching
Velcro together.
Figure 1
locknuts
platform cable
1/4-20 x 1-1/2" bolts
steel washers
locknuts
nylon washers
nylon washers
(2 if needed)
1/4-20 x 2-1/2"
bolts
nylon washers
Figure 2
Figure 3A
Figure 3B
Figure 3C
fRONT vIEW Of
sEAT AssEMBlY
pull to
tighten
Figure 4